Welcome!
Welcome to Part 1 of COMP2850 Software Engineering!
In this first part of the module, you will be expanding your understanding of object-oriented programming principles. You will be doing this using a new language, Kotlin.
If you’ve not already done so, please bookmark this site in your web browsers, so that you have convenient access to it in future.
Please consult the sections on use of Git & GitHub, working in Codespaces and working locally for important information on how to do the practical work required in Part 1.
Credits
This material was written by humans.
Please report any errors via the General channel for COMP2850 in Microsoft Teams.
Use of Git & GitHub
All your work for this module will be managed using the Git version control system.
You should have already used the GitHub Classroom link in Minerva to claim a GitHub repository. You will do all of your work for this part of the module in clones of this repository.
These clones can exist temporarily in the cloud, in a GitHub Codespace. You also have the option of working in a more permanent local clone, on your own computer or a SoCS lab machine.
Git Commands Refresher
Here’s a reminder of some of the Git commands that you used last year. You will need to use these again throughout this module.
| Command | Purpose |
|---|---|
| add | Add changes or new files to staging area, prior to committing |
| commit | Commit staged changes to the project history |
| fetch | Retrieve changes you don’t yet have from remote repository |
| log | Display the history of commits |
| mv | Move or rename a file or directory |
| pull | Fetch changes, then merge them into the current branch |
| push | Transfer commits from this clone to remote repository |
| rm | Remove files (or directories, with -r option) |
| status | Display repository status (very useful!) |
If you are not already fluent in the use of basic Git commands, it is essential that you achieve fluency in Semester 1 of COMP2850.
Without this as a solid foundation, you will not be able to participate effectively in the group work in Semester 2.
See the bottom of this page for links to some helpful Git resources.
Git Workflow
If you follow the approach outlined below, you will be able to work freely in Codespaces, or directly on the SoCS lab machines, or on your own PC, switching between these environments as you wish. (See the instructions on cloning if you plan to work directly on lab machines or your own PC.)
If you work in multiple clones of the repository and don’t follow this approach, you may encounter merge conflicts, which can be tricky to resolve.
Starting a Work Session
It’s very important that the clone you are working in has all of the latest changes that you have made. To achieve this, use
git pull
You can also do this via the VS Code GUI, by clicking on the Sync Changes button.
If you are working in a newly-created Codespace, with a fresh clone of the repository, this step will not be needed.
Ending a Work Session
At the end of a session (e.g., at the end of one of your timetabled classes), remember to add and commit changes to the clone you are working in, then push them back to GitHub.
You can achieve this with the following commands, entered into a terminal window:
git add -A
git commit -m "Finished work for Week 1, Session 1"
git push origin main
Adjust the commit message accordingly. Try to make sure that these messages are brief but accurate summaries of the commits you have made.
Note also that the commands above will commit all changes, made anywhere in
the repository. To be more selective, omit the -A option from git add and
instead provide pathnames for the files or directories containing the changes
you wish to include.
Alternatively, you can perform these operations in VS Code:
-
Open the Source Control panel, e.g., by pressing
Ctrl+Shift+G. -
Use the
+button next to a changed file to add that change to Git’s staging area, or use the topmost+button to stage all changes. -
Type your commit message into the text field at the top of the Source Control panel, e.g., “Finished work for Week 1, Session 1”.
-
Click the Commit button.
-
Click the Sync Changes button to push the commit to GitHub.
It is crucial that you commit changes and push those commits back to GitHub at the end of any work session done in a Codespace.
You may lose work if you forget to do this!
Useful Git & GitHub Resources
- Git cheatsheet
- Free book: Pro Git (2nd ed.)
- LinkedIn Learning course: Git Essential Training
Working in Codespaces
The instructions below apply specifically to GitHub Codespaces.
They do not apply if you are working locally.
Accessing a Codespace
-
Visit your repository’s home page on github.com. Bookmark the page in your browser if this is your first visit, so that you have a quick and easy way of accessing it in future.
-
Click on the green Code button and select the ‘Codespaces’ tab. If a Codespace exists already, select that; otherwise, click the
+button to create a new one.
See the sections below for the next steps, which differ depending on whether this is a new Codespace or a pre-existing Codespace.
New Codespace
-
Wait for your new Codespace to start up. Once it is up and running, click on the Extensions button on the left of the VS Code window. Enter
Kotlininto the Search box.Select the ‘Kotlin Language’ extension, authored by Mathias Frohlich. Click on the small blue Install button to install it.
-
Install the Kotlin command line compiler by using this command in the terminal window:
sdk install kotlinCheck that it has been installed correctly with
kotlinc -versionYou should see Kotlin’s version number displayed.
Pre-existing Codespace
If you are returning to a pre-existing Codespace, then it shouldn’t be necessary to install anything; the Kotlin compiler and VS Code extension that you installed when you created the Codespace should still be available.
However, we do recommend that you start your work session by pulling any recent commits from your GitHub repository into the Codespace, as described earlier.
There might be recent changes that need to be pulled in if you have been doing work for this module elsewhere—e.g., on your own computer or on a SoCS lab machine.
If you do all your work in Codespaces then it won’t be strictly necessary to start a session by pulling commits, but it is a good idea to get into the habit of doing it, just in case you need to switch work environments at some point in the future.
Cloning Your Repository
If you want to work directly on SoCS Linux machines or your own PC, you will need to set up an SSH key, authorize access to the GitHub organization containing your repository, and then clone that repository to your SoCS filestore or your PC’s hard disk.
Installing Git
On your own PC, check if you have Git installed and set up correctly by entering
git
at a command line prompt. If you get a ‘command not found’ error then you’ll probably need to install it yourself:
-
If you are running Linux, you can do this using your distribution’s package manager.
-
If you have a Mac, you can install Git as part of the Xcode command line tools.
-
If you are running Windows, then you should install the Git for Windows distribution. (Note that we recommend the use of Linux or Mac rather than Windows, if possible.)
Setting up an SSH Key
You may have done this last year for COMP1850—in which case you can skip this step and go straight to ‘Authorizing and Cloning’ below.
-
In a terminal window1, create an SSH key pair with a command like this:
ssh-keygen -t ed25519 -C "USERNAME@leeds.ac.uk"Be sure to substitute your University of Leeds username for
USERNAMEhere! -
Start the SSH agent if necessary:
eval "$(ssh-agent -s)"Then add your SSH key pair to it:
ssh-add ~/.ssh/id_ed25519 -
Display the public key in the terminal, with
cat ~/.ssh/id_ed25519.pubCopy everything that was displayed by this command to the clipboard.
-
In your browser, go to github.com and login if necessary, then click on your profile icon at the top-right of the page and choose Settings > SSH and GPG Keys. Then click on the green New SSH key button.
Paste the contents of the clipboard into the space provided. Give the key a recognizable title that identifies the environment you are using (e.g.,
My LaptoporSchool of Computer Science), then click Save.
See the GitHub guides to connecting using SSH keys and troubleshooting common problems if you need more help with this.
Authorizing and Cloning
Note: you should ignore steps 1 & 2 below if you are working in a fork of
the comp2850-oop-work repository.
-
In your browser, go to github.com, click on your profile icon at the top-right of the page and choose Settings > SSH and GPG Keys.
-
Click on the Configure SSO drop-down menu that appears next to your SSH key. Select ‘COMP2850-2526’ from list of options and click on the Authorize button. Use your University of Leeds credentials to authorize single sign-on access to the repository.
-
Go to your repository’s home page on github.com. Click on the green Code button, select the ‘Local’ tab and choose SSH as the Clone option. Copy the repository URL to the clipboard.
-
In a terminal window on a SoCS Linux PC or your own PC navigate to where you want to clone the repository. Type
git clone, then paste in the repository URL that you copied in the previous step. End the command with the name you want to use for the directory that contains the repository, then press Enter.
-
If you are using Windows, this terminal should be the ‘Git Bash’ terminal provided by the Git for Windows distribution. ↩
Working Locally
This is a guide to how to work on the programming tasks using either the Linux PCs in the SoCS labs or your own PC. We assume that you have already cloned your GitHub respository to one of these environments.
These instructions do not apply if you are working in a Codespace.
On SoCS Lab Machines
The JDK and Kotlin command line compiler have already been installed for you on the Linux machines in the SoCS labs, so there is nothing that you need to install1.
To access the Kotlin compiler on lab machines, you must first enter the following command in a terminal window:
module load kotlinc
Check that this has worked with
kotlinc -version
You should see a line printed, giving version details for the Kotlin compiler and the underlying Java Virtual Machine.
If you don’t want to be continually entering this command in every terminal
window you work from, you can instead edit ~/.bashrc and add the
module load command to the end of this file.
After saving your changes to ~/.bashrc, start a new terminal window and you
should find that the Kotlin compiler is now available. It will be available to
you every time you log in from this point on.
We leave the choice of code editing environment up to you. The lab machines provide a reasonably up-to-date version of VS Code, which you can access via the Applications menu, and more traditional choices such as Vim or Emacs are also available.
On Your Own PC
As a minumum, you need the Java Development Kit (JDK) and Kotlin’s command line compiler installed. JDK 21 is ideal, but other versions (newer or older) should work OK too.
JDK Installation
If you are running Linux, the easiest way of getting the JDK is probably via your Linux distribution’s own package manager. Alternatively, you can use a third-party package manager such as SDKMAN. With this set up, you can install any one of a number of JDK distributions. We recommend installing the Eclipse Temurin JDK, like so:
sdk install java 21.0.8-tem
On macOS, you can use SDKMAN as outlined above, or you can use the popular Homebrew package manager instead. For example, with Homebrew installed, you can install the JDK like so:
brew install openjdk
On Windows, you can use SDKMAN as above, although installing it isn’t as straightforward. You may find it easier to just install a JDK manually, without using a package manager. You can download a suitable version from adoptium.net.
If installing manually on Linux, macOS or Windows, you will need to modify
the PATH environment variable to include the directory containing the
java and javac executables.
After installing, check the installation by entering this command:
java -version
You should see a few lines displayed, giving the version and name of the installed JDK.
Kotlin Compiler
If you have SDKMAN on your system, the compiler can be installed with
sdk install kotlin
On a macOS system running Homebrew, it can be installed with
brew install kotlin
To install manually, without using a package manager, download the compiler
from GitHub. Unzip the Zip archive in a suitable location on your
system, then modify your PATH variable to include the bin subdirectory
containing the kotlinc executable.
After installing the compiler, check that you can access it with
kotlinc -version
You should see a line printed, giving version details for the Kotlin compiler and the underlying Java Virtual Machine.
IntelliJ IDEA
IntelliJ IDEA (hereafter referred to simply as IntelliJ) is a powerful IDE from JetBrains, the creators of Kotlin. It is suitable for developing software in Kotlin, Java and other languages.
You will not be able to use IntelliJ on SoCS lab machines, but you do have the option of using it on your own PC.
You can use the Community Edition without a license. You can also use the full professional edition (‘IntelliJ IDEA Ultimate’) for free if you request a student license.2
Please read our advice on using IntelliJ if you plan on using it for the tasks.
IntelliJ is a demanding application that requires a reasonably up-to-date computer to run well.
8 GB of RAM should be consider the absolute minimum spec, though more RAM is strongly recommended. You will also need plenty of free disk space.
-
If you are using VS Code as an editor, you may wish to install the Kotlin Language extension. See the info on working in Codespaces for details of how to do this. ↩
-
This student license applies to many other JetBrains products besides IntelliJ, and it must be renewed annually during your studies. ↩
Using IntelliJ IDEA
If you wish to use IntelliJ to do the tasks, please follow the advice on this page.
You can stop reading right now if you do not intend to use IntelliJ!
Note that the procedure for setting up an IntelliJ project varies, depending on whether or the task is managed by a build tool or not, and which build tool is used. The subsections below cover all three possibilities.
Note that you cannot use IntelliJ in a Codespace or on SoCS lab machines!
You should not attempt to install it into those environments. The advice provided here assumes that you have installed it on your own computer.
Working on Basic Tasks
Most of the tasks do not have any particular structure, and they are not managed by a build tool such as Gradle or Amper.
To use IntelliJ for these tasks:
-
Move to the relevant task directory (e.g.,
task1_1). Inside that directory, create a subdirectory namedsrc.If there are existing
.ktfiles in the task directory, move them intosrc. -
Start IntelliJ. On the Welcome screen, click New Project. Make sure that ‘Kotlin’ is selected as the project type, from the list of options on the left of the dialog.
-
In the Location text field, specify the path to the
tasksdirectory in your repository, i.e., the parent directory of all the tasks. -
In the Name text field, specify the directory name for the task you are working on (e.g.,
task1_1). Don’t worry about the ‘Directory is not empty’ warning that pops up. -
IMPORTANT: do NOT tick the ‘Create Git repository’ checkbox!
-
Leave Build System set to ‘IntelliJ’.
-
Make sure that the JDK setting references a valid JDK version on your system.
-
Leave the ‘Add sample code’ checkbox unticked. Make sure that the ‘Use compact project structure’ box is ticked.
-
Click the Create button.
When the main window appears, it should show the README file associated with the task.
To add code to the project, right-click on the src folder in the Project
panel on the left of the screen and select New > Kotlin Class/File. Choose
the appropriate file type from the list of options, enter a name for the file,
then press Enter.
To run code, open a source code file that contains a main() function and
click on the green triangle in the margin of the editor, at the start of the
function definition.
Working on a Gradle Project
If a task directory in your repository contains files named gradlew and
build.gradle.kts, it is a Gradle project. The procedure for working with
one of these projects is fairly simple.
-
Start IntelliJ. On the Welcome screen, click the Open button.
-
Select a directory containing a Gradle project (e.g.,
task1_4). A dialog will appear, asking whether you trust the project. Click the Trust Project button. -
Wait for the project to import. Note: this might take a while!
When the main window appears, it should show the README file associated with the task.
To add code to the project, navigate down to the src/main/kotlin directory
in the Project panel on the left of the screen. Right-click on this directory
and select New > Kotlin Class/File. Choose the appropriate file type
from the list of options, enter a name for the file, then press Enter.
To run unit tests for the first time, click on the Gradle button (the one with the elephant icon) in the toolbar on the right of the window. Expand the list of Gradle tasks that appears in the Gradle tool panel. Look under the heading ‘verification’ for a task named ‘test’ and double-click on it.
To run an application for the first time, look under the heading ‘application’ in the list of Gradle tasks that appears in the Gradle tool panel. Double-click on the task named ‘run’.
IntelliJ will create run configurations for the ‘test’ and ‘run’ tasks when you use them for the first time. These will appear in a drop-down menu at the top of the window. You can use this menu and the Run button to run the tests or the application in future.
Working on an Amper Project
If a task directory in your repository contains files named amper and
module.yaml or project.yaml, it is an Amper project. The procedure for
working with such projects is simple.
-
Start IntelliJ. On the Welcome screen, click the Open button.
-
Select a directory containing an Amper project (e.g.,
task1_5). A dialog will appear, asking whether you trust the project. Click the Trust Project button. -
Wait for the project to import. This might take a while!
When the main window appears, it should show the README file associated with the task.
To add code to an Amper project, navigate down to the src directory in the
project panel on the left of the screen. Right-click on this directory and
select New > Kotlin Class/File. Choose the appropriate file type from
the list of options, enter a name for the file, then press Enter.
IntelliJ should create a run configuration for the project automatically. You should therefore be able to use the Run button (the one with a green triangle icon at the top of the window) to run the application.
Unfortunately, Amper isn’t as neatly integrated into IntelliJ as Gradle, particularly when it comes to handling tests. To run the unit tests in an Amper project, you will need to open a terminal, either using the button in the toolbar on the left of the window, or by selecting View > Tool Window > Terminal. Then, in the terminal, enter
./amper test
Getting Started With Kotlin
We begin at the traditional starting point: a simple “Hello World” program.
After that, we consider how to compile more complex multi-file programs from the command line.
We finish by looking at how to manage Kotlin development using build tools.
After completing the work in this section, you will understand how to compile and run Kotlin applications from the command line, both manually and with a build tool. You will also understand the nature of the Kotlin compiler’s output, and the relationship between Kotlin and the Java Virtual Machine.
“Hello World!”
-
In your editor, create a file named
Hello.kt, containing the following code. Save your file to thetasks/task1_1subdirectory of your repository.Tip
You can use the ‘Copy to Clipboard’ button that appears in the top-right of the code panel to help with this, but we strongly recommend that you actually type in the code, as this will help you acclimatize more rapidly to Kotlin features and syntax.
fun main() {
    println("Hello World!")
}
Notice that functions are defined using
fun, and that the start of the function body is marked by a left brace, as in C.Kotlin recognizes a function named
mainas the entry point for a program, just like C does.Printing to the console is similar to Python, except that Kotlin has two functions for this, named
printlnandprint. The former prints a newline at the end of the given string, whereas the latter does not.Note also that there is no semi-colon at the end of the statement! Kotlin hardly ever requires them1.
A right brace marks the end of the function body. Like C, Kotlin uses pairs of braces to define blocks, rather than following Python’s approach of using indentation.
-
In a terminal window, cd to the
tasks/task1_1subdirectory of your repository and then compile the program with this command:kotlinc Hello.ktIf this fails, check that you are in the directory containing the
Hello.ktfile, and make sure that the Kotlin command line compiler is installed properly (see the information provided on working in a Codespace and working locally for help with this). -
Investigate what the compiler has produced. On Linux or macOS, use
ls -lto check directory contents & file creation times, then usefileto query file type. -
Run the compiled program with
kotlin HelloKtBe sure to type this command exactly as shown here!
-
You would need semi-colons if you wanted to put multiple statements on a single line. Kotlin also uses semi-colons in
enumclasses. ↩
Multi-file Programs
Let’s consider a more complex version of “Hello World!”, split across two files of source code.
-
In the
tasks/task1_2subdirectory of your repository, create a fileHello.ktcontaining this code:fun main(args: Array<String>) { if (args.isNotEmpty()) { println(greetingFor(args[0])) } else { println(greetingFor("World")) } } -
Now create a new file named
Greet.kt, containing the following:fun greetingFor(target: String): String { val greeting = setOf("Hello", "Hi", "G'day").random() return "$greeting $target!" }Make sure that this is in the same directory as
Hello.kt. (This should be thetasks/task1_2subdirectory of your repository.) -
In a terminal window, go to
tasks/task1_2and compile the program withkotlinc Hello.kt Greet.ktThe compiler will generate a separate file of bytecode for each of the source files. If you list the directory contents, you should see
HelloKt.classandGreetKt.class. -
Try running the program, with and without a command line argument:
kotlin HelloKt Joe
kotlin HelloKt
Notice that there is no need to specify
GreetKthere. The Java Virtual Machine (JVM) is able to find and load all of the bytecode needed to run the application. All you need to do is specify the entry point, i.e., the place where themain()function can be found.Remove the two
.classfiles before proceeding further, e.g., withrm HelloKt.class GreetKt.class -
It’s hard to manage an application whose code is spread across multiple files of bytecode, so the Kotlin compiler allows us to bundle the code together in a single JAR file.
Try this now:
kotlinc -d hello.jar Hello.kt Greet.ktCheck the size of this JAR file, then list its contents, using the two commands below. (Use
dirinstead ofls -lif you are trying this on Windows.)ls -l hello.jar jar -tf hello.jar -
Run the application in
hello.jarwith this command:kotlin -cp hello.jar HelloKtAs before, you can add a command line argument to this if you wish.
Notice the need for the
-cpoption here. This adjusts the JVM’s classpath so that it includeshello.jar, thus ensuring thathello.jarwill be searched to find the bytecode of the application. -
It is also possible to bundle the Kotlin runtime library with a JAR file. Try this now:
kotlinc -include-runtime -d hello.jar Hello.kt Greet.ktCheck the size and contents of
hello.jaragain. You’ll see that it is now very much larger than before. Although this big increase in size is annoying for such a simple program, the advantage is that the JAR file is now portable to a system that doesn’t have Kotlin’s development tools installed. The only requirement is that a JVM be available on that system. -
Try running the application directly on the JVM with this command:
java -jar hello.jar
Build Tools
The compiler commands used in the previous section are tedious to type. This manual approach to compilation is impractical for anything other than very small programs. Instead, we generally use specialized build tools.
Build tools can
- Download dependencies: libraries of code used by an application
- Compile files efficiently—e.g., only those that have changed since the last compilation
- Run tests and report on the results
- Perform checks on code style or code quality
- Generate API documentation from doc comments
- Package a library or application for deployment and distribution
You encountered the Make build tool last year, when working with C. Make is a very basic tool, designed to support efficient compilation and not much else.
In this module you will be using two different build tools that are more powerful than Make. Gradle is a well-established, standard build tool for Kotlin and Java applications. Amper is a newer and simpler alternative to Gradle, from the creators of Kotlin itself.
Using Gradle
-
The
tasks/task1_4subdirectory in your repository contains another version of the application seen previously, organized as a Gradle project.Take a few minutes to explore the files in
task1_4and its various subdirectories. -
Open the file
build.gradle.ktsin your editor and examine it. This is the Gradle build script1 for the application. Notice that it specifies some dependencies, specifically for the unit tests that accompany the application.To see the tasks that can be performed by the build script, go to a terminal window, move into the
task1_4subdirectory and enter./gradlew tasksThis command runs the Gradle wrapper. It will work as above on Linux or macOS. If you see a ‘Permission denied’ error on these systems, you can fix this with
chmod u+x gradlewNote: If you are using Windows and your command prompt is provided by
cmd.exe, you’ll need to omit the leading./from the command to run it. If your command prompt is provided by Windows Powershell then you’ll need to use.\gradlewto run it. -
Search under the
srcsubdirectory oftask1_4for the tests and the application source code. Examine these source files in your editor. -
Enter the following command to run the tests:
./gradlew testGradle should report the status of each test, showing that they all pass. It should also report ‘BUILD SUCCESSFUL’ as the overall result.
Notice that, although a task to compile the code exists, we didn’t have to specify it. Gradle recognizes that the
testtask depends upon this task, and it will run the compilation task first if needed. -
Try running the tests a second time. You should see Gradle jump straight to the ‘BUILD SUCCESSFUL’ message. It recognizes that there is no need to rerun the tests, because no code has changed.
You can force Gradle to recompile everything and rerun the tests with
./gradlew --rerun-tasks test -
Now try running the application, with
./gradlew runIt should behave exactly as before2.
-
Finally, try packaging the application for distribution, using
./gradlew distZipThis will create a file named
task1_4.zip, in thebuild/distributionssubdirectory oftask1_4. This Zip archive contains JAR files for the application and the Kotlin standard library, plus a shell script and batch file that can be used to run the application on Linux, Mac or Windows systems.If you like, copy this Zip archive to somewhere else on your system, unzip it, then try running the application using the shell script (on Linux or macOS) or batch file (on Windows).
-
When you’re done, you can remove all of the build artifacts for the project with
./gradlew clean
-
Note that this build script is itself written in Kotlin! ↩
-
By default, the
runtask runs an application without command line arguments. You can supply arguments as a quoted string, like this:./gradlew run --args='arg1 arg2'. It is also possible to customize theruntask in the build script so that it provides a default set of arguments to the application. ↩
Using Amper
-
The subdirectory
tasks/task1_5in your repository contains yet another version of the ‘Hello World’ application. This is similar totask1_4, except that it uses Amper as the build system rather than Gradle.Take a few minutes to explore the files in
task1_5and its various subdirectories. -
Open the file
module.yamlin your editor and examine it. This is the Amper equivalent of Gradle’s build script. Notice that it is much smaller and simpler. All it does is declare that this is a JVM-based application, with dependencies on a couple of libraries that are needed to run the unit tests.To see what you can do with Amper, go to a terminal window, move into the
task1_5subdirectory and enter./amperThis command will work as above on Linux or macOS. If you see a ‘Permission denied’ error on these systems, you can fix this with
chmod u+x amperNote: If you are using Windows and your command prompt is provided by
cmd.exe, you’ll need to omit the leading./from the command to run it. If your command prompt is provided by Windows Powershell then you’ll need to use.\amper.batto run it. -
Enter the following command to run the tests:
./amper testAs with Gradle, it isn’t necessary to perform a separate compile step; Amper recognizes that this is a prerequisite to running tests, and it will compile the code first if needed.
The output generated by Amper is different from that produced by Gradle (and not quite as user-friendly, to be honest), but you should still be able to see details of which tests, if any, have failed.
-
Now try running the application, with
./amper runYou’ll see that Amper is a bit more verbose than Gradle with its logging. This can be distracting. You can suppress it using the
--log-level=offoption:./amper --log-level=off run -
Examine the contents of the
build/taskssubdirectory. You should see that this contains four subdirectories. Two of them are for the tests and two for the application itself. In each case, one subdirectory holds the individual.classfiles and the other holds a single JAR file containing those.classfiles. -
Finally, try packaging the application as a portable JAR file:
./amper packageThis will create a new subdirectory of
build/tasks, containing a single file namedtask1_5-jvm-executable.jar.You should be able run the application stored in the JAR file using
java -jarfollowed by the JAR filename. -
When you’re done, you can remove all of the build artifacts for the project with
./amper clean
Data Types & Variables
The most fundamental aspect of any programming language is how it represents data.
Kotlin provides a range of built-in data types similar to those you’ve seen already in C and Python, but with some important differences.
Variables in Kotlin are defined differently from how they are in C and Python. Unlike C, we often don’t need to specify the type of a variable, thanks to type inference.
Another important point is that Kotlin recognizes the different roles of variables in a program. It allows us to distinguish between those that are updated during program execution and those that are not.
After completing this section, you will be able to recognize the range of scalar (single-valued) data types that Kotlin provides. You will also be able to create variables of these different types.
We will not be covering all of Kotlin’s fundamental data types in this section. For example, we’ll say relatively little here about strings.
In general, during this part of the module we expect you to do your own additional research into Kotlin’s features to achieve a complete understanding of how to use the language effectively.
Scalar Data Types
Scalar types are the built-in types that a language provides for representing single values. Kotlin supports a range of scalar types similar to other languages.
Take numbers, for example. Integers can be represented using the
Byte, Short, Int and Long types, whereas floating-point values are
represented by the Float and Double types.
There is generally a close correspondence to types in Java, which shouldn’t be a surprise given that we typically compile Kotlin code down to Java bytecode, for execution on a JVM. However, there are some differences too.
For example, Kotlin has a set of types for representing unsigned integers:
UByte, UShort, UInt, ULong. An unsigned integer shifts the range
of representable values so that only positive values are represented. Thus
a Byte can be a value in the range -128 to 127, whereas a UByte can
be in the range 0–255.
Some languages provide support for unsigned integer types while others do not. For example, C, C++ and Kotlin do, whereas Java and Python do not.
As regards text, Kotlin provides Char, to represent an individual
Unicode character, and String, to represent a sequence of
those characters. As in C, the single quote is the delimiter for literal
Char values, and the double quote is the delimiter for literal String
values. Like Python, Kotlin also supports triple-quoted strings, for easy
representation of multiline text.
We will encounter other built-in data types later in the module.
Defining Variables in Kotlin
You introduce a variable into Kotlin code by using either the val or var
keyword, followed by the name of the variable, followed by an assignment
operation that gives it a value:
val name = "Nick"
var age = 42
Answer
Answer
name is a String, and age is an Int.
Note: you must use this exact spelling for the type names. Kotlin is case-sensitive, like most programming languages.
The code example above raises some important questions:
- Why do we not need to specify types for either of these variables?
- Why is the type of the
agevariable not ambiguous? - Why is one of the variables defined with
valand the other withvar?
Read on for answers to these questions…
Type Inference
Like C, Kotlin requires that a variable has a type that is known at compile time. However, unlike C, Kotlin can often infer what that type should be, freeing us from the need to specify it explicitly. This gives Kotlin some of the lightweight feel of a dynamically-typed language like Python.
Consider the two examples from earlier. These could be written more explicitly as
val name: String = "Nick"
var age: Int = 42
However, we do not need to be this explicit. Kotlin can infer that name is
a String because the value we are assigning to name consists of characters
enclosed in double quotes.
Similarly, Kotlin can infer that age should be of type Int because we
are assigning to it a value that consists solely of digits.
Note that type inference in the second example is not ambiguous, despite
the fact that Kotlin has a number of different integer types. This is because
integer literals consisting only of digits are always regarded as
Int values.
If you want an integer literal to be regarded as an unsigned value, you must
append a u or U to it. If you want it to be regarded as a long integer,
you must append an L to it. These can be combined: thus, 42uL will
be regarded as an unsigned long integer.
Floating-point literals are also not ambiguous. A value like 3.5 is treated
as a Double. If you want it to be treated as a Float, you must append
f or F to it.
Sometimes, you have to specify types explicitly.
For example, Kotlin doesn’t provide special syntax to indicate that an
integer literal should be represented as a Short or Byte value, so in
those cases you will need to indicate explicitly the type of the variable
that will hold such a value.
Another example is function definitions. When defining a function that has parameters, you must always specify the types of those parameters.
val or var?
Both val and var introduce named variables into a program, but it’s
important to understand the difference between these two kinds of variable.
When you define a variable with val, you are allowed to assign a value
to it once, and once only. Any subsequent attempt at assignment will
cause a compile-time error.
When you define a variable with var, you can assign a value to it as
many times as you like.
Here’s an example:
val name = "Nick"
name = "Joe"       // compiler error

var age = 42
age = 43           // ok
Why Bother With val?
Wouldn’t it be easier to just define everything as a var?
In practice there are many situations in programming where we give a name to a value purely so that we can use it later in a program, and not because we need to update that value. Then there are other situations where we do need to update the value. Kotlin gives us syntax to distinguish explicitly between these two different ways of using variables.
The advantage of being explicit is that the compiler can then help us catch
some programming errors. For example, suppose you have a program that
defines a variable amount as a val and another variable newAmount as
a var. At a later point in the code, you intend to update the value of
newAmount but accidentally type the variable’s name as amount. This will
lead to a compiler error, because you are attempting to assign a new value
to a val. If you had defined both variables using var, the program would
compile but would now have a bug in it—one that might be hard to find
and fix.
The recommended approach in Kotlin is to define variables using val
wherever you can. Use var only in those specific cases where a variable
will need to be reassigned a value after it has initially been created.
Don’t think that using val is the same as defining a constant in
your code!
When you use val, all you are doing is establishing a permanent link
between an object and the name that you want to use to refer to that object.
The compiler will stop you associating the name with a different object,
but it won’t stop that object from changing its state, should that be
possible for the object in question.
For example, you might have a val that is referencing an array of numbers.
The compiler will be happy for you to replace the contents of that array with
new values. What it won’t let you do is reuse that variable to refer to
a different array of numbers.
Constants
We saw in the previous section that when you use val, you are a
creating a fixed association between a name and an object. You won’t be
allowed to associate your chosen name with a different object. This doesn’t
necessarily mean that the object remains in the same state. So val
variables are not true constants.
Kotlin does, however, allow us to create true compile-time constants, by
applying the const modifier to a val:
const val SPEED_OF_LIGHT = 2.99792e8

const val VERSION = "v1.0"
When you define a constant in this way, the compiler will inline any usage of that constant that it finds—meaning that it will replace all occurrences of the constant with its literal value.
In your own code, you can use const val to give names to simple values that
are fixed for all time and known in advance.
Note that there are some restrictions that apply to constants:
-
A constant can only be an instance of
String,Charor a numeric type -
A constant has to be defined either at the top level of a file (i.e., not inside a function), or inside the companion object of a class (see later)
Naming of Things
Before proceeding further, let’s consider how variables, constants and other program elements should be named in Kotlin.
Naming Styles
Here are some of the naming styles commonly used in programming:
| Style | Description | Example |
|---|---|---|
| (Lower) camel case | Join words, first word all lowercase, others start with uppercase letter | myProject |
| Upper camel case | Join words, all of them start with uppercase letter | MyProject |
| Snake case | Join with underscore, all words in lowercase | my_project |
| Screaming snake case (a.k.a. const or macro case) | Join with underscore, all words in uppercase | MY_PROJECT |
You should be familiar with some of these from last year. For example, you will have seen C and Python code in which variables and functions are named using snake case.
The convention in Kotlin is to use
- Lower camel case for names of variables, functions and methods
- Screaming snake case for names of constants
- Upper camel case for class names
We expect you to follow this convention rigorously in COMP2850.
Meaningful Names
It is extremely important that variables and other program elements are given names that are meaningful. A variable’s name should describe what that variable represents.
For example, in software that handles an election of some kind, n or num
would not be good names for a variable that represents the number of votes
that were cast in that election; numVotes or numberOfVotes would be
much better choices here.
In certain situations, short or single-character variable names are OK. For
example, if you are using a for loop to index the characters of a string
or the elements of an array, it is common to use i, j or k as the name
of the indexing variable. This is acceptable because the variable is used
within the body of that loop and nowhere else.
Generally, the names of variables and classes should be nouns or noun phrases, whereas the names of functions and methods should be verbs or verb phrases.
Tasks
Make sure you do all of these. They won’t take very long.
After you’ve finished, remember to commit your work and push it to GitHub!
You should commit regularly, using informative commit messages. You should push at least once, at the end of every work session.
Task 2.5.1
-
In the
tasks/task2_5_1subdirectory of your repository, write a Kotlin program containing four lines of code. The first line should create avalvariable and assign an integer value to it. The second line should print the value of the variable. The third line should attempt to assign a new value to the variable. The fourth line should attempt to print the value of the variable again. -
Try compiling this program so that you understand exactly how the compiler reacts to the error on the third line.
-
Fix the error by changing
valtovar, then recompile and run the program.
Task 2.5.2
-
In the
tasks/task2_5_2subdirectory of your repository, write a Kotlin program containing these lines of code:val myAge = 29u val universeAge = 13_800_000_000L val status = 'M' val name = "Sarah" val height = 1.78f val root2 = Math.sqrt(2.0)Check that your program compiles. Then see if you can predict the type of each of these variables. Make a note of your predictions.
-
To check whether you have predicted the type of variable
myAgecorrectly, add the following print statement to the program:println(myAge::class)Add a similar print statement for each of the other variables. Then compile and run the program. How many of your predictions were correct?
Basic I/O
In this section we start by considering how a Kotlin program can receive input via the command line, as part of the command that invoked the program.
After that, we focus on basic console I/O operations—i.e., those that involve reading from standard input or writing to standard output once the program is running.
After completing this section, you will understand how to handle command line arguments, how to read from the console and how to format data for console output. File I/O will be considered elsewhere.
Command Line Input
If you want your Kotlin program to use command line arguments, you must
modify the definition of main() so that it has an array of strings as
its sole parameter. The type of this parameter must be declared as
Array<String>. The name given to it has no special significance, but
args or argv are common and sensible choices.
You will also need to check that the correct number of arguments have been
supplied to the program. Arrays in Kotlin have a size property that you
can examine in order to check this. If the required number of arguments
haven’t been provided, it will be necessary to terminate the program
prematurely, with a suitable error message.
For example, if a program requires a filename as a single command line argument, you could check that this argument is present in the manner shown below. (Equivalent code in C and Python is also provided, for comparison.)
import kotlin.system.exitProcess

fun main(args: Array<String>) {
    if (args.size != 1) {
        println("Error: filename required as sole argument")
        exitProcess(1)
    }

    // required argument available as args[0]
}
#include <stdio.h>
#include <stdlib.h>

int main(int argc, char* argv[]) {
  if (argc != 2) {
    printf("Error: filename required as sole argument");
    exit(1);
  }

  // required argument available as argv[1]
}
import sys

if len(sys.argv) != 2:
    sys.exit("Error: filename required as sole argument")

# required argument available as sys.argv[1]
Kotlin stores arguments differently from C and Python.
In C, the first element of the argument array is the path to the executable file containing the program, and the second element of this array contains the first argument supplied to the program.
Python is like C. The first element in sys.argv, its list of command line
arguments, is the name of the Python program, and the second list element
is the first command line argument.
In Kotlin, the program name/file path is NOT stored in the array. Thus,
in the example above, args[0] will be the first argument supplied to the
program, not args[1].
If you are wondering about exitProcess(1) in the example above, its
purpose is to halt program execution, setting the program’s exit status
to 1.
By convention, an operating system will assume that a program has terminated normally if it has an exit status of zero1, and that it has terminated abnormally if the exit status has any non-zero integer value. It is good practice to signal program failure to the OS in this fashion.
Having the exit status available can sometimes be useful, e.g., if you are running the program from a shell script and need to halt the script if that program fails to run properly.
Task 3.1
-
Edit the file named
Args.kt, in thetasks/task3_1subdirectory of your repository.In this file, write a small Kotlin program that accepts command line arguments. Your
main()function should contain only two lines of code, which should print out the first and second command line arguments. Do not add anything else at this stage. -
Compile the program, then run it without supplying any arguments on the command line:
kotlin ArgsKtWhat happens?
-
Run the program with two command line arguments, e.g.,
kotlin ArgsKt arg1 arg2Then try running it like this:
kotlin ArgsKt 'arg1 arg2'What happens, and why do you see this behaviour?
-
Modify the program so that it tests for the existence of the two required command line arguments before attempting to print them. Use the code example above as a guide.
If the required arguments are not present, your code should call
exitProcess(), with a non-zero exit status.Recompile the program, then use the following commands to run it with varying numbers of command line arguments, displaying exit status each time:
kotlin ArgsKt arg1
echo $?
kotlin ArgsKt arg1 arg2
echo $?
kotlin ArgsKt arg1 arg2 arg3
echo $?
Here,
$?is a shell variable that holds the exit status of the last command. This is what you would use in shell scripts to decide whether script execution should continue.
-
An exit status of 0 is the default. Thus you do not need to have an explicit
exitProcess(0)at the end of your program. You’d only need to use this if you wanted to halt the program before the end ofmain()and signal that this was a normal termination rather than an error of some kind. ↩
Console Input
Kotlin’s standard library provides the function readln() to read a line
of input from the console. This line of input is returned as a String
object.
Here’s an example, with the equivalent C and Python code provided for comparison:
print("Enter your name: ")
val name = readln()
char name[80];
printf("Enter your name: ");
fgets(name, sizeof name, stdin);
name = input("Enter your name: ")
You can see that Python’s approach is the most concise and C’s the most verbose, with Kotlin somewhere in between.
Task 3.2
-
In the
tasks/task3_2subdirectory of your repository, create a small Kotlin program containing the two lines shown above.Add a third line that prints the length of the string supplied by the user. This is available to you as the
lengthproperty of the string variable, i.e.,name.length. -
Compile the program, then run it a few times, trying various lengths of input, including no input at all (just press the
Enterkey for this, without typing anything else). -
Now run the program and press
Ctrl+Dinstead of entering anything. What happens?
Conversion to Other Types
Command line arguments are provided to a program as strings, and the
readln() function returns a string. But what if you are expecting the
input to be a number?
In such cases, you can use one of the many numeric conversion functions
associated with the String class. For example, to parse a string into an
integer value, you can invoke toInt() or toLong(). To parse the string
into a floating-point value you can use toFloat() or toDouble().
Here’s an example of how you could input a user’s age in a Kotlin program. The equivalent code in C and Python is provided for comparison:
print("Please enter your age: ")
val age = readln().toInt()
int age;
printf("Please enter your age: ");
scanf("%d", &age);
age = int(input("Please enter your age: "))
Notice the use of call chaining in this Kotlin example. The readln()
function returns a String object, upon which we immediately invoke
toInt().
You’ll see this pattern frequently in Kotlin, Java, and other object-oriented
languages. The benefit here is that it avoids the need for an additional
variable just to hold the value returned by readln().
In parallel with toInt(), toDouble(), etc, Kotlin provides extension
functions named toIntOrNull(), toDoubleOrNull(), etc. These deal with
invalid conversions in a different way. There is also a function named
readlnOrNull(), whose behaviour differs from readln() slightly. We will
discuss these functions later, when we cover null safety.
Task 3.3
-
Edit the file
Conversion.kt, in thetasks/task3_3subdirectory of your repository.In this file, create a small program containing the two lines of Kotlin code shown above. Add a third line that prints the age entered by the user.
-
To see how valid input is handled, compile the program in the usual way, then run it and enter your own age.
-
Run the program a few more times, with the following as inputs:
19.5
nineteen
3147203180
What do you observe? Do you understand why the third example fails?
-
Optional: would you see different behaviour in C when parsing these strings to an integer using the
scanf()oratoi()functions?Write a small C program to see whether you are right.
Console Output
You have already seen examples of using println() and print() for
console output in Kotlin. These functions both take a single argument, and
that argument can be of any type. If the argument is not itself a string,
a string representation of it will be generated, and this will then be
printed.
If you require more complicated output, combining fixed text with values generated by your program, you can achieve this using
- String interpolation
- The
format()extension function of theStringclass - The
printf()method of the objectSystem.out
Printing With String Interpolation
Strings in Kotlin can act as templates, into which the values of program variables will be inserted, in a process known as interpolation.
Python has an equivalent feature, commonly known as the ‘f-string’.
C has no direct equivalent, but the same result can be achieved using the
sscanf() function.
In Kotlin, you can interpolate a variable’s value into a string by including
that variable’s name in your string, prefixed by a $ symbol.
You can also interpolate the results of expressions, property access,
function calls or method calls into a string. In these cases, you need to
enclose the expression, property access or call in braces, as well as using
the $ prefix.
Here are some examples of printing interpolated strings, with the equivalent Python f-string syntax for comparison:
print("Enter your name: ")
val name = readln()

println("Hello $name!")
println("Your name contains ${name.length} characters")
println("Is it a short name? ${name.length < 5}")
println("Uppercase name is ${name.uppercase()}")
name = input("Enter your name: ")

print(f"Hello {name}!")
print(f"Your name contains {len(name)} characters")
print(f"Is it a short name? {len(name) < 5}")
print(f"Uppercase name is {name.upper()}")
Formatted Output
Python f-strings allow you to control the format of the interpolated value
in various ways. For example, you can interpolate a float value with
a specified number of decimal places.
String interpolation in Kotlin is much more basic than that. You’ll need to follow a different approach if you want more control over formatting.
One approach is to use the format() extension function of the String
class. For example, if you have a Float or Double variable named
distance, representing a distance in kilometres, you could format its value
into a string and then print that string with code like this:
println("Distance = %.2f km".format(distance))
Here, %.2f is a format specifier indicating that a floating-point
value should be inserted into the string at this point, and that it should
be formatted using two decimal places. The available format specifiers
are very similar to those used in C.
Another approach is to use the method System.out.printf(). Here’s an
example, with the equivalent C code provided for comparison:
val area = Math.PI * radius * radius
System.out.printf("Circle area is %.3f\n", area)
float area = M_PI * radius * radius;
printf("Circle area is %.3f\n", area);
If you already know C, the nice thing about System.out.printf() is that it
allows you to carry on using a very familiar approach to outputting formatted
data on the console. However, using that System.out prefix repeatedly
is tedious and adds clutter to the source code.
Fortunately, Kotlin provides a solution to this, via the with()
scope function:
with(System.out) {
    printf("Circle colour = (%d,%d,%d)\n", r, g, b)
    printf("Circumference = %.3f\n", 2.0 * Math.PI * radius)
    printf("Area = %.3f\n", Math.PI * radius * radius)
}
Inside the braces, method calls are implicitly made on the subject of the
with call1—in this case, the object System.out, which represents
the standard output stream.
When you use System.out.printf(), you are bypassing Kotlin!
This method is part of the Java standard library. The clever thing about Kotlin is that it integrates seamlessly with Java, allowing you to use anything from the Java standard library, or third-party Java libraries, in your Kotlin programs.
Obviously, this is only true of software that is running on the JVM. If you target a different platform with the compiler then you won’t be able to use things like this in your code.
-
Although it might not look like it, this really is a function call! We will discuss this unusual syntax when we cover functions later. ↩
Flow Control
Kotlin’s support for selecting between different execution paths is similar to what you’ve already seen in C & Python. However, one important difference is that these selection structures operate as expressions rather than statements, i.e., they yield values that can be assigned to a variable.
Iteration will also feel mostly familiar to you. Kotlin’s while loop is
very much like C’s while loop, and its for loop is very similar to
Python’s for loop. However, Kotlin also supports styles of iteration that
are not found in those languages.
After completing this section, you will have a thorough understanding of how do selection and iteration in Kotlin. The other ways of affecting flow are covered in the sections on functions and error handling.
if Expressions
You can use if, in combination with else if and else where required,
to choose between different execution paths in a Kotlin program. The syntax
is basically the same as in C:
if (number < 0) {
    println("Number too low")
}
else if (number > 100) {
    println("Number too high")
}
else {
    println("Number OK")
}
if (number < 0) {
    printf("Number too low\n");
}
else if (number > 100) {
    printf("Number too high\n");
}
else {
    printf("Number OK\n");
}
if number < 0:
    print("Number too low")
elif number > 100:
    print("Number too high")
else:
    print("Number OK")
However, note that the Kotlin compiler is stricter than a C compiler. It
will require the test performed by if or else if to be a proper boolean
expression.
You can construct more complex boolean expressions in Kotlin using &&
and ||, just as in C:
if (number < 0 || number > 100) {
    println("Number is out of range")
}
One important difference between Kotlin and C or Python is that, in Kotlin, selection structures are expressions, not statements. This means that a selection structure can be regarded as having a value, which can be assigned to a variable. The value will be determined by the chosen execution path, so each path should yield a result of the appropriate type.
Thus you could rewrite the example above like this:
val message = if (number < 0) {
    "Number too low"
}
else if (number > 100) {
    "Number too high"
}
else {
    "Number OK"
}

println(message)
Each branch yields a string, so the compiler will infer the type of
message to be String.
In the original version of this example, we could have omitted the else
branch if we didn’t want to print a message when number is in range.
We cannot do that here; this new version requires an else branch.
The reason is that we are assigning the result of the if expression to
a variable. The expression must therefore always yield a result. The else
branch guarantees this by providing a value that can be used in cases where
none of the tests in the other branches evaluate to true.
You don’t need to write an else branch if you are not using the result
of the expression in some way.
Whilst C and Python don’t allow you to duplicate an example like the one above, they do support a simpler form of conditional expression. Here’s an example of that simpler form, written for all three languages so you can compare the syntax:
val sign = if (number < 0) '-' else '+'
char sign = (number < 0) ? '-' : '+';
sign = '-' if number < 0 else '+'
This is often described as a ternary expression, because it has three
parts: a boolean expression; some code to evaluate if that expression has the
value true; and some code to evaluate if that expression has the value
false.
In the examples above, Python arguably has most natural and readable syntax for ternary expressions, with C being the least readable in this regard.
Range Checking
If you wish to check that a variable’s value is in range, you could do it like this:
if (number >= 0 && number <= 100) {
    // use number
}
else {
    // do something else
}
An alternative approach in Kotlin is to define a range and check for membership of that. The above example could be rewritten to use a range like this:
if (number in 0..100) {
    // use number
}
else {
    // do something else
}
Here, 0..100 defines a closed integer range, with 0 and 100 included
as endpoints.
Ranges are not limited to integers. You can also define floating point ranges, ranges of characters, even ranges of strings:
0.0..100.0
'a'..'z'
"aaa".."zzz"
To understand that last example, think of an alphabetical ordering of
strings, much like words in an English dictionary. Testing whether a string
is in the range "aaa".."zzz" will yield a result of false if that string
would come before aaa or after zzz in such a dictionary; otherwise,
it will yield a result of true.
In each of the examples above, literals have been used as the endpoints, but keep in mind that you are also allowed to use variables as endpoints of a range.
Task 4.2
Write a program to simulate ordering a pizza.
-
Your program should be in a file named
Pizza.kt, in thetasks/task4_2subdirectory of your repository. -
Your program should present a menu to the user consisting of four pizza options. It should label these options
a,b,candd. -
Your program should use
readln().lowercase()to read the user’s input and convert it to a lowercase string. -
Your program should use an
ifexpression to check that the length of the input string is 1, and that the first (and only) character of the string is one of the four available pizza options. It should use aCharrange for the latter. -
If the input is valid, your program should print “Order accepted”; otherwise, it should print “Invalid choice!”
Here’s an example of program output and user input:
PIZZA MENU

(a) Margherita
(b) Quattro Stagioni
(c) Seafood
(d) Hawaiian

Choose your pizza (a-d): b
Order accepted
when Expressions
At its simplest, Kotlin’s when expression can operate much like C’s
switch statement. Here’s an example. (Note: we’ve omitted some of the code
below because you don’t need to see all of it to understand the syntax
differences.)
when (day) {
    1 -> println("Monday")
    2 -> println("Tuesday")
    3 -> println("Wednesday")
    ...
}
switch (day) {
    case 1:
        printf("Monday\n");
        break;
    case 2:
        printf("Tuesday\n");
        break;
    case 3:
        printf("Wednesday\n");
        break;
    ...
}
Clearly, the Kotlin syntax is simpler and more compact. C requires that
each case be terminated with a break statement, otherwise execution will
‘fall through’ to the following case1. Kotlin doesn’t require this.
However, when in Kotlin is also more powerful than switch in C. For one
thing, you are not limited to matching to a single value in each branch.
You can match the subject of the expression to a comma-separated list of
options:
when (day) {
    1, 3, 5 -> println("Take a walk")
    2, 4    -> println("Go to the gym")
    6, 7    -> println("Rest")
}
You can also match the subject of the expression to ranges. For example,
imagine you are writing a program to transform numerical exam marks, on a
0 to 100 integer scale, into one of three possible grades: "Fail" (mark
between 0 and 39), "Pass" (mark between 40 and 69), "Distinction" (mark
between 70 and 100). If the mark lies outside the 0–100 range, a grade
of "?" should be returned.
The required Kotlin code could be written like this:
val grade = when (mark) {
    in 0..39   -> "Fail"
    in 40..69  -> "Pass"
    in 70..100 -> "Distinction"
    else       -> "?"
}
Notice how clear and readable this is2.
As with if expressions, an else branch is needed here, because we are
assigning the result of the when expression to a variable and therefore
need to ensure that it always yields a value.
As a final example, consider the following code:
when {
    isPrime(x) -> println("x is a prime number")
    x % 2 != 0 -> println("x is odd")
    else       -> println("x is even")
}
This demonstrates that you don’t always have to provide a subject whose value
is then matched against the provided options. In this more flexible form of
when expression, each branch performs its own independent test, using a
boolean expression. The first branch for which the expression evaluates to
true is the one that executes. If none of the expressions are true then
the else branch, if present, will execute.
Task 4.3
A university module sets three assignments, each of which is awarded an integer mark between 0 and 100. A grade for this module is determined from the equally-weighted average of these three marks.
Write a Kotlin program that determines the grade, given three marks that have been provided on the command line.
-
Your program should be in a file named
ModuleGrade.kt, in thetasks/task4_3subdirectory of your repository. -
Your program should first check that three command line arguments have been supplied and exit with a suitable error if this is not the case.
-
After determining the rounded average of the three marks, the program should turn this into a grade of Distinction (70–100), Pass (40–69) or Fail (0–39), using the
whenexpression shown above. It should then print both the rounded average mark and the grade.
Test your program carefully with different inputs to make sure that it behaves correctly.
Kotlin has a handy extension function for rounding to an integer.
To access this function, add the following import statement to the top
of your .kt file:
import kotlin.math.roundToInt
-
C programmers sometimes use this fall-through behaviour deliberately, to write code that performs the same action for multiple matching cases. This is often regarded as poor programming practice. ↩
-
There’s no significance here to the alignment of the
->in each branch. The compiler doesn’t care about this, but it does make the code look a little neater for the human beings who have to read it! ↩
while & do…while
Kotlin has a while loop that operates in the same way as the while loops
of C and Python:
var x = 0.0
while (x <= 100.0) {
    val y = sqrt(x)
    println("%5.1f %6.3f".format(x, y))
    x += 2.5
}
double x = 0.0;
while (x <= 100.0) {
    double y = sqrt(x);
    printf("%5.1f %6.3f\n", x, y);
    x += 2.5;
}
x = 0.0
while x <= 100.0:
    y = math.sqrt(x)
    print(f"{x:5.1f} {y:6.3f}")
    x += 2.5
Once again, Kotlin is stricter than C with regard to the test that follows the
while keyword. This test must yield a boolean result.
Like C (but unlike Python), Kotlin also has a do…while loop.
Remember that a while loop will not execute at all if the test associated
with the while evaluates to false immediately—whereas a do…while
loop is guaranteed to execute at least once, because the test is done at the
end rather than the start.
Task 4.4
-
Copy
Pizza.ktfrom thetask4_2subdirectory of your repository to thetask4_4subdirectory. -
Modify the copy of
Pizza.kt, so that it repeatedly prompts for input until a valid option has been supplied by the user.Use a
whileordo…whileloop to achieve this.
for Loops
The for loop in Kotlin operates in much the same way as Python’s for
loop. It is quite different from C’s for loop (which is effectively just a
different way of writing a while loop).
We’ll see more for loops later, when we explore collection types.
For now, let us concentrate on two particular examples: iterating over the
characters in a string, and iterating over an integer range.
Here is how you could use a for loop to print each character from a
string on a separate line:
val message = "Hello!"
for (character in message) {
    println(character)
}
Notice that character is not declared as a val or var here; indeed, it
would be an error to do so. The loop variable of a for loop is
implicitly a val.
Here is a traditional ‘counting’ loop, using for and a closed integer
range, with the closest equivalent in Python provided for comparison:
for (n in 1..10) {
    println(n)
}
for n in range(1, 11):
    print(n)
This works because Kotlin can treat integer ranges as progressions, in which there are clearly-defined values between the start and end points of the range. Those values are generated by repeated addition of a step, which has a default value of 1.
You can supply your own value for this step. For example, to print only the even integers between 2 and 20, you could do
for (n in 2..20 step 2) {
    println(n)
}
for n in range(2, 21, 2):
    print(n)
It is also possible to create descending progressions, using the downTo
function. Here’s a small example1, with its closest equivalent in
Python:
for (n in 10 downTo 1) {
    println(n)
}
for n in range(10, 0, -1):
    print(n)
You can also use step with downTo:
for (n in 10 downTo 1 step 2) {
    println(n)
}
for n in range(10, 0, -2):
    print(n)
Note that the value used with step is always positive.
It is important to understand that iteration with a for loop is not
supported for all types of range, because not all of them can be treated
as progressions.
For example, you can iterate over a range with Char or Int endpoints,
but you cannot iterate over a range with Float or String endpoints.
Task 4.5
Create a file named OddSum.kt, in the tasks/task4_5 subdirectory of
your repository.
In this file, write a Kotlin program that uses a for loop to sum up all of
the odd integers between 1 and some user-specified limit. You program should
prompt the user to input this upper limit, and it should print the result
of the summation.
Check that the program behaves as expected, and fix any problems that you observe.
Be sure to try some reasonably large values for the upper limit.
You may observe some surprising behaviour here, if you haven’t thought carefully enough about the type of value used to represent the sum…
-
Although it might not look like it,
10 downTo 1is indeed a function call, made using infix notation. When a function is called with infix notation, we are allowed to omit the dot operator and the parentheses. We could have avoided infix notation and written this instead as10.downTo(1). ↩
repeat()
Suppose you wish to execute a piece of code 5 times, and you don’t need to
count out each iteration. In such a case, you don’t have to use a for loop.
Instead, you can do this:
repeat(5) {
    println("Hello World!")
}
The interesting thing about this example is that it is a function call
rather than a distinct looping structure like for or while.
The repeat() function expects to be given two arguments. The first is a
count of how many repetitions are required. The second argument is the code
to be executed repeatedly, typically provided in the form of a
lambda expression.
We will discuss lambda expressions in more detail later, but for now
you can think of them as ‘anonymous functions’. In this example, the left and
right braces define the extent of the lambda expression. The lambda expression
is very simple; all it does is call the println() function.
What may be slightly confusing to you is that this piece of code appears outside the parentheses, making it look like it isn’t being passed in as an argument of the function call!
In cases where a function expects to be supplied with a piece of code as the final argument of a call to that function, and that code is written as a lambda expression, Kotlin allows us to move the lambda expression outside the parentheses, as we have done here.
This idea of a function argument being outside the parentheses of a function call will look strange to you at first, but you will get used to it.
It’s an idiom that is used very frequently in Kotlin, and it does end up making code look a little neater.
Functions
Functions are one of the ways in which we can organize code in a more modular fashion. Modular code is easier to write, test, understand and maintain. Modularity also facilitates reuse.
A Kotlin function can be defined in two ways: with a block body or with an expression body.
In addition, we can create blocks of code known as lambda expressions, which are a bit like ‘anonymous functions’.
Functions can also be categorized according to the scope of the function definition. We can write standalone functions that exist on their own, separate from any other structure. We can also write extension functions and member functions that are associated with specific classes.
After completing the work in this section, you will be able to create functions with block and expression bodies, and you will be able to call those functions using both positional and named arguments. You will also be able to write extension functions that ‘plug in’ to an existing type, extending its capabilities.
You will learn about lambda expressions and member functions later.
Block Body
This style of function definition begins with the keyword fun, followed by
- The function’s name
- The parameter list, in parentheses (possibly empty)
- A return type, if the function contains a
returnstatement - The function’s body, enclosed in braces
The parameter list is a comma-separated list of parameter declarations, just as you have seen for functions in C and Python. A parameter declaration must give both the parameter’s name and its type, with a colon between the two.
The return type, if present, is preceded by a colon.
With a return Statement
Here is an example of a function with a block body and return statements:
fun anagrams(first: String, second: String): Boolean {
    if (first.length != second.length) {
        return false
    }
    val firstChars = first.lowercase().toList().sorted()
    val secondChars = second.lowercase().toList().sorted()
    return firstChars == secondChars
}
This function requires two strings, represented by the parameters first
and second. It compares these two strings to see whether they are anagrams
of each other. Since this comparison is going to yield a true or false
result, the return type is declared explicitly as Boolean. Notice that
the return type comes between the parameter list and the function body, and
that it is immediately preceded by a colon.
The function has two return statements. The first of these allows it to
end computation early if the strings are of different lengths. Only if they
are of the same length will it proceed with a more detailed comparison. This
is done by converting each string to a sorted list of lowercase characters,
then comparing these two lists using the == operator. The boolean result of
the == expression is then returned.
Without a return Statement
If you are writing a function that doesn’t need to return a value to the caller—e.g., because it will be printing the results of computation, rather than returning those results for use elsewhere—then there is no need to specify a return type.
As an example, suppose you wish to create a function that simulates rolling any of the standard polyhedral dice used in tabletop role-playing games.

The function could be implemented like this:
fun rollDie(sides: Int) {
    if (sides in setOf(4, 6, 8, 10, 12, 20)) {
        println("Rolling a d$sides...")
        val result = Random.nextInt(1, sides + 1)
        println("You rolled $result")
    }
    else {
        println("Error: cannot have a $sides-sided die")
    }
}
Notice that there is nothing between the closing parenthesis of the parameter list and the opening brace of the function body, i.e., no return type has been specified.
This example includes one thing—sets—that we haven’t discussed yet, but it should nevertheless be fairly obvious what the code is doing. The caller specifies the required die by providing the number of sides that the die has. Rolls of d4, d6, d8, d10, d12 and d20 dice are supported; any other value for number of sides results in an error message being printed.
For example, rollDie(6) simulates rolling a d6. This is achieved via a call
to Kotlin library function Random.nextInt(), with arguments of 1 and 7.
That call returns a pseudo-random integer in the range from 1 up to but not
including 7. This integer value is then printed; it isn’t returned by the
rollDie() function.
Nevertheless, rollDie() still returns something: a special value, named
Unit.
All Kotlin functions return something—either an explicit value provided
by the function body, or Unit. This is somewhat analogous to Python, in
which functions that don’t have a return statement nevertheless still
return the value None1.
Task 5.1.1
-
Edit the file named
Anagrams.kt, in thetasks/task5_1_1subdirectory of your repository. Add to this file the code for theanagrams()function presented above. -
Next, add a
main()function that- Reads in two strings from the user
- Compares those strings using
anagrams() - Displays the result of the comparison to the user
-
Compile the program, then run it a few times to check that it is working correctly.
Task 5.1.2
-
Edit the file named
Die.kt, in thetasks/task5_1_2subdirectory of your repository. Add to this file the code for therollDie()function presented above. -
Next, add a
main()function that callsrollDie()a few times, with different values for the number of die sides. Compile the program, then run it a few times to check that the function is working correctly. -
Add a new function to
Die.kt, namedreadInt(). This function should have a singleStringparameter, representing a prompt that will be displayed to the user. It should declare a return type ofInt.Your implementation of this function should print the supplied prompt, read input from the user, convert the input to an
Intvalue and then return this value.Hint
You will find
toInt()useful here.See the discussion of converting strings to numeric types for more help with this.
-
Now modify
Die.ktso that the main program allows the user to specify the number of die sides. Obviously, you should use yourreadInt()function to achieve this!Compile the program, then run it a few times to check that it is working correctly.
-
This is not quite the same thing as
voidin C, C++ or Java. Use ofvoidin those languages literally means ‘nothing is returned’. But having functions & methods always return something—even if it is just a value that isn’t useful—turns out to be a rather good idea. It makes it much easier for Kotlin to support the functional and generic programming styles. ↩
Expression Body
If a function’s body can be written as a single expression then you can omit
the braces and return statement. In this style of function definition, you
must use an = symbol between the function header and the expression. There
is typically no need to specify the return type explicitly, as the compiler
can usually infer this.
For example, here’s how you could write a Kotlin function to compute the area of a circle:
import kotlin.math.PI

fun circleArea(radius: Double) = PI * radius * radius
Notice the absence of an explicit return type. The compiler will infer
the return type to be Double, because the expression is a multiplication
of values that are all of type Double.
Notice also the absence of braces or the return keyword.
As another example, consider the when expression to compute exam grades
that we saw earlier. You could make this code more reusable by turning
it into a function with an expression body. Here’s what such a function could
look like:
fun grade(mark: Int) = when (mark) {
    in 0..39   -> "Fail"
    in 40..69  -> "Pass"
    in 70..100 -> "Distinction"
    else       -> "?"
}
If you wanted, you could write this with a block body instead:
fun grade(mark: Int): String {
    when (mark) {
        in 0..39   -> return "Fail"
        in 40..69  -> return "Pass"
        in 70..100 -> return "Distinction"
        else       -> return "?"
    }
}
However, the version with an expression body is neater and more compact.
Task 5.2.1
-
Edit the file named
Circle.kt, in thetasks/task5_2_1subdirectory of your repository. Copy thecircleArea()implementation shown above into this file. -
Add a new function, similar to
circleArea(), that computes and returns the perimeter (circumference) of a circle. Use an expression body for this new function, likecircleArea()does. -
Add a third function named
readDouble(). This function should have a singleStringparameter, representing a prompt that will be displayed to the user. After printing this prompt, the function should read input from the user, convert it to aDoublevalue and then return this value. -
Finally, add a
main()function that uses all three of these functions. Your finished program should read a value for circle radius from the user, compute area and perimeter, then display these quantities to four decimal places.See the earlier discussion of formatted output if you need help with displaying area and perimeter in the required way.
-
Compile your program, then run it a few times to check it behaves as expected.
Task 5.2.2
-
Edit the file named
Grades.kt, in thetasks/task5_2_2subdirectory of your repository. Copy the expression form of thegrade()function shown above into this file. -
Next, add to the file a
main()function that- Iterates over the program’s command line arguments using a
forloop - Converts each argument to an
Int, representing an exam mark - Invokes
grade()on the exam mark, to determine the corresponding grade - Prints both the mark and the grade
- Iterates over the program’s command line arguments using a
-
Compile your program, then test it by running it with different numeric arguments. Here’s an example of how you might run it from the command line, and what the output might look like:
$ kotlin GradesKt 45 72 29 63
45 is a Pass
72 is a Distinction
29 is a Fail
63 is a Pass
Named & Default Arguments
Named Arguments
Imagine a function applyInterest() that calculates compound interest
accrued on the balance of a savings account held by the customer of a bank.
Consider how we might use such a function:
val balance = applyInterest(1200.0, 1.7, 3)
This function call demonstrates the use of positional arguments. Whatever is in first position in the argument list becomes the value of the parameter that occurs first in the function’s parameter list. Then the argument in second position becauses the value of the second parameter, and so on.
Unfortunately, when you use literal values as positional arguments, as in the example above, it’s not always obvious what the numbers passed in as arguments actually represent. You might need to refer to documentation, or see the parameter list of the function implementation itself, before you can understand code like this fully.
Fortunately, Kotlin gives us a solution to this problem, in the form of
named arguments. These are specified using the function parameter name,
followed by the = symbol, followed by the argument value. You may remember
this syntax from Python, which also supports the use of named arguments.
Thus the function call above could have been written like this:
val balance = applyInterest(amount=1200.0, rate=1.7, years=3)
Now it is much easier to understand what is going on: the function applies interest to an initial amount of 1200.0, for a period of 3 years, with an interest rate of 1.7%.
A bonus of using named arguments is that the ordering of the arguments no longer needs to match the order of parameters in the function’s parameter list. Thus the following would also work:
val balance = applyInterest(rate=1.7, amount=1200.0, years=3)
It is possible to mix the positional and named argument styles in a single function call, but there are some limitations. Consult the language docs on named arguments if you need more information on this.
Note also that if you are using the JVM platform, you cannot use named arguments when calling methods that are defined in Java classes. You have to use positional arguments in those cases.
Default Arguments
It is possible in Kotlin to provide default arguments as part of a function definition. These defaults will be used if no argument is provided when the function is called. Here’s a small example:
fun greet(target: String = "World") {
    println("Hello $target!")
}
This function can be called in two ways:
greet()        // prints Hello World!
greet("Joe")   // prints Hello Joe!
Default and named arguments are often used together to provide a function with ‘options’. Such a function will typically be called with a positional argument that is always required, optionally followed by named arguments that customize its behaviour in various ways.
For example, we might have a function to read data from a CSV file. Its default behaviour might be to read all rows of data and treat the commas in each row as the column separators. But we might have some cases where a different character is used to separate columns. And we might sometimes need to skip a number of rows to get to the data we need.
We can handle these situations by giving the function a separator parameter
that defaults to ',' and a skip parameter that defaults to 0.
Here are some examples of different ways in which that function might be called:
readCsvFile("data.csv")
readCsvFile("data.csv", skip=10)
readCsvFile("data.csv", separator='|')
readCsvFile("data.csv", skip=5, separator=':')
Task 5.3.1
For this task, you will modify your solution to Task 5.1.2 slightly.
-
Copy
Die.ktfrom thetask5_1_2subdirectory of your repository to thetask5_3_1subdirectory. -
Most games involving dice use a standard d6. Modify the implementation of the
rollDie()function inDie.ktto support this, by giving it a default argument of 6 for the number of die sides. -
Modify the
main()function so that it demonstrates thatrollDie()can now be called both with and without an argument.
Task 5.3.2
-
Edit the file named
Dice.kt, in thetasks/task5_3_2subdirectory of your repository.In this file, write a function named
rollDice(). This should work in a similar way torollDie()from the previous task, except that it should be able to roll multiple dice (all of the same type), printing the total score across all of those dice.Your function will therefore need two parameters: one representing the number of sides and the other the number of dice. Use a default of 6 for the number of sides and a default of 1 for the number of dice.
-
Add a
main()function that testsrollDice(). It should try calling the function in various ways, using both the positional and named argument styles, and omitting arguments so that you see the default values being used.
Extension Functions
An extension function is a function that we ‘plug in’ to an existing data type in order to extend its capabilities in some way.
In other object-oriented languages we would achieve this by using inheritance to create a specialized version of an existing type. The desired behaviour would be implemented as a member function (method) of this new type. Kotlin supports this approach fully, but also offers the simpler alternative of writing an extension function.
Extension functions are particularly useful in cases when all we want to do is add a small piece of functionality to an existing type. In such cases, it can feel like too much trouble to create a whole new type that inherits from that existing type.
Also, some types will explicitly deny us permission to extend them via inheritance. In such cases, extension functions are our only option for adding functionality to the type.
Example
Imagine that you are writing some code in which it is frequently necessary to test whether an integer value is odd or not. This can be accomplished easily enough by using the modulus operator to test whether dividing by 2 yields a non-zero remainder:
if (n % 2 != 0) {
    ...
}
The only drawback is that this code isn’t as readable as it could be.
An obvious solution would be to write a dedicated function that tests for oddness:
fun isOdd(n: Int) = n % 2 != 0
But since oddness is a quality intrinsic to integers, it makes sense to
implement this test as an extension function of the Int type. This is very
easy to do:
fun Int.isOdd() = this % 2 != 0
Note the three changes that are needed to make this an extension function:
-
The name of the type being extended must be used as a prefix to the function name, with the two names separated by the period character
-
The parameter list is now empty, because the integer value is no longer passed in as a function argument; instead it is the receiver of the function call
-
Within the function body, the receiver of the call is referenced as
this
The extension function is then used like so:
if (n.isOdd()) {
    ...
}
In effect, the Int type has been extended with a new capability. Anywhere
in your application, you are now able to ‘ask’ an integer value whether it is
odd or not.
Extension Properties
Oddness is an intrinsic quality of integers, so it would be nice if it could be implemented as a property of integers, rather than requiring an explicit function call. This is also fairly easy to do:
val Int.isOdd: Boolean get() = this % 2 != 0
Note the differences between this and the extension function:
-
We define it using
valrather thanfun -
We specify the property’s type (
Boolean, in this case) explicitly -
We use
get()to define the ‘getter function’ that retrieves the value of the property
Making isOdd an extension property rather than an extension function
allows us to omit the parentheses, which feels simpler and more natural:
if (n.isOdd) {
    ...
}
Extension properties like this are a useful abstraction, but keep in mind that under the hood, a function is always being called. Properties are merely a way of hiding these function calls, to improve the clarity and readability of the code.
We will discuss properties in detail later, when we cover classes.
Task 5.4.1
-
Edit the file
StringFunc.kt, in thetasks/task5_4_1subdirectory of your repository. In this file, write an extension function for theStringtype namedtooLong(). This should returntrueif the length of the receiver is greater than 20 characters.Check that your implementation compiles before proceeding any further.
-
Add to
StringFunc.kta program that tests your extension function. This should- Prompt for entry of a string
- Use
readln()to read that string - Use
tooLong()to check whether it is too long
Compile and run the program to make sure that it behaves as required.
Task 5.4.2
-
Copy
StringFunc.ktfrom thetask5_4_1subdirectory of your repository to thetask5_4_2subdirectory. Then rename the copy toStringProp.kt. -
In this new file, change
tooLong()into an extension property namedtooLong. Change the test program accordingly. Compile and run it to make sure that it behaves as required.
Infix Functions
Infix notation is a particular way of calling an extension function or member function, in which the call operator (the dot) and the parentheses are omitted. This can help to make the code more readable.
You’ve already seen an example of this:
for (n in 10 downTo 1) {
    ...
}
Here, 10 downTo 1 is infix notation for the call 10.downTo(1), which
invokes the downTo() extension function on the value 10, passing it an
argument of 1. This function call returns an integer progression representing
the sequence 10, 9, 8, … 2, 1.
To create a function that supports infix notation, begin its definition with
the keyword infix. Note also that your function must
- Be an extension function or member function
- Have a single parameter, for which an argument is always supplied
Example
Consider an extension function for strings, longerThan(). This function
returns true if the receiver contains more characters than the string
supplied as an argument:
fun String.longerThan(str: String) = this.length > str.length
This function could be used on two strings a and b like so:
if (a.longerThan(b)) {
    ...
}
To enable the use of infix notation here, all we need to do is add the
infix keyword to the start of the function definition:
infix fun String.longerThan(str: String) = this.length > str.length
Now the function call can be simplified to
if (a longerThan b) {
    ...
}
Obviously, this is not really necessary.
We could just compare the string lengths directly with
a.length > b.length.
The benefit here is the increase in clarity. a longerThan b is a bit
clearer and more readable than the explicit comparison of properties.
You shouldn’t overuse infix functions or extension functions, but sometimes it may be worth introducing them to make code more readable.
Task 5.5
-
Copy
Anagrams.ktfrom thetask5_1_1subdirectory of your repository to thetask5_5subdirectory. -
Edit this new copy of
Anagrams.ktand modify the anagram checking function so that it is an extension function ofString, callable using infix notation. Change the function’s name toanagramOf. -
Modify
main()so that it uses this new version of the function. If you’ve done everything correctly, it will be possible to test whether one string is an anagram of another using very readable code like this:if (secondString anagramOf firstString) { println("$firstString and $secondString are anagrams!") } -
Compile the program and run it to check that it behaves as expected.
Unit Testing (Part 1)
Unit testing is a critical part of software development, and we will expect you to write good unit tests in all of your assessments for this module.
In this section, we will position unit testing in the context of all testing approaches, then consider some of the key concepts involved in writing unit tests. After that, we will introduce you to a unit testing framework for Kotlin, Kotest.
After completing this section, you will understand the basic principles of unit testing and you will be able to write simple unit tests for functions using Kotest. Testing of classes, and the use of test fixtures and rich assertions, will be covered in Part 2.
Introduction
Unit tests are the tests that a programmer writes for the piece of code that they are currently developing. Unit tests therefore test one small part of the system, in isolation from other parts.
Testing can never prove that software has been implemented correctly1, but if you’ve written a comprehensive suite of unit tests that all pass, you can be much more confident that what you have written meets the requirements. Code without unit tests is essentially untrustworthy, and many programmers would regard such code as unfinished.
Whilst it is certainly possible to write unit tests using the native
features of a language (e.g., the assert statement in C and Python), it
is generally preferable to use a dedicated unit testing framework.
Frameworks provide a number of benefits, including
- Automated discovery of tests
- Simpler and more expressive ways of writing tests
- Control over which tests are run, and how they are run
- Support for various ways of reporting test results
Note that unit testing is not the only form of testing needed in software projects. Depending on the nature of a project, we may also need: integration testing, where we test whether components of the system work properly in combination with each other; acceptance testing, where we verify with users that the functionality they require has been delivered; stress testing, where we determine whether the system copes adequately under heavy load; and penetration testing, where security specialists probe a system to identify its vulnerabilities.
Conceptually, a large number of small, fast unit tests form the base of a ‘test pyramid’. Above this, we have a smaller number of integration tests, which are larger in size, run more slowly, and are run less frequently. At the top of the pyramid are the full end-to-end tests. These are the largest and slowest of all. There will be far fewer of these than there are unit tests in a typical system, and they will be run much less frequently.

-
In his 1972 Turing Award Lecture, renowned computer scientist Edsger Dijkstra said “Program testing can be a very effective way to show the presence of bugs, but it is hopelessly inadequate for showing their absence.” ↩
Unit Testing Concepts
What Do We Test?
Sometimes, a function or method will be so small and simple that it will not need to be tested directly. For example, when implementing a class in Java or C++, we would typically write ‘getter’ methods for the fields of the class that merely return the current value of the field. Code like this is too simple to need testing itself. In general, however, you will need unit tests for the majority of code that you write.
Note also that you shouldn’t necessarily be writing one test for each function or method in your code. Instead, think about how each function or class is expected to behave, and write a set of tests that verify each aspect of that behaviour.
When verifying behaviour, it is important to test at the boundaries where behaviour changes. It is quite common for mistakes to be made at these boundaries—e.g., the classic ‘off by one’ error that crops up when writing loops, indexing arrays, etc.
It is also crucial to test that errors occur when expected. Programmers have a tendency to focus on the ‘happy path’, when inputs are all valid, but behaviour also needs to be correct in cases where invalid input has been supplied, or computation fails for some other reason.
Equivalence Partitions
Is it feasible to test using all possible inputs to a piece of code?
Consider these hypothetical C functions (bodies are not shown as they are not relevant):
int func1(char c) { ... }

int func2(int n) { ... }

int func3(int x, int y) { ... }
How many possible inputs are there to each of these three functions?
(If you are in a lab class, discuss your answers with the people sitting near you.)
Discussion
Discussion
A char in C occupies 8 bits, so there are 28 = 256 possible
inputs to func1().
An int is normally represented using 32 bits, so there are 232
= 4,294,967,296 possible inputs to func2(). Exhaustive testing of func2()
would likely be very slow.
Since func3() has two int parameters there are (232)2
= 18,446,744,073,709,551,616 possible combinations of input value—a number
that makes exhaustive testing clearly infeasible.
An alternative to exhaustive testing is to identity ranges of input within which code behaviour is expected to be the same. It is important to consider ranges of invalid input here, as well as ranges of valid input.
For each of these equivalence partitions, we test using at least one typical value, plus the boundary values. If tests pass for these few values, it is reasonable to assume that they would pass for all values in the partition.
For example, consider this function:
fun tooShort(str: String) = str.length < 8
There are two obvious equivalence partitions here, one containing all strings whose length is less than 8 characters, the other strings whose length is greater than or equal to 8 characters.
For the first of these partitions, "xxxxxxx" could be used as a boundary
value (or any other string containing 7 characters), and "xxxx" would
be suitable as a typical value. We would expect the function to return
true for each of these values.
For the second of these partitions, "xxxxxxxx" could be used as a boundary
value (or any other string containing 8 characters), and "xxxxxxxxxxx"
would be suitable as a typical value. We would expect the function to
return false for each of these values.
Desirable Properties of Unit Tests
The acronym ‘FIRST’ is a useful way of remembering that unit tests should be
- Fast
- Isolated
- Repeatable
- Self-validating
- Timely
Fast means that a single unit test should require only a few milliseconds to run. This is necessary because well-tested code will have a large number of unit tests, and developers will want to run those tests frequently.
Isolated means that a test shouldn’t have external dependencies. For example, tests should not depend on a database that is used by other code, otherwise there is a risk of that database changing and affecting results. Test isolation also means that tests should be isolated from each other, so that the outcome of running a test will not depend on the order in which tests are executed.
Isolation makes it easier for tests to be Repeatable—meaning that they produce the same outcome each time they run, provided there have been no changes to the code being tested. Repeatability can be a challenge if you have code that interacts with something that changes—e.g., the system clock. In such cases, it may be necessary to replace the thing that changes with a ‘dummy object’ that generates fixed output.
Self-validating tests determine success or failure for themselves, without requiring human intervention to check results. In practice, this means that tests should make assertions, which either succeed or fail. The testing framework should be able to count the failures and provide you with details that help you track down the reason for the failure.
Tests should be written in a Timely fashion, at the point when you are writing code that needs testing rather than much later. Timely testing means that you shouldn’t be writing large amounts of code before you turn your attention to the tests that you need for that code. For example, if you create a function to perform a task, you should write tests for that function, and run them to make sure they all pass, before moving on to next piece of code.
In the most extreme form of timely testing, test-driven development, unit tests will actually be written before the code that needs to be tested!
Using Kotest
The Kotlin standard library includes some built-in support for unit testing,
via the kotlin.test package, but there are nicer third-party options out
there. In this module we will be using the Kotest framework, which
offers some very powerful and intuitive ways of writing tests.
Both kotlin.test and Kotest use JUnit as the underlying platform
for running tests on the JVM.
Gradle Configuration
To add support for Kotest to a Gradle-based project, you need to add the
required dependencies to build.gradle.kts and then, if required, configure
the test tasks.
...

val kotestVersion = "5.9.1"

dependencies {
    ...
    testImplementation("io.kotest:kotest-runner-junit5:$kotestVersion")
    testImplementation("io.kotest:kotest-assertions-core:$kotestVersion")
}

...

tasks.withType<Test>().configureEach {
    useJUnitPlatform()
    testLogging {
        events("passed", "skipped", "failed")
    }
}
Notice how, in the example above, the dependencies are specified using
testImplementation. This ensures that the libraries are used only for the
purpose of running tests; they won’t be bundled with your application if
you create a distributable release via the distZip task, for example.
The second part of the example above configures any tasks related to testing so that they will use JUnit 5 as the underlying platform for running tests. It also sets up logging of test results so that individual tests will be logged to the console, with an indication of whether the test passed, failed or was skipped by the framework.
Additional configuration of Kotest can be done via settings in the file
kotest.properties, which should be placed in src/test/resources.
See tasks/task1_4 for an example.
Amper Configuration
Configuring an Amper project for Kotest is a bit simpler than configuring a
Gradle project. The main thing you need to do is add two new entries to the
test-dependencies section of the module.yaml file:
test-dependencies:
  - io.kotest:kotest-runner-junit5:5.9.1
  - io.kotest:kotest-assertions-core:5.9.1
In Amper projects, the kotest.properties file should be placed in a
subdirectory of the project directory named testResources.
See tasks/task1_5 for an example.
Test Organization
One of the nice features of Kotest is that it supports multiple testing
styles. These styles represent different ways of organizing and writing
tests, drawing inspiration from a range of testing approaches and testing
frameworks. You can use whichever style suits you best, but we will focus
here on the StringSpec style, which is perhaps the simplest.
In this style, tests are collected together into classes that inherit from
StringSpec. Each test consists of a descriptive string, followed by a
lambda expression containing the code for the test. (We will cover lambda
expressions properly later; for now, just think of
them as blocks of code, enclosed in braces.)
For example, suppose you want to write unit tests for the grade() function
discussed earlier. You could structure these tests
using the StringSpec style like this:
class GradeTest : StringSpec({
    "Grade of Distinction for mark between 70 and 100" {
        // code to test for a Distinction goes here
    }

    "Grade of Pass for mark between 40 and 69" {
        // code to test for a Pass goes here
    }
    ...
})
Notice how each string describes one aspect of the expected behaviour of the code being tested. If you have a written specification of how the code should behave, you can often extract these strings directly from that written specification!
When the tests are run, each of these strings will be displayed, along with a message to indicate whether the test passed or failed.
When using Kotest, you will need an import statement for StringSpec:
import io.kotest.core.spec.style.StringSpec
The same goes for other elements of the framework. These imports should be
put at the top of the .kt file containing your tests.
The .kt files containing your tests should be placed in a separate directory
subtree, parallel to the application source code. Gradle and Amper use
different locations for these subtrees, which are summarized in the table
below.
| Code Type | Gradle Location | Amper Location |
|---|---|---|
| Application | src/main/kotlin | src |
| Tests | src/test/kotlin | test |
Writing a Test
Unit tests follow a standard pattern, consisting of three steps:
- Arrange
- Act
- Assert
The Arrange step involves setting up the conditions needed for the test to be performed. This might mean defining variables to represent a particular set of values that will be passed to a function, or creating an instance of a class and configuring it to be in a particular state.
The Act step involves carrying out the operation we wish to test—i.e., invoking a function or method.
The Assert step involves verifying that the operation produced the expected outcome.
Kotest supports a particularly nice syntax for making assertions, involving
matchers. We will explore matchers more thoroughly later. Here, we
focus on the most useful of them, shouldBe.
shouldBe is an infix function. It asserts that the expression on its
left yields the value provided by the expression on its right. For example,
we expect that the function call grade(70) should return the string
"Distinction". We can make this assertion with
grade(70) shouldBe "Distinction"
Notice how clear and easy to read this is!
We could have written this so that it more explicitly follows the Arrange-Act-Assert pattern:
val mark = 70                   // Arrange
val result = grade(mark)        // Act
result shouldBe "Distinction"   // Assert
However, such an approach seems unnecessarily complicated in this case; the concise, single-line version is simpler and easier to read. Simplicity is important when writing tests.
You should aim to make tests short and simple—ideally avoiding complex logic such as selection or iteration. The reason for this should be obvious: the more complex a test is, the greater the chance of it containing a programming error itself.
Test Granularity
A written specification for the grade() function might look like this:
A grade of "Distinction" is returned for a mark between 70 and 100
A grade of "Pass" is returned for a mark between 40 and 69
A grade of "Fail" is returned for a mark between 0 and 39
An unknown grade ("?") is returned for marks below 0
An unknown grade ("?") is returned for marks above 100
You could turn each line of this specification into a test. For example, the first could be
"Grade of Distinction for marks between 70 and 100" {
    grade(70) shouldBe "Distinction"
    grade(85) shouldBe "Distinction"
    grade(100) shouldBe "Distinction"
}
Note that three assertions are made here, corresponding to the two boundary values and one typical value for this particular equivalence partition.
Alternatively, you could adopt a more fine-grained approach, in which three separate tests are done to verify that a grade of Distinction is computed correctly:
"Grade of Distinction for mark of 70" {
    grade(70) shouldBe "Distinction"
}

"Grade of Distinction for mark of 85" {
    grade(85) shouldBe "Distinction"
}

"Grade of Distinction for mark of 100" {
    grade(100) shouldBe "Distinction"
}
Which of these approaches is better?
The nice thing about the coarse-grained approach is that there is a clear one-to-one mapping from statements in the written specification onto tests. The coarse-grained approach also results in fewer tests—which means the test suite will run a little faster, because the overhead associated with finding and running a test is incurred a smaller number of times.
However, the coarse-grained approach also means that each test will be a bit larger and more complex than it could be. Remember that tests should ideally be small and simple!
Other issues can arise when a coarse-grained test makes multiple assertions. By default, a test fails as soon as an assertion fails. So you don’t get any useful information from any subsequent assertions until you’ve fixed the issue that caused the first failure.
Also, when the test framework reports on a failed assertion from a multi-assertion test, it won’t always be immediately clear in the report which assertion caused the tested to fail. You will always see a line number, which you can check against the test source code, but it would nice to see instantly what the issue was, without having to make that check.
Soft Assertions & withClue
Kotest offers two solutions to the problems mentioned above.
The first is to ‘soften’ the assertions made by a test. When you do this, the framework will execute all of the assertions in a test and provide feedback on which of them failed, rather than stopping at the first failed assertion.
To enable soft assertions, simply create a file KotestProjectConfig.kt in
the same directory as your tests, containing the following code:
import io.kotest.core.config.AbstractProjectConfig

object KotestProjectConfig : AbstractProjectConfig() {
    override val globalAssertSoftly = true
}
Don’t worry about exactly what this code means for the moment; all will become clear later, once we’ve covered classes and object-oriented programming.
The second trick is to add clues to each assertion in a multi-assertion test. Clues are short strings of text that will be printed along with details of the failed assertion. The test for a grade of Distinction could be written using clues like this:
import io.kotest.assertions.withClue
import io.kotest.core.spec.style.StringSpec
import io.kotest.matchers.shouldBe

class GradeTest : StringSpec({
    "Grade of Distinction for marks between 70 and 100" {
        withClue("Mark=70") { grade(70) shouldBe "Distinction" }
        withClue("Mark=85") { grade(85) shouldBe "Distinction" }
        withClue("Mark=100") { grade(100) shouldBe "Distinction" }
    }
    ...
})
Running Tests in Gradle
As we saw earlier, when we first looked at build tools, you can run the unit tests in a Gradle project via the Gradle wrapper:
./gradlew test
If logging to the console has been configured, you will see the status of each test listed. If all tests pass, then Gradle will conclude its output with ‘BUILD SUCCESSFUL’; otherwise, it will count the failures and also provide a filename and line number for each failed test, allowing you to check the details of the assertion that caused the test to fail:
GradeTest > Grade of Distinction for marks between 70 and 100 FAILED
    io.kotest.assertions.AssertionFailedError at GradeTest.kt:9

GradeTest > Grade of Pass for marks between 40 and 69 PASSED

GradeTest > Grade of Fail for marks between 0 and 39 PASSED

3 tests completed, 1 failed

FAILURE: Build failed with an exception.
In addition, Gradle will direct your attention to an HTML report containing more detailed information on the failed tests. You can paste the given file URL into the address bar of a web browser to view this report.
Running tests in Amper
To run tests in an Amper project, do
./amper test
Note that Amper reports test results in the console in a different way to Gradle. Also, it does not currently generate a nice HTML report like Gradle does.
Tasks
Task 6.4.1
-
The
tasks/task6_4_1subdirectory of your repository is a Gradle project containing some Kotest unit tests similar to the examples discussed in Section 6.3.In a terminal window, move into this subdirectory and run the tests for the project using the Gradle wrapper1:
./gradlew testYou should see output in the terminal window, indicating that 1 out of 3 tests has failed.
-
In your browser, access the test report. Click through to the details of the failed test. You should see something like this:
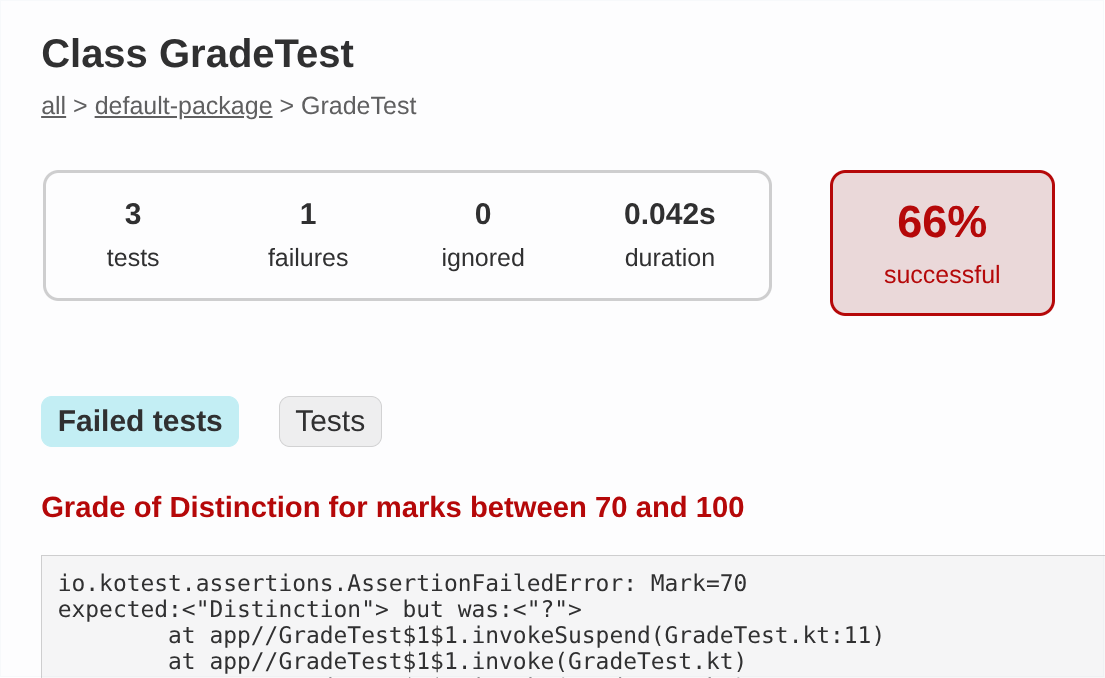
You can ignore the vast majority of the lengthy exception traceback here. The pertinent information is in the first few lines.
Notice that four useful things are displayed here:
- The clue associated with the failed assertion
- The value that was expected to be returned by
grade() - The value that was actually returned by
grade() - The location of the failed assertion (line 11 of the test source code)
-
Using this information, identify the problem in
Grade.ktand fix it. Rerun the tests to check that they all pass. -
There are only three tests here, but the written specification of
grade()shown earlier suggests that there are five equivalence partitions. Add two more tests, one for each of these partitions. Run the tests to check that they all pass. -
Optional: try rewriting the tests in a more fine-grained style, without clues and with only one assertion per test. Again, run the tests to check that they all pass.
Task 6.4.2
Previously, we set you the task of writing an infix function that checks whether two strings are anagrams of each other. This task involves writing unit tests for that function.
We have provided a solution to that earlier exercise as a Gradle project,
in the tasks/task6_4_2 subdirectory of your repository.
-
In a terminal window, go to this subdirectory, then compile and run the anagram checking program with
./gradlew run -
Here is a specification of how
anagramOf()is supposed to behave:-
Two strings of different lengths are not anagrams
-
An empty string is not an anagram of itself
-
A non-empty string is an anagram of itself
-
Two strings are anagrams if they contain the same characters in a different order
-
Letter case is disregarded when comparing character sequences, i.e., the lowercase and uppercase forms of a character are considered to be equivalent
Locate the file
AnagramTest.ktin the project source code. Add a set of unit tests to this file to verify that the function behaves in the manner specified above. -
-
Run the tests. If the test results indicate any deviation from the specification given above, modify the implementation of
anagramOf()to fix the issue.
-
If you are using the IntelliJ IDE, you can open the
task6_4_1subdirectory as a project. After project setup is complete, you will be able to access thetesttask in the Gradle tool window of the IDE. Double-click on it to run it. IntelliJ will create a run configuration, which can subsequently be accessed in the toolbar in order to rerun the tests. ↩
Collection Types
Like any modern programming language, Kotlin provides a range of ways in which collections of objects can be organized and manipulated as a single entity. There are six main collection types, and these can be nested to create more complex data structures if needed.
| Type | Description |
|---|---|
| Pair | Tuple of two values, each of any type |
| Triple | Tuple of three values, each of any type |
| Array | Fixed-sized collection, indexed by position |
| List | Collection of items, indexed by position |
| Set | Collection of unique items |
| Map | Collection of associated keys & values |
Pairs, triples and arrays allow us to represent collections with a fixed number of elements. Lists, sets and maps can grow, shrink or have their contents replaced, but only if we use the mutable variants of those collection types, rather than the immutable versions.
After completing this section, you will understand how to create and use instances of all these collection types in your Kotlin programs.
Pairs & Triples
Creation
You can create a Pair or Triple by invoking their constructor
directly. For example, you could pair up someone’s name and age, or bundle
together name, age and height, like this:
val person = Pair("Sarah", 37)

val person2 = Triple("Joe", 24, 1.75f)
Note that this code is technically shorthand for
val person = Pair<String,Int>("Sarah", 37)

val person2 = Triple<String,Int,Float>("Joe", 24, 1.75f)
Pair & Triple, like all Kotlin collections, are generic types. You
can think of a generic type as an ‘incomplete type’, with parameters that
are themselves types. Values for these parameters are provided inside angle
brackets to complete the type specification. In the case of collections,
these type parameters are used to specify the type(s) of the contents of
the collection.
In the examples above, the type parameters of the Pair have values of
String and Int, whereas the type parameters of the Triple have values
of String, Int and Float.
In some cases, you won’t need to specify what these type parameters are when you use collections, because the compiler will use type inference to figure this out. In other cases, you will need to provide a full specification—e.g., when creating an empty collection, or when writing a function with a parameter that is a collection.
to() Function
An alternative way of creating a Pair is to use the to() extension
function:
val person = "Sarah" to 37
This doesn’t look like a regular function or method call, because it is using infix notation.
to() is a nice way of pairing keys with values for use in a
map.
Element Access
The elements of a Pair are referenced as first and second. The
elements of a Triple are, unsurprisingly, referenced as first, second
and third.
val person = Pair("Sarah", 37)

println(person.first)    // prints Sarah
println(person.second)   // prints 37
Obviously first and second are not ideal as ways of referring to a
person’s name or age. You can use a technique known as destructuring to
assign the elements of a pair to individual variables with better names.
This is the equivalent of tuple unpacking in Python.
val person = Pair("Sarah", 37)
...
val (name, age) = person
println("Name is $name, age is $age")
person = ("Sarah", 37)
...
name, age = person
print(f"Name is {name}, age is {age}")
Pair and Triple are intended for situations in which you need to bundle
two or three values together temporarily, for a very specific purpose.
Often, it will be more useful to represent a group of two or three related values using a class. This is certainly the recommended approach when you are dealing with the important entities in a software application.
For example, in a graphics application you could represent points in a
two-dimensional coordinate system using Pair<Double,Double>, but a better
option would be to create a proper Point class, with dedicated x and y
properties.
Arrays
Arrays are useful when you need an ordered sequence of values, indexed by their position in that sequence, and the length of that sequence doesn’t need to change after creation.
Creation
You can create an array in two different ways. The first approach requires you to specify the type of element to be stored in the array, the size of the array, and some code to initialize the array elements:
val numbers = Array<Float>(100) { 0.0f }

val greetings = Array<String>(5) { "Hello" }
Here, numbers is created as an array of 100 Float values, each equal to
0.0, and greetings is created as an array of 5 strings, all "Hello".
{ 0.0f } and { "Hello" } are examples of lambda expressions
that specify how to compute an element’s initial value. In these two simple
cases a constant value is used, but it is possible to have more complex
expressions that give the elements different values. For example, you could
use the lambda expression { Random.nextFloat() } to initialize the array
numbers with pseudo-random values. (Try this out!)
The second approach involves specifying the desired initial values for each
array element individually, passing them all to the arrayOf() function:
val numbers = arrayOf(9, 3, 6, 2)

val names = arrayOf("Nine", "Three", "Six", "Two")
With this approach, there is no longer a need to specify element type or array size: type inference is used to determine the former, and arguments are simply counted to determine the latter.
Primitive Arrays
-
Create a file named
Array.kt, in thetasks/task7_2subdirectory of your repository. Add the following code to it:fun main() { val numbers = arrayOf(9, 6, 3, 2) val cls = numbers::class println(cls.qualifiedName) println(cls.java) } -
Compile and run the program. What does it print?
-
Modify the first line in
main()so that theintArrayOf()function is called, instead of thearrayOf()function. Recompile the program and run it again. What has changed?
The change in the first line of program output tells us arrayOf() and
intArrayOf() create two different array types, but why is that? And what
does that strange-looking second line of output actually mean?
On the JVM, Kotlin uses Java as much as possible to provide the underlying
implementation of its classes. The second line of program output shows that
underlying Java representation, in a rather cryptic form1. The opening
[ indicates that a Java array is being used. The rest of the string
indicates the type of value in the array. Ljava.lang.Integer; means that
Integer objects are stored in the array, whereas I indicates that the
array holds primitive int values.
This matters because an array of int values is handled more efficiently
than an array of Integer objects (e.g., the overhead associated with
boxing and unboxing operations is avoided).
This is why Kotlin has an IntArray class and an intArrayOf() function:
to give us access to this more efficient representation from our Kotlin
programs.
When you need an array of ‘primitives’ (numbers, characters or booleans),
it is more efficient to use the dedicated classes that Kotlin provides for
these types, rather than the generic Array class.
In other words, you should use IntArray, FloatArray or CharArray rather
than Array<Int>, Array<Float> or Array<Char>.
Similarly, if you are creating arrays of primitives from a known set of
values, you should prefer functions like intArrayOf(), floatArrayOf(),
charArrayOf() to the general-purpose arrayOf() function.
Element Access
The normal way of accessing an array element is to use [], with a
zero-based integer index—just as you would in C. Thus you could use x[0]
to look up or modify the first element of array x.
Alternatively, you can use the get() method to retrieve an element, and
the set() method to modify an element. These expect a zero-based array
index, just like []. The set() method also requires the new value for
the array element as a second argument.
Last year, you will have seen that C doesn’t stop you moving beyond the
bounds of an array, whereas Python will prevent you from doing that with a
list. Kotlin follows the same approach as Python, generating an
ArrayIndexOutOfBoundsException if an invalid array index is used.
You can use slice() to return part of the array. The desired portion is
specified using an integer range. Note however that the result of slicing is
returned as a list, not an array.
-
These are type descriptors, used in Java bytecode. They are written in a form that suits the JVM rather than a human reader. ↩
Lists
Lists are like arrays, but they are more flexible, because the sequence of values can grow or shrink after it has been created. They work in a similar way to Python lists.
List Creation
Creating a list follows the same pattern that we saw for arrays. It can be done by specifying element type, size, and some code that generates an initial value:
val numbers = List<Float>(100) { 0.0f }

val greetings = List<String>(5) { "Hello" }
Alternatively, you can provide the list contents as arguments to the
listOf() function:
val numbers = listOf(9, 3, 6, 2)

val names = listOf("Nine", "Three", "Six", "Two")
There are a few differences between lists and arrays, however.
One difference is that you can pass a list to the println() function and
see the list contents displayed on the console. You can’t do that with
arrays1.
Another difference is that there is no such thing as a more efficient ‘list
of primitives’. So there is no IntList class and no intListOf() function,
for example.
Element Access
You can use [], get() and slice() to access list elements, just as
you can with array elements.
Try this out now.
-
Edit the file
List.kt, in thetasks/task7_3_1subdirectory of your repository.In this file, write a program that uses these two lines to create and display a list of integers:
val numbers = listOf(9, 3, 6, 2, 8, 5)
println(numbers)
Check that this compiles and runs successfully.
-
Add a line of code that prints the value of
numbers[0]. Add another line that prints the value ofnumbers.get(0). You should see 9 printed twice after you recompile and and run the program. -
Add a line that attempts to print the value of
numbers[10]. What do you think will happen when you recompile and run the program?Try it to see if you are right.
-
Comment out the line that caused the problem, using
//. Then add a line that prints the value ofnumbers.slice(2..4). -
Add a line that prints the value of
numbers.first(). Then add a line that prints the value ofnumbers.last(). What do you think would happen if these operations were performed on an empty list?(Try this out, if you like!2)
-
Add a line that assigns a new value to
numbers[0]. What do you see when you try to compile the program? -
Replace the offending line with one that attempts to add a new value to the list:
numbers.add(1)What happens now when you try to compile the program?
Kotlin prefers immutability.
Lists created using the List<> constructor or the listOf() function are
immutable by design. This means that you cannot add a new value to such a
list, remove any of its values, or replace any of its values.
However, note that the the objects in the list could still change state, if they are of a type that supports such operations.
Mutable Lists
If you want your list to change after creation, you need to be explicit
about this. For example, you can specify MutableList<> instead of
List<>:
val greetings = MutableList<String>(5) { "Hello" }

greetings.set(0, "Hi there")   // OK: greetings is mutable
Alternatively, you can use the mutableListOf() function:
val numbers = mutableListOf(9, 3, 6, 2)

numbers[0] = 1   // OK: numbers is mutable
mutableListOf() is also the most convenient way of creating an empty
mutable list—although in this case you will need to supply an element
type in angle brackets, because there are no contents for type inference to
work on:
val data = mutableListOf<Double>()
Adding & Removing Values
Mutable lists have a number of methods that can be used to modify the list:
| Method | Description |
|---|---|
add() | Adds an item at the end, or a given position |
addAll() | Adds all items from the given collection |
remove() | Removes first occurrence of the given item |
removeAll() | Removes all occurrences of the specified items |
removeAt() | Removes the item at the given position |
clear() | Empties the list of all its contents |
Note that the removeAll() method expects to be given another collection,
specifying the items to be removed. You can also specify the items it should
remove by providing a predicate function that returns True for those items.
See the API documentation for MutableList for further details.
Task 7.3.2
-
Copy
List.ktfrom thetask7_3_1subdirectory of your repository to thetask7_3_2subdirectory. -
Modify this copy of
List.ktso that it uses themutableListOf()function to create the list. Check that this fixes the compiler errors found in the previous task. -
Add some code to
List.ktthat demonstrates the list modification methods in the table above. After calling each method, add a line that prints the list, so that you can see the effect of the call.
-
This has to do with the underlying implementations of collections. On the JVM, a Kotlin array is implemented as a Java array, which doesn’t support the automatic conversion of array contents to a string for printing. A Kotlin list, on the other hand, is implemented by a Java class that does support automatic conversion of contents to a string. ↩
-
You can use
listOf<Int>()to create the empty list here. ↩
Sets & Maps
A map is an associative container for values. Rather than indexing values by their position in a sequence, as is the case for arrays and lists, a map associates each value with a key. This key is then used to look up the corresponding value. Keys must therefore be unique.
A set is a little like a map with keys but no associated values. In effect, the keys are the values we wish to store! Sets are essentially unordered collections in which items are guaranteed not to be duplicated.
C has no equivalents to sets and maps in its standard library, but Python provides both of these data structures. (A Python dictionary is equivalent to a Kotlin map.)
Creation
Sets and maps are created in a similar way to arrays and lists, by invoking
the constructors for Set<> and Map<>, or the creation functions setOf()
and mapOf(). The latter is often used in conjunction with the to()
function, to construct maps in a very readable way.
val fixedOptions = setOf("Save", "Load", "Quit")

val fixedPrices = mapOf(
    "Apple" to 32,
    "Orange" to 55,
    "Kiwi" to 20
)
The same mutability considerations that apply to lists also apply to sets
and maps. Thus the Set<> constructor and setOf() will give you an
immutable set, whereas the Map<> constructor and mapOf() will give you
an immutable map.
If you want mutability, you must request it explicitly:
val options = mutableSetOf("Save", "Load", "Quit")

val prices = mutableMapOf<String,Int>()   // key & value types needed!
As with mutable lists, it is necessary to specify the type(s) of the collection’s contents when creating an empty mutable set or an empty mutable map.
Set Manipulation
To add an item to or remove an item from a mutable set, use the add()
or remove() method, as appropriate.
These methods expect a single argument: the item to be added/removed. Both
of them return true if the operation succeeded, false if it did not.
val names = mutableSetOf("Joe", "Sarah", "Nicole")

print("Enter your name: ")
val name = readln()

if (names.add(name)) {
    println("$name added")
}
else {
    println("I'm sorry, we already have a $name")
}
If you want to add or remove multiple items at the same time, you can use
addAll() or removeAll(). Both of these methods accept a collection
of the values to be added or removed as the only argument. Both return
true if at least one value was added or removed, or false if there was
no modification of the set.
You can empty a mutable set of all its contents using the clear() method.
Looking Up Values in a Map
You can look up the value associated with a key using the [] operator
or the get() method:
val prices = mutableMapOf(
    "Apple" to 32,
    "Orange" to 55,
    "Kiwi" to 20
)

println(prices["Apple"])   // prints 32
println(prices["Pear"])    // ?
What do you think happens when the second of these two print statements is executed?
If you are unsure, try running this code…
It’s important to understand that the object returned when [] or get()
is used on a map is an instance of a nullable type, which we will cover
later.
If you don’t want this behaviour, you can use getOrElse() instead:
prices.getOrElse(item) { 15 }

prices.getOrElse(item) {
    throw NoSuchElementException("No price for $item")
}
As its name suggests, this returns the associated value if the given key is present, or else it performs the action specified by the given lambda expression. In the first of the examples above, this lambda expression simply returns a default value. The second example throws an exception in cases where the key is missing.
Modifying a Map
You can modify an existing value or add a new key-value pair to a mutable
map using the [] operator in an assignment operation, or by calling
the put() method. For example, given the mutable map described earlier,
you could do this:
prices["Apple"] = 40    // updates price of Apple
prices["Banana"] = 65   // introduces new item & price
You can remove a key-value pair from a mutable map by invoking the remove()
method on it, with the key as the argument.
You can empty a mutable map of all its contents using the clear() method.
Membership & Iteration
Membership Tests
You can test whether an item is in an array, list or set using in, or
the contains() method. The former is more elegant:
if (item in collection) {
    // item is in the collection!
}
You can also use in with maps, but in this case you need to test for
membership of either the map’s keys or its values:
if (item in map.keys) {
    // item is a key of the map
}

if (item in map.values) {
    // item is a value of the map
}
An alternative to the above approach is to use the containsKey() or
containsValue() method of the map.
You can check whether multiple values are all contained within an array,
list or set using the containsAll() method. For example
numbers.containsAll(setOf(1, 2, 3))
will return true if the list numbers contains the values 1, 2 and 3.
It will return false if any of them are missing from the list.
Iteration
You can iterate over the contents of an array, list, set or map using a
for loop. With arrays, lists and sets, the syntax is
for (item in collection) {
    // do something with item
}
Iteration is slightly more complex with maps, because the for loop will
yield pairings of key and value1. Typically we use destructuring
within the loop to extract key and value into separate variables:
for ((key, value) in map) {
    // do something with key and value
}
You can also iterate over keys or values separately, by using the keys or
values properties of the map in a for loop:
for (key in map.keys) { ... }

for (value in map.values) { ... }
Functional Style
You may wish to come back to this section after you have learned about lambda expressions.
Arrays, lists, sets and maps also allow iteration over their contents in a
more functional style, via the forEach extension function.
This function expects to be supplied either with a function reference or with a lambda expression. The supplied function or lambda should take a single parameter, which represents an item from the collection. The function or lambda will be executed once for each item.
For example, to print out each item of a collection on a line by itself, you could use either of the following:
collection.forEach(::println)

collection.forEach { println(it) }
-
You might think that a Kotlin
Pairis always used for this, but on the JVM a Java collection class,LinkedHashMap, is used to implement maps, and its inner classEntryis used to implement the pairing. ↩
Other Operations
Properties & Methods
Arrays, lists, sets and maps all have a size property that tells you
how many elements are in a collection. In the case of maps, size is the
number of key-value pairs held in the map.
Lists, sets and maps all have an isEmpty() method that returns true if
collection size is zero, false if it is non-zero.
Lists have indexOf() and lastIndexOf() methods that can be used to
find the first and last occurrence of a particular value in the list. These
will return the index of the value you seek, or -1 if it couldn’t be found.
val words = listOf("Apple", "Orange", "Apple", "Kiwi")

println(words.size)
println(words.isEmpty())
println(words.lastIndexOf("Apple"))
println(words.indexOf("Banana"))
Extension Functions
Much of the useful functionality of collections is provided via extension functions. Many of these functions rely on lambda expressions to maximize their flexibility, so we will defer discussion of those until we cover that topic, but here are a few examples of what you can do without needing lambdas.
-
If you have an array, list or set whose elements are of a numeric type, then you can use the
min(),max(),sum()andaverage()functions to compute the minimum, maximum, sum and average (arithmetic mean) of those numbers. -
Given an array or list, you can use the
reversed()function to get a new list with the elements in reverse order. You can also usedsorted()andsortedDescending()to get new lists whose elements have been sorted into their natural ascending and descending order, respectively. -
The
chunked()function can be invoked on lists or sets to ‘chunk’ their contents into a list of lists, each of a given size. For example, the code below groups the contents ofnumbersinto chunks with a maximum size of 3. When run, it prints[[9, 3, 6], [2, 8, 5], [1]].val numbers = listOf(9, 3, 6, 2, 8, 5, 1) val chunks = numbers.chunked(3) println(chunks) -
The
distinct()function can be invoked on arrays and lists. It returns a list in which duplicate values have been removed. -
The
shuffled()function can be invoked on a list to get a new list in which the elements have been reordered pseudo-randomly. If the list is mutable and you prefer to reorder its elements in place, you can useshuffle()instead.
These are just a few examples. See the operations overview in the offical language documentation, or the API reference material, for more details.
More Tasks
Task 7.7.1
In this task, you will create a program that computes these statistics for a numeric dataset:
- Minimum
- Maximum
- Mean (‘average’)
- Median
To implement this quickly and easily, you will need to make effective use of the methods and extension functions of lists. Everything you need for this task was mentioned in the discussion of extension functions on collections.
A good solution to this task shouldn’t require much more than 30 lines of source code (excluding blank lines & comments).
-
Edit the file named
Stats.kt, in thetasks/task7_7_1subdirectory of your repository.In this file, write a function that prompts the user to enter a series of floating-point values, storing them in a list. The function should return the list.
Kotlin’s
buildList()provides an elegant way of implementing this:fun readData() = buildList { // Print a prompt for the user // Write a loop to read the numbers // Inside this loop, call add() to add a number to list }Your program will need to cope with varying amounts of data, so you should have some way of terminating the input when the user has finished entering values.
-
Write a second function that computes the median of a list of floating-point values.
-
Write a third function that displays the required statistics for a list of floating-point values. Obviously, this should make use of the function you created in the previous step. The other statistics can each be computed using a single line of code.
-
Finally, write a two-line
main()function that uses the previously written functions to read the data and display the required statistics.
Task 7.7.2
Edit the file named Contacts.kt, in the tasks/task7_7_2 subdirectory of
your repository.
In this file, write a Kotlin program to simulate a database of contacts and their telephone numbers. Use a map of strings onto strings to represent this database.
Your program should repeatedly prompt the user to enter a contact’s name. If the name is present in the map, the program should display the corresponding phone number; otherwise, it should prompt for entry of that person’s phone number and then store the pairing of name and number in the map.
Lambda Expressions
In Kotlin, functions are first-class objects. This means they have an equivalent status to the different types of data that we manipulate in a program. Thus it is possible to write higher-order functions that expect to receive another function as an argument, or that return another function to the caller. This is a key aspect of the functional programming paradigm.
These functions that we pass in as arguments are typically quite short. Also, it is common for them to be needed only at one point in the source code. Kotlin therefore allows us to define these functions at the point of use, in a more compact way, as lambda expressions.
The format of a lambda expression (or ‘lambda’, for short) is
{ parameter-list -> body }
This is like a function with no name, and with the parameter list moved
inside the braces. An arrow (->) separates the parameter list from the
body. No return type is declared, as this will be inferred by the compiler.
After completing this section, you will understand how to create your own lambdas, using a compact syntax. You will also recognize the important role played by lambdas in helping us manipulate collections.
Defining a Lambda Expression
Consider the following predicate function, which returns true if
the given argument is an even integer, false if it is odd:
fun isEven(n: Int): Boolean {
    return n % 2 == 0
}
Because this is so simple, it can be written more compactly, with an
expression body. This involves removing the braces,
the return statement and the declaration of a return type:
fun isEven(n: Int) = n % 2 == 0
But we can go one step further, and remove the name—turning it into a lambda expression:
{ n: Int -> n % 2 == 0 }
Tasks
-
Write down a lambda expression that accepts a
Doublevalue and returns the square of that value. Usexas the name of expression’s only parameter. -
Write down a lambda expression for comparing two
Intvalues namedaandb. Your expression should returntrueifais less thanb, otherwisefalse.
Solutions
Solutions
You should have something like this for the first lambda expression:
{ x: Double -> x * x }
The second lambda should look like this:
{ a: Int, b: Int -> a < b }
Using a Lambda Expression
An Example
Consider the following list of integers:
val numbers = listOf(1, 4, 7, 2, 9, 3, 8)
To extract the even numbers from this list, you can use the filter()
extension function that is provided for Kotlin collections. This expects to
receive a predicate function that returns true for values that should be
preserved, false for values that should be filtered out.
You could do the filtering using the isEven() function
seen earlier:
val evenNumbers = numbers.filter(::isEven)
(The :: prefix is needed to create a reference to isEven(),
allowing you to pass that function to the filter() function.)
However, if this is only place in your code where it is necessary to extract even numbers from a list, it seems wasteful to define a separate named function to facilitate this. This is where lambdas, as ‘anonymous functions’, come into their own. You could instead write the code to extract the even numbers like this:
val evenNumbers = numbers.filter({ n: Int -> n % 2 == 0 })
Now the predicate is defined anonymously, at the point of use. There is no need for its definition to occupy space elsewhere, cluttering the source code.
Simplifying The Syntax
You can simplify the syntax of using a lambda expression in up to four distinct ways. Let’s consider each of them, with reference to the example of filtering a list of numbers.
-
The first thing you can do is omit the parameter type, as it can be inferred from the context in which the lambda is being used:
val evenNumbers = numbers.filter({ n -> n % 2 == 0 }) -
In cases like this one, where the lambda has a single parameter, the second thing you can do is make the parameter implicit:
val evenNumbers = numbers.filter({ it % 2 == 0 })Notice that the parameter list has gone entirely; all we have left is the body of the expression, with the special name
itnow representing the parameter. -
The next thing is to move the lambda outside of the parentheses:
val evenNumbers = numbers.filter() { it % 2 == 0 }Note: this can be done only in cases where the lambda is the final argument of the function or method call, as is the case here1.
-
If the lambda is the only argument of the function or method call, then you can make one further simplification and remove the parentheses entirely:
val evenNumbers = numbers.filter { it % 2 == 0 }This is the final, most compact form—requiring ten fewer characters than the original lambda.
In Kotlin, lambdas are usually written in the most compact way possible, so take some time to study the simplifications outlined above and make sure that you understand them.
-
Higher-order functions will often be written in such a way that the expected function or lambda expression is the last parameter in the parameter list, purely to facilitate this simplification. ↩
Lambdas & Collections
Kotlin is extremely good at manipulating collections in a wide variety of ways, with a minimum of code—largely because many operations can be controlled using lambda expressions.
Consider, for example, the first() and last() functions that give us the
first and last items in an array or list. What if you wanted the first
even value in an array of integers, or the last non-blank string in a list
of strings?
To achieve this, all you need to do is supply first() or last() with
the appropriate predicate, written as a lambda. The returned value will be
the first or last item in the collection for which the predicate returns
true.
val numbers = intArrayOf(9, 3, 6, 2, 8, 5)
val firstEven = numbers.first { it % 2 == 0 }

val words = listOf("Hello", "Goodbye", "Ciao", "", "Hi", "")
val lastNonBlank = words.last { it.isNotBlank() }
As another example, consider the count() operation. You can invoke this
with no arguments, to get the number of items in a collection1, but
you can also supply it with a predicate, and it will then count the number
of items for which that predicate is true.
Given a list of integers named numbers,
- How would you count occurrences of the value 3?
- How would you count the odd integers?
In each case, use a lambda expression in your answer, and make it as compact as possible.
Answers
Answers
To count occurrences of a specific value, the predicate needs to test
whether its parameter is equal to that value. If the value is 3, then the
predicate required is { it == 3 }, thus the required code is
numbers.count { it == 3 }
You need to use the implicit parameter it here because the question asks
for the most compact lambda expression possible.
To count odd integers, the predicate needs to test whether its parameter is odd, and the obvious way of doing that is to check whether the remainder after dividing by 2 is non-zero. Thus, the required code is
numbers.count { it % 2 != 0 }
Numerical Operations
We saw earlier that it is possible to perform numerical operations such as finding the minimum or maximum, or computing a sum, for a collection of numbers. There are variants of these operations that use lambdas.
For example, suppose you have a function that fetches measurements of
temperature from a series of weather stations. This dataset is returned to
you as a list of Pair<String,Double> objects. The String in a pair is
the name of the weather station and the Double is the temperature measured
at that station.
How would you find the lowest temperature in this dataset, and the station that recorded that temperature?
You could write some code that iterates over the list of pairs, comparing each of them with the pair that is your current ‘best guess’ at the measurement having the lowest temperature. If the pair you are currently looking at has a lower temperature than the current best guess, then it becomes your new best guess:
var lowest = dataset[0]
for (measurement in dataset) {
    if (measurement.second < lowest.second) {
        lowest = measurement
    }
}
Alternatively, you could replace these six lines of code with a single line:
val lowest = dataset.minBy { it.second }
Here, { it.second } acts as a selector function, picking out the value
to use when seeking a minimum. In this case, it simply picks out the second
value of each Pair object, which is the temperature. minBy() performs
all of the comparisons necessary to find the list element for which the
selector yields a minimum value, returning that element. The variable
lowest is therefore a Pair object, containing the lowest temperature in
the dataset and the name of the station that recorded that temperature2.
Task 8.3
-
The
tasks/task8_3subdirectory of your repository is an Amper project containing code for analysis of weather station temperature data. Examine the files in thesrcsubdirectory of this project.Notice that
Funcs.ktintroduces a type alias: a new type name,Record, which is just a more convenient alias forPair<String,Double>. -
Implement the body of
fetchData()so that it returns a simulated dataset, in the form of a list ofRecordobjects. UselistOf()to create the list, and theto()extension function to create each pair. -
Add code to
main()that creates a dataset and then finds the weather stations that recorded the lowest & highest temperatures. Use the single line of code discussed above to find the lowest, and write a similar line to find the highest. Print the full details of these stations (station name and recorded temperature).Build and run the program with
./amper runCheck that it produces the expected output.
-
Add a line of code that invokes the
averageTemp()function, to compute the average temperature across the entire dataset. Add another line that prints the average temperature, to two decimal places.Build and run the program again, and check that it produces the expected output.
-
Modify
main()so that it performs the calculation of average temperature entirely withinmain(), with a single line of code, avoiding use of theaverageTemp()function entirely.Hint
You’ll need to find a suitable operation on collections, and provide it with the appropriate lambda.
The documentation for aggregate operations on collections will be useful here.
Sorting
We encountered the sorted() and sortedDescending() operations
earlier. These produce sorted versions of a collection, based on the
‘natural ordering’ of the items in the collection. In practice, this means
that meaningful comparison operations must exist for those items. This is
automatically the case for things like numbers, characters and strings, but
it won’t be true if the items in a collection are more complex than that.
Kotlin provides more than one way of handling this. The approach we’ll
consider here involves the sortedBy() and sortedByDescending()
operations.
Let’s consider the temperature dataset example once again. Suppose you
want to display the entire dataset, but sorted alphabetically by weather
station name. dataset.sorted() won’t work, because each item in the list
is a Pair, and there is no natural ordering defined for Pair objects.
Instead, you can use sortedBy(), with a selector that picks out the
station name, i.e., the first item in each pair:
dataset.sortedBy { it.first }.forEach { println(it) }
The rule of thumb here is that the selector used with sortedBy must always
return a value for which meaningful comparisons are possible. The code above
works because the selector yields a string, and Kotlin knows how to order
strings.
For further information on sorting operations, see the Kotlin documentation on ordering of collections.
Filtering & Mapping
Filtering and mapping are fundamental operations in purely functional programming languages, but they are so useful that they are also supported in hybrid languages like Kotlin.
As we’ve seen already, filtering creates a new collection by applying a predicate to an existing collection. That predicate is used to determine which of the existing values are included in the new collection and which are discarded:
val words = listOf("Hello", "Hi", "Goodbye", "Bye")
val shortWords = words.filter { it.length < 5 }
Mapping, on the other hand, applies a mapping function to each item of an existing collection, transforming it in some way. The values returned by the mapping function are the contents of the new collection.
As an example, suppose you have a list of numbers, and you wish to create a
new list containing the squares of those numbers. This can be done with a
map() operation like so:
val numbers = listOf(1, 4, 7, 2, 9, 3, 8)
val squares = numbers.map { it * it }
Filtering and mapping operations can easily be chained. For example, if you want the squares of only the odd numbers, this can be done with
numbers.filter { it % 2 != 0 }.map { it * it }
You have a list of strings named lines. You need a new list, in which
blank strings have been removed and the remaining non-blank strings are
in lowercase. A blank string is a string that is either empty or that
consists solely of whitespace characters.
Write a single line of code that uses filter and then map to achieve this.
Hint
Hint
You’ll need to use two extension functions of the String class for this.
See the documentation for String for more details. (Select the
‘Members & Extensions’ tab and look under the ‘Functions’ heading.)
-
Though it would be easier just to access the
sizeproperty in this case. ↩ -
Kotlin also supports the
minOf()operation. This uses a selector in the same way asminBy(), but it returns the actual minimum value, rather than the element for which the selector returned a minimum. ↩
Sequences
In the previous section, we saw how filtering and mapping operations can be chained together:
numbers.filter { it % 2 != 0 }.map { it * it }
In the example above, the initial filtering operation generates a temporary collection, which is then transformed by the subsequent mapping operation. After that point, the temporary collection is no longer required, and the memory it uses it will be reclaimed.
This isn’t much of a problem for the small examples that we’ve considered so far, but there could be significant performance implications to the creation of these intermediate collections if we are working with longer chains of operations, or if we are working with very large amounts of data (e.g., lists with millions of elements).
To cater for these scenarios, Kotlin provides the Sequence type1.
A Sequence object represents a sequence of values, over which we can
iterate. A Sequence object knows how to retrieve the next value in this
sequence of values, without actually having to store all of the values
from the sequence itself. This means that a potentially infinite series of
values can be represented as a Sequence.
Because sequences are iterable, operations such as filter() and map()
can be performed on sequences just as easily as on actual collections.
In this way, we can avoid creation of intermediate collections when we
chain operations together.
The functional programming approach involves using filter, map and a few
other functions as small, simple ‘building blocks’ that can be combined in
order to implement very complex manipulations of data in a collection.
This approach is much more powerful than one in which we have to write a large, complicated function every time we are faced with a data manipulation task. Complex manipulations are easier to understand when expressed as combinations of simple operations. Using sequences ensures that we can benefit from this expressiveness without sacrificing performance.
See the Kotlin language documentation for more information on how to use sequences.
Task 8.4.1
-
Examine the file
Sequences.kt, in thetasks/task8_4_1subdirectory of your repository. You should see code like this:fun main() { val numbers = listOf(1, 4, 7, 2, 9, 3, 8) val result = numbers // make changes here println(result) } -
Compile the program and run it. You should see the contents of
numbersdisplayed. -
Add
.asSequence()to the end of the second line of code inmain(), afternumbers. Recompile and run the program again. How has the output changed? -
Add
.filter { it % 2 != 0 }to the end of that line. Recompile and run the program again. What do you see now? -
Add
.map { it * it }to the end of the line. Recompile and run again. What has changed? -
The filtering and mapping operations added in the previous steps did not themselves produce any data. They merely extended the sequence with additional stages of processing. To retrieve usable values from the sequence, you must add a terminal operation to it.
Add
.toList()to the end of the line, then recompile and run again. This time, you should see a list of the squares of the odd integers fromnumbers.
Task 8.4.2
-
The
tasks/task8_4_2subdirectory of your repository is an Amper project that explores the performance impact of using sequences. OpenBenchmark.ktin thesrcsubdirectory of this project and study the code in this file.The operation performed by this program involves reading lines of text from a file, filtering out the blank lines, then filtering out all the lines containing at least 10 characters, then converting the lines that remain into all lowercase.
This operation is performed in two different ways, with and without the use of
Sequence. The execution time of each implementation is measured and displayed. -
Also in
tasks/task8_4_2is a large text file, containing the entire text of Leo Tolstoy’s notoriously long novel War And Peace. The file is over 3 MB in size and contains over 66,000 lines. Take a moment to examine its contents. -
In a terminal window, go to the project subdirectory and then run the performance benchmark on the file, using this command:
./amper run war-and-peace.txt
-
The equivalent feature in Python is the generator. ↩
Writing Higher-Order Functions
When you write a function, you must declare the types of its parameters. But how do you do that when one of those parameters is itself a function?
The general syntax for specifying a function type is
( parameter-types ) -> return-type
For example, consider this predicate:
fun isEnglishVowel(c: Char) = c.lowercase() in "aeiou"
The type of this function is
(Char) -> Boolean
Now let’s write a higher-order function that has a parameter of this type.
Imagine that we need a function howMany() to count the number of
characters in a string that satisfy a given predicate. (There is actually
no need for such a function, as strings support the count() operation
already, but let’s pretend that this doesn’t exist…)
We could implement howMany() like so:
fun String.howMany(include: (Char) -> Boolean): Int {
    var count = 0
    for (character in this) {
        if (include(character)) {
            count += 1
        }
    }
    return count
}
Notice the String. prefix to the function name on the first line. This
defines howMany() as an extension function of the String class and
allows us to invoke it as if it were a method of that class.
howMany() has a single parameter, include, with a type of
(Char) -> Boolean: i.e., a function that takes a single Char and returns
a Boolean.
The for loop iterates over the characters of the string on which
howMany() has been invoked. We refer to that string using the special
variable name this.
Task 8.5
Try using the howMany() function described above.
-
In the
tasks/task8_5subdirectory of your repository, create a file namedCount.kt, containing the definition ofhowMany()shown above. Check that the code compiles before proceeding further. -
Add a
main()function that creates a string and then callshowMany()on it in various ways, using different lambdas as the argument.
Error Handling
In many object-oriented programming languages, run-time errors are handled using exceptions. You saw last year how this idea works in Python. Here, we take a deeper dive into the concept, using Kotlin.
You’ll notice many similarities between Kotlin’s approach and Python’s approach, but Kotlin provides some additional features that make it easy to create and intercept exceptions.
Another idea that you encountered last year, in both Python and C, is the idea of assertions. Assertions are a feature of unit tests, but they can also be used directly in production code (e.g., to help with debugging, or as a defensive programming technique).
After completing this section you will have a solid understanding of how exceptions work in Kotlin. You will not only be able to create them within your own code, but also intercept those that occur in other code that you are using. You will also be able to write Kotlin code containing assertions.
Error Handling Approaches
Example 1
Consider a function that writes lines of text to a file. The function is supposed to prevent the overwriting of a file that already exists:
import java.io.File
import kotlin.system.exitProcess

fun writeToFile(lines: List<String>, filePath: File) {
    if (filePath.exists()) {
        println("Error: $filePath already exists!")
        exitProcess(1)
    }

    // rest of function not shown
}
What do you think about this approach to error handling? Is it generally applicable? What drawbacks might there be?
If you’re in class, discuss these questions with the people sitting near you. If you are on your own, think carefully about these questions yourself. When you’ve finished discussing or thinking about them, click on the ‘Discussion’ heading below to reveal our take on these issues.
Discussion
Discussion
In some situations, this approach might be acceptable, but it isn’t generally applicable to all situations, because it makes specific assumptions about how the error is handled.
The most obvious issue is the assumption that the program should be terminated immediately. In some situations, it may be possible to ask the user to specify a different filename, avoiding the need to terminate the program.
A more subtle issue is the assumption that there is somewhere for the error
message to appear! When you run a program from a terminal, you will see
output appear in that terminal, but where does the output of println()
go when code like this is executed by a server?
Example 2
Now consider this function, which computes the variance for a numerical dataset:
fun variance(dataset: List<Double>): Double {
    if (dataset.size < 2) {
        return -1.0
    }

    val mean = dataset.average()
    val sumSquaredDev = dataset.map { it - mean }.sumOf { it * it }
    return sumSquaredDev / (dataset.size - 1)
}
Notice how the function returns the special value of -1.0 when there aren’t
enough data points to compute variance.
Is this better / more flexible than the approach followed in the previous example? What drawbacks might there be?
As before, discuss these questions with the people sitting near you, or think about them yourself. After discussing / thinking about them, click on the ‘Discussion’ heading for our take.
Discussion
Discussion
This approach improves on the previous example in some respects, because it makes no assumptions about how the error should be handled, but it has problems of its own.
One issue is that it won’t always be possible to find a special value that signals an error. In this case, returning a negative value works, because variance can never be negative—but there will be some functions for which every representable return value is potentially a genuine result of computation.
One option here would be to return a Pair, containing the result of
computation plus an error code that indicates whether that result is valid
or not, but that feels clumsy. Alternatively, we could return the result of
computation or null; we will discuss this idea further when we consider
nullable types.
A general problem with this approach is that the caller of a function is free to simply ignore any error code that the function returns.
Features of Exceptions
Exceptions have two key features that distinguish them from the approaches considered previously.
First, an exception is an object of a distinct type, used specifically to signal errors1. The type of the exception conveys information about the nature of the error, and further details can be provided via data stored inside the exception object.
Second, an exception cannot be ignored. When an exception occurs, it fundamentally changes the flow of control within a program. If no code is found to intercept and deal with an exception, it will halt the program.
Information Transfer
Exceptions are implemented as classes, with names that indicate the kind of error that they represent. These classes are typically organized into a hierarchy:
---
config:
  class:
    hideEmptyMembersBox: true
---
classDiagram
  Exception <|-- RuntimeException
  RuntimeException <|-- ArithmeticException
  RuntimeException <|-- IllegalArgumentException
  RuntimeException <|-- IndexOutOfBoundsException
  IllegalArgumentException <|-- NumberFormatException
Note that classes lower in the hierarchy represent more specialized types of error.
Aside from conveying information via the name of its class, an exception has
a String property named message that can be used to give further details
of the error. This property can be given a value when you create an exception
object.
For example, the variance() function discussed previously could signal an
insufficient amount of data using this exception object:
IllegalArgumentException("not enough data")
The class name tells us that the argument supplied to variance() is not
suitable, and the string provides details of why that is the case.
The standard exception types will often meet your needs, but sometimes it is useful define your own exception class, and Kotlin makes this very easy to do:
class MyException(message: String) : Exception(message)
There are basically three reasons why you might want to do this:
- You want to convey more information about the error, via the name of the class
- You want to be able to easily intercept this specific type of exception
- You want to add more information to the exception, beyond a basic error message
For example, consider the writeToFile() function discussed earlier. If
writing to the file fails, you might want to indicate this via a dedicated
exception that includes the line number on which failure occurred. You
could define a suitable exception class like this:
class TextException(msg: String, val line: Int) : Exception(msg)
Don’t worry about understanding the syntax here. We will discuss it properly when we cover classes and inheritance later.
Flow Of Control
-
Open the file
Control.kt, which is in thetasks/task9_2subdirectory of your repository. Study the code, then compile and run the program.Examine the output. This shows you that
main()calls the functionfirst(), which in turn callssecond(). This stack of function calls then ‘unwinds’:second()finishes normally, thenfirst(), thenmain(). -
A line of
second()that causes an exception has been commented out. Uncomment it now, then recompile the program and run it again. How has the behaviour changed?
The key point to note from this demo is that none of the messages about
leaving a function are printed. When the exception occurs inside
second(), it prevents any of the other code from running2. The only
way to regain control over program execution is to catch the exception.
The additional information displayed here is known as a stack trace. It shows details of the call stack at the time of the exception, and is very useful for debugging.
When you see a stack trace like this, work your way down from the top, moving pass any references to library code in which the exception may have originated, until you reach the first reference to your own code. This will give you a filename and a line number, showing you where you can begin your investigation into what caused the error.
-
This is not true of all languages. In C++, for example, it is possible to use values of almost any type as exceptions. ↩
-
This is true for this specific example, but other code can run in cases where
finallyhas been used. ↩
Throwing Exceptions
To signal an error from your own code, you must create an exception object
and then throw it. Kotlin allows you do to this directly, via the throw
statement, or indirectly, using one of its precondition functions.
Direct Use of throw
Consider the variance() function discussed earlier. Instead of returning
-1.0 to signal an error, you could do this instead:
fun variance(dataset: List<Double>): Double {
    if (dataset.size < 2) {
        throw IllegalArgumentException("not enough data")
    }
    ...
}
Remember that exceptions change flow of control completely. No other part
of the variance() function will execute once the exception is thrown.
Remember that flow of control will be affected in the code that called
variance(), too.
Precondition Functions
You can also throw certain exceptions using the functions require(),
check() and error(). These typically require a little less code than
throwing the exception directly yourself, but their main benefit is that
they can make the intention of your code clearer.
require() will throw IllegalArgumentException if the boolean expression
specified as its first argument evaluates to false. The message associated
with the exception is provided by an optional second argument, which is
a lambda expression.
For example, the error handling for variance() could be written like
this:
fun variance(dataset: List<Double>): Double {
    require(dataset.size > 1) { "not enough data" }
    ...
}
Notice how clear and readable this is.
check() will throw an IllegalStateException if the boolean expression
supplied as its first argument evaluates to false. The message associated
with the exception is provided by an optional second argument which is,
again, a lambda expression.
error() is the simplest of the three functions. It takes an error message
as its sole argument and throws an IllegalStateException with that message.
require() is a neat way of verifying the prerequisites needed for a
successful function call, before any further computation is attempted,
whereas check() is intended for use later on in a function’s code, for
the purpose of checking whether computation is proceeding as expected.
Together, these two functions fulfil a similar role to assert statements
in C & Python.
Catching Exceptions
You can regain control over a program in which an exception has been thrown by catching that exception. Kotlin provides direct and indirect ways of doing this.
try…catch
The direct way of catching exceptions involves putting code that might
cause an exception inside a try block. This block is immediately followed
by one or more catch blocks:
try {
    // code that might cause an exception
}
catch (error: MyException) {
    // specific exception handling code
}
catch (error: Exception) {
    // more general exception handling code
}
Each catch block specifies the type of exception that it will intercept.
The code inside the block specifies your response to the matching exception.
The catch blocks are processed in the order in which they appear, with the
first matching block being executed and all subsequent blocks being ignored
(even if they would also match). If no match is found, the exception will
continue to propagate outwards.
An important point to understand is that a catch block written to
intercept an instance of a particular class of exception will also intercept
instances of subclasses.
So, referring to the earlier diagram, a catch block that intercepts
IllegalArgumentException will also intercept NumberFormatException, and
a block that intercepts Exception will catch all types of exception.
Let’s see how this works in practice.
-
Open the file
Catch.kt, in thetasks/task9_4subdirectory of your repository. Study the code carefully. -
Compile
Catch.kt, then run the program with a variety of inputs to see how it behaves. Use your observations to help you answer the questions in the following quiz.
Exception Handling Tips
-
Don’t micromanage exceptions.
Whilst it might seem tempting to give each potentially exception-causing function call its own enclosing
tryandcatch, this will quickly make your code cluttered and hard to read. -
Organize
catchblocks so that the more specialized exception types are caught first.Remember that a
catchblock that targetsExceptionwill catch all kinds of exception. If you have multiplecatchblocks, it should be the last one. -
Don’t throw an exception yourself and then immediately catch it.
Remember: throwing an exception at one point in your code signals that you don’t know how to deal with an error (or that you don’t want to make assumptions about how to deal with it). Catching the exception should happen at a point where you are able to take on the responsibility for handling the error.
These two points should be at different locations in your code. If you find yourself tempted to signal an error and handle it within the same context, then there really isn’t any point in throwing the exception in the first place!
finally
You can optionally follow your catch blocks with a finally block. The
code in this block will always execute, regardless of whether an exception
has occurred in the try block. This can be useful when working with
files or network connections, as you can then ensure that these have been
properly closed.
try {
    // code that might cause an exception
}
catch (error: MyException) {
    // code that runs if MyException occurs
}
finally {
    // code that always runs, with or without an exception
}
It’s also possible to pair try directly with finally, i.e., have no
catch blocks at all. The try…finally structure is useful if you
don’t want to catch any exceptions but want to guarantee the clean-up of
resources1.
You can never have a try block on its own. It must always be followed
immediately by a catch block, or a finally block.
runCatching()
The runCatching() function runs the given block of code, catching
any exceptions that occur within that block. It returns a Result
object that encapsulates any value returned from that block of code, and
details of the caught exception (if one was thrown).
You can access the isSuccess or isFailure boolean properties to see
whether the block of code ran successfully, or failed with an exception.
You can retrieve the value returned from the block of code2 using the
method getOrNull(). This value will be null if execution of the block
failed and an exception was caught.
You can retrieve the caught exception using the method exceptionOrNull().
This will yield null if execution succeeded and no exception was caught.
Here’s an example of how you might use runCatching():
val result = runCatching {
    // code that could produce exceptions
}

if (result.isFailure) {
    println("Task failed with an exception:")
    println(result.exceptionOrNull())
}
In this example, the message associated with the caught exception is printed, but you could do something more sophisticated here—e.g., retrieve the full stack trace and write it to a log file.
runCatching() doesn’t do anything you couldn’t do already using try and
catch blocks. It’s main benefit lies in making your code easier to read.
-
It should be noted that Kotlin has some neater ways of ensuring that files or other open resources are always closed properly—e.g., the
use()extension function. ↩ -
This value could be
Unit—meaning that execution succeeded, but didn’t produce a value that can be used in other computation. ↩
Assertions
You can make assertions using the assert() function, from the Kotlin
standard library. This fulfils a similar purpose to Python’s assert
statement, or C’s assert macro.
Here’s an example, with the equivalent code in Python & C provided for comparison:
fun processText(text: String) {
    assert(text.length > 0)
    ...
}
def process_text(text):
    assert len(text) > 0
    ...
#include <assert.h>
#include <string.h>

void process_text(const char* text)
{
  assert(strlen(text) > 0);
  ...
}
The example above looks very similar to the precondition functions that
we saw earlier. We could easily replace the use of assert() with
a call to require():
require(text.length > 0)
But these two approaches are subtly different.
require() is ‘always on’. It will always throw an IllegalArgumentException
if its argument evaluates to false.
assert(), on the other hand, is ‘off by default’. It will do nothing unless
assertions have been enabled on the JVM. If they are enabled, and its argument
evaluates to false, then AssertionError will be thrown.
Thus require() is better suited to situations where run-time errors might
be expected to occur from time to time, whereas assert() is better suited
to situations where we are not expecting problems but want to have a ‘sanity
check’ that can be enabled at run time when needed.
To enable assertions, it is necessary to pass the -ea command line option
to the JVM. For example, if you have an application that has been compiled
into a portable JAR file named app.jar, you would need to run it with either
of these commands:
kotlin -J-ea app.jar
java -ea -jar app.jar
In Python and C, assertions are ‘on by default’, and need to be disabled
manually. In Python, you would do this by running the python command with
the -O command line argument. In C, you would do it by defining a special
preprocessor symbol, NDEBUG, prior to the point where assert.h gets
included into the source code.
Task 9.6
-
In the
tasks/task9_6subdirectory of your repository is an Amper project for a program to compute variance in a numeric dataset. Source code files for this program are in thesrcsubdirectory of this project.Open the source code file named
Funcs.ktand add thevariance()function discussed earlier. Your implementation should test whether the provided list has enough values usingrequire(). -
To check that you’ve implemented
variance()correctly, go totasks/task9_6in a terminal window and run the unit tests for this function with./amper testMake sure the code compiles and the tests all pass before proceeding any further.
The tests are in
test/VarianceTest.kt. Take a few minutes to study this code.This is a ‘sneak peak’ at some of the more advanced features of Kotest, which we will cover in Unit Testing (Part 2)…
-
Add a function to
Funcs.ktthat will read data from a file and return it as a list ofDoublevalues:fun readData(filename: String) = buildList { File(filename).forEachLine { add(it.toDouble()) } }Note: you will also need to add
import java.io.Fileat the top ofFuncs.kt.Check that the code compiles with
./amper build -
Now open
Main.kt. In this file, write amain()function that expects a filename to be supplied on the command line. Your program should use thereadData()andvariance()functions to read a dataset from that file and then compute its variance. Your program should display both the size of the dataset and the variance, formatting the latter to five decimal places.Use
tryandcatchblocks orrunCatching()to intercept exceptions that might occur. Display some information about the caught exception and then terminate the program with a non-zero status code.Once again, check that the code compiles with
./amper build -
Try running the program without a command line argument, and then with the name of a file that doesn’t exist:
./amper run
./amper run file-that-does-not-exist
Both of these should result in errors. The second of them should be dealt with by your exception handling code.
-
Create the following test files:
- An empty file
- A file containing a single number
- A valid file, containing only numbers (one per line)
- A file that mixes numeric & non-numeric data
Run the program on each of these, to check that it behaves as expected.
Null Safety
Nulls are a feature of many programming languages. They can be useful, as a way of indicating the absence of a meaningful value, but they can also cause problems. A common run-time error in Java applications, for example, is the null pointer exception (NPE).
One of Kotlin’s most compelling features is that it can handle nulls safely and elegantly. As a result, NPEs rarely occur in Kotlin applications.
After completing this section, you will understand why it is important for Kotlin to be strict about how null values are handled. You will also be able to work with nullable types in your code and perform the required null checks efficiently.
An Example
-
Go to the
tasks/task10_1subdirectory of your repository and open the fileNull.ktin your editor. Study the code carefully.This program has a function
printReversed(), which prints a reversed, uppercased version of the string passed to it.The
main()function contains code to read a string from the user, print it, then invokeprintReversed()on it. The last of these operations is currently commented out. -
Compile the code and run it. Enter some text when prompted.
-
Try running it again, but this time press
Ctrl+Dwhen prompted for input. What happens? -
Uncomment the final line of
main(), then try compiling the program again. What message you do see from the compiler?
Explanation
Explanation
At first, before uncommenting that final line of main(), the program
compiles and runs as you would expect. Entering some text results in that
text being displayed. However, if you press Ctrl+D you should see
the word “null” displayed.
This happens because readLine() is used to read input from the console.
Unlike readln(), which throws an exception when the input stream is closed,
readLine() returns the special value null instead.
When you uncomment the last line of main(), the program will no longer
compile. The error message complains of an argument type mismatch:
actual type is 'String?', but 'String' was expected
But what does this mean, and how do we fix it?
Read on for answers to those questions…
Nullable Types
Basic Concept
To understand the compilation error in Null.kt, you must first understand
that the data types we normally use in a Kotlin program are non-nullable.
This means that an Int variable or a String variable, for example,
cannot have the value null.
This is quite useful. It means we can invoke a method or extension function
on an Int, a String or an instance of some other data type with complete
confidence, knowing that there is definitely an object there, on which the
requested operation can be performed.
However, nulls can also be useful. For example, if a function is not able to generate a sensible return value, it can be useful to signal this by returning a null, rather than by throwing an exception.
Besides, it is actually necessary for Kotlin to support the use of nulls, because Kotlin is supposed to integrate seamlessly with Java, and object references in Java can implicitly be null.
Kotlin addesses this by having a parallel type system, consisting of
nullable variants of the standard non-nullable types. These nullable variants
have the same name as their non-nullable counterparts, but with a ?
appended. Thus Kotlin has Int? to represent nullable integers, String?
to represent nullable strings, and so on.
The use of ? as a suffix is a clever mnemonic device. You can think of
Int?, for example, as meaning “could be an integer or could be null”,
whereas Int means “definitely an integer”.
It’s important to understand that there is no extra code required here.
The Kotlin standard library doesn’t have code to implement the String
class, plus additional code to implement the String? class.
Instead, you should think of nullability as a ‘label’ attached to a type
declaration to indicate a degree of uncertainty. It means that “a variable
of this type might represent the value null instead of a useful value”.
Now we can finally explain why the compilation error in Null.kt occurs.
The function readLine() has a return type of String?, meaning it might
return a String object or it might return a null. Thus the type of
variable input is also String?. The error occurs because printReversed()
is expecting a non-nullable string as an argument, but it is being given
a nullable string.
The Kotlin compiler is strict about using a value of a nullable type in places where a value of a non-nullable type is expected. It will allow this only if we explicitly check the value first, to make sure that it is not null.
Benefits of Strictness
To understand why Kotlin’s strict requirement for null checks is a good idea, consider what happens in the Java language.
In Java programs, there is always the possibility that an object reference
might be null, but the compiler doesn’t require references to be checked
before use. If a program attempts to invoke a method on an object but the
object reference is null, the result is a runtime error—specifically,
a NullPointerException (NPE).
NPEs can always be avoided through more careful programming, but Java developers often aren’t careful enough. Sometimes, an NPE ‘leaks out’ of an application and is embarrassingly visible to users—as in this example from 2018, of an NPE in a banking app:
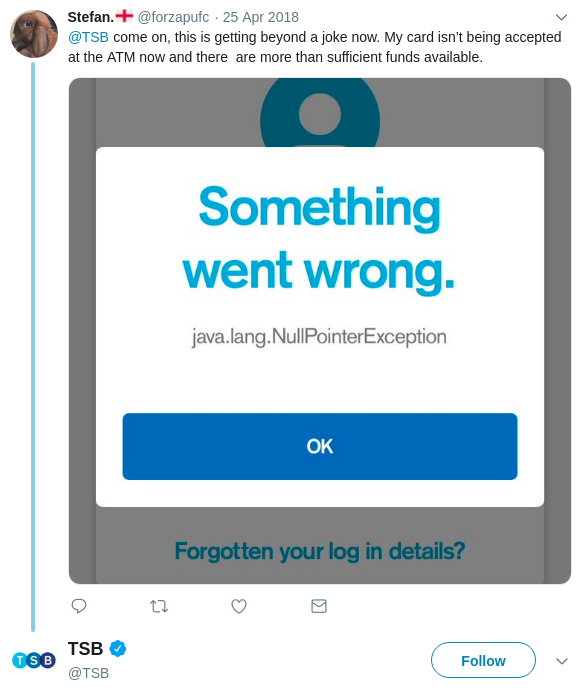
This problem is much less common in Kotlin applications, thanks to the strictness of the Kotlin compiler and the ease with which null checks can be performed.
Null Checks
Fixing the compiler error in Null.kt requires that we add a null check.
We can do this using an if or when expression (although there are
better ways, which we will consider shortly).
First Approach
The most obvious fix is to do a null check before calling printReversed().
-
Edit the file
Check1.kt, in thetasks/task10_3_1subdirectory of your repository. This is basically the same asNull.kt, with the last line ofmain()uncommented.We’ve already seen that this final line, invoking
printReversed(), causes a compiler error. Replace it now with this code:when (input) { null -> println("Result: null") else -> printReversed(input) } -
Try compiling the program. This time, it should compile successfully.
-
Test the program by running it with different inputs. Try pressing
Ctrl+Dwhen prompted.
Think about what is happening here. The when expression creates two
execution paths for the program: in the first, input is known to have the
value null; in the second, we have established that input is NOT equal
to null, so it must therefore be a valid string.
In this second branch, the compiler is happy to treat the String? object
as if it had been a String object all along, and we are free to use it as
an argument to printReversed(). This is sometimes referred to as
smart casting.
Note that there is no conversion of one object into another taking place here, and therefore no runtime cost, aside from the cost of doing the null check in the first place. You can think of nullability as a kind of label attached to an object, indicating uncertainty. Examining the object via a null check removes the uncertainty and erases that label.
Second Approach
An alternative approach is to leave the main program as it is and instead
change the definition of printReversed() so that it can handle nullable
strings.
-
Edit the file
Check2.kt, in thetasks/task10_3_2subdirectory of your repository. This is basically the same asNull.kt, with the last line ofmain()uncommented. -
Modify the
printReversed()function so that it looks like this:fun printReversed(text: String?) { when (text) { null -> println("Result: null") else -> println("Result: ${text.reversed().uppercase()}") } }Notice what has changed here. The function parameter now has the type
String?instead ofString. As a consequence of this, we have to do the null check inside the function, before attempting to reverse and uppercase the supplied string. -
Try compiling the program. It should compile successfully.
-
Test the program by running it with different inputs. Try pressing
Ctrl+Dwhen prompted. It should behave in exactly the same way asCheck1.kt.
The Safe Call Operator
Basic Concept
Kotlin makes writing null-safe code a lot easier than Java does, first by controlling the locations where null checks ought to be done, and second by giving us more elegant tools for doing those checks.
The first of these tools is the safe call operator, ?.
You are already familiar with ., the regular call operator. We use this
whenever we need to invoke a method or extension function on an object,
or access one of its properties. The Kotlin compiler won’t allow use of .
on an instance of a nullable type, unless a null check has been done—but
it will allow ?. to be used with nullable values.
In effect, the safe call operator does the null check for us, as well as invoking the specified method or function if the null check establishes that the value is not null.
For example, if text is a variable of type String?, we can invoke the
reversed() extension function on this variable like so:
val result = text?.reversed()
If text is null, nothing else occurs and null will be assigned to
result. If text is not null, the function will be called and the value
of result will be whatever the function returns—in this case, the
contents of text, in reverse order.
Call Chains
If you have a call chain, you will need to repeat the use of safe call along the chain:
val result = text?.reversed()?.uppercase()
If the calls made in the chain are to functions that don’t themselves
return nullable values, this can needlessly repeat the null checks—in
which case, a more efficient approach is to use safe call once, in
combination with the let() scope function:
val result = text?.let { it.reversed().uppercase() }
The argument passed to let() is, of course, a lambda expression… 😉
You can read this code as “if text is not null, let it be reversed and
then uppercased, to produce a value for result”.
Task 10.4
-
Copy
Check2.ktfrom thetask10_3_2subdirectory of your repository to thetask10_4subdirectory. Rename the copy toSafeCall.kt. -
Edit
SafeCall.ktand apply what you’ve learned about safe calling to simplify the definition ofprintReversed().You should be able to replace four lines with a single line of code.
-
Compile and run the program. It should behave in exactly the same way as
Check2.kt.
The Elvis Operator
Basic Concept
A common requirement is to evaluate an expression and, if the result is null, substitute a non-null ‘default value’ in its place. This can, of course, be done using an explicit null check:
val result = when (text) {
    null -> "☹️"
    else -> text.reversed().uppercase()
}
But Kotlin provides another simplifying tool for this, the
elvis operator, ?:
Note: the technical term for this is the ‘null coalescing operator’, but pretty much everyone calls it the elvis operator, because it looks like Elvis Presley when rotated clockwise!

The example above can be written much more concisely using a combination of the safe call and elvis operators:
val result = text?.reversed()?.uppercase() ?: "☹️"
The value of result will be determined by the expression to the left of
elvis if that expression evaluates to anything other than null; otherwise,
it will be determined by evaluating the expression to right of elvis.
Task 10.5
-
Copy
SafeCall.ktfrom thetask10_4subdirectory of your repository to thetask10_5subdirectory. Rename the copy toElvis.kt. -
Modify the code in
SafeCall.ktusing the elvis operator, so that it prints the string???as the result if the user pressesCtrl+Dwhen prompted for input. -
Compile and run the program to verify that it behaves correctly.
Other Examples
When we looked at maps, we saw that you can access stored values using
getOrElse(). This returns the value associated with the given key if that
key is present, or else the result of executing the given lambda
expression if it is not.
prices.getOrElse(item) { 15 }

prices.getOrElse(item) {
    throw NoSuchElementException("No price for $item")
}
You can achieve the same results more concisely, using [] and the
elvis operator:
prices[item] ?: 15

prices[item] ?: throw NoSuchElementException("No price for $item")
…OrNull()
Because Kotlin is good at dealing with nulls, there are a number of functions in the Kotlin standard library that return null.
For example, there is a readlnOrNull() function to go alongside
readln(). It does the same things as readln(), except that it returns
null if the input stream is closed rather than throwing an exception1.
When we considered input from the command line or console, we saw that
the strings obtained from the user can be converted to other types with
functions such as toInt(), toLong(), toFloat(), toDouble(). Each
of these throws an exception if the string cannot be parsed successfully,
but there is also an …OrNull() version of each of them that returns
null when parsing fails.
When we considered collection types, we saw that there are extension
functions like min(), max(), minBy() and maxBy(), for finding
minimum and maximum values. Each of these throws an exception if invoked
on an empty collection, but there is also an …OrNull() version of
each of them that returns null for empty collections.
Notice the pattern here: for each function that throws an exception if an
operation can’t be carried out successfully, there is a counterpart, with
OrNull appended to its name, that returns null if the operation can’t be
carried out. This means we often have two distinct options for handling
failed operations in our code.
-
readlnOrNull()does effectively the same thing as the now-deprecatedreadLine(). ↩
Object-Oriented Modelling
In this section, we take a short break from Kotlin and turn our attention to the object-oriented development paradigm.
We start with a recap of some essential object-oriented concepts (what an object is, what a class is, etc). You can skim over this subsection quickly if you understand these concepts fully, either from prior experience or last year’s coverage of them.
After that, we consider some techniques for the determining which classes are needed to fulfil the requirements of a software application.
We conclude the section with a look at the syntax for UML class diagrams and some different approaches to drawing these diagrams.
Objects & Classes
The Procedural Perspective
Our exploration of Kotlin thus far has covered how to organize software in a modular fashion as a collection of functions. This is similar to how you wrote C programs last year.
This approach is sometimes described as procedural programming.
The procedural paradigm reflects a ‘task-oriented’ perspective, in which the overall task we want the software to carry out is decomposed into a number of smaller sub-tasks, which themselves might be decomposed into even smaller elements.
These various sub-tasks are mapped onto discrete, self-contained units of code, described as procedures, subroutines or functions, depending on the programming language used. (In C & Kotlin, for example, we describe them as functions.)
Some functions will handle the low-level detail. Others will orchestrate things by sequencing calls to those lower-level functions. Some functions may even call themselves, a process known as recursion. (We looked at this idea briefly last year.)
With this perspective, the most important things to focus on in a description of the task are the verbs and verb phrases. These will provide clues about some of the functions that you will need to implement. The nouns and noun phrases will give you information about the kinds of data that will need to be provided as input to these functions, and the kinds of data that they will produce as output.
However, this isn’t the only way of looking at a problem, nor is it the only way of structuring software that solves that problem.
The Object-Oriented Perspective
The classic 1913 edition of Webster’s Dictionary defined the word ‘system’ like this:
An assemblage of objects arranged in regular subordination, or after some distinct method, usually logical or scientific; a complete whole of objects related by some common law, principle, or end; a complete exhibition of essential principles or facts, arranged in a rational dependence or connection; a regular union of principles or parts forming one entire thing; as, a system of philosophy; a system of government; a system of divinity; a system of botany or chemistry; a military system; the solar system.
For a long time, humans have understood this idea of systems as collections of interacting, ‘rationally dependent’ objects. Take the solar system, for example. This is a collection of various objects (the Sun, Venus, Earth, Jupiter, etc). These objects interact with each other according to the theory of gravitation developed by Isaac Newton and later refined by Albert Einstein.
If it is useful to think of systems in the real world as being collections of interacting objects, then it follows that this may also be a useful way of structuring software that models such systems.
For example, in software that manages books in a library, it may be useful to imagine two objects: one representing a person who is a member of the library, and the other representing a book they might want to borrow.
To handle borrowing a book, these objects exchange messages. The object representing the library member first sends a message to itself, asking whether it is allowed to borrow more books (which will involve checking that the number of books currently borrowed is below some specified limit).
If further borrowing is allowed, the object representing the library member then issues a ‘borrow’ request to the object representing the book. The latter replies to indicate whether borrowing succeeded. (It might fail if there are no remaining copies of the book on the shelves.)
The Challenge of Object-Oriented Thinking
In his 1896 paper Some Preliminary Experiments in Vision, the psychologist George M Stratton reported on his experiences of viewing the world through upside-down goggles. Initially, he found this nauseating, but after a few days he found that he adapted fully to this strange new perception of his environment.
Moving from a procedural view of software systems to an object-oriented view can be similarly disorienting at first. Much like Stratton’s goggles, it turns things upside down. Instead of the verbs and verb phrases being the focal point, now it is the nouns and noun phrases that are of primary importance, as these provide clues to the objects that will exist in the system. The verbs and verb phrases still matter, as they will provide information about the nature of the messages that need to pass back and forth between the objects, but they are not the prime focus of our thinking.
Just as Stratton adjusted to his new perception, viewing software systems with your ‘object-oriented goggles’ will feel more natural in time, even if you struggle with it to start with.
What Are Classes?
Systems consist of objects, but those objects fall naturally into particular categories or classes.
The solar system, for example, contains objects named the Sun, Venus, Earth, Jupiter, etc. But these objects are not all of the same type. The Sun is a star, whereas Venus, Earth and Jupiter are all planets.
Star and Planet are classes. The object named ‘The Sun’ is an instance of the Star class. The objects named Venus, Earth and Jupiter are all instances of the Planet class.
In software, a class specifies the attributes that describe objects of that class, and the operations that can be performed on or by objects of that class. All instances of the class will have these attributes, and all instances will support the specified set of operations.
A software class is a simplified abstraction of a real-world class. Rather than attempting to provide a complete model of the real-world class, It will specify only those attributes and operations that are pertinent to the software being developed.
When a class is implemented in an object-oriented programming language, the attributes are mapped onto a set of variables typically known as instance variables or fields. (In Kotlin, we use the term properties.) The values of these variables collectively represent the state of an object of that class. Two objects in identical states are nevertheless distinct from each other, i.e., they each have their own unique identity. (In practical terms, this means that they occupy different addresses in memory.)
The operations we have specified for a class are implemented as member functions or methods of the class. These look a lot like regular functions, except that they have privileged access to the fields of the class. Some methods will query object state, whereas others will change the state of an object. The latter are sometimes described as mutator methods.
Origins & Philosophy
The idea of classes originated with the Greek philosopher Plato (428–348 BC).
Plato suggested that each object in the world was made in the image of a perfect, ideal form, which provided the template for its creation. He believed that there was an immaterial ‘universe’ of these ideal forms.
This fits remarkably well with how classes work in software. A class definition is indeed a kind of template for objects of that class, specifying not only how to create instances of the class but also how those instances are subsequently allowed to behave.

(Greek philosophers Plato (left) and Aristotle, in Raphael’s painting “The School of Athens”)
Plato’s student Aristotle (384–322 BC) set out to find the “common and distinguishing properties of all things, from the most primary object down to the tiniest details”.
Like Plato, he regarded objects as belonging to specific categories or classes. He proposed that the ‘essence’ of a class derives from two sources: the ‘genus’ and the ‘differentia’.
The genus is the set of characteristics provided by a parent class, whereas the differentia are the extra characteristics that distinguish the class from its parent and its sibling classes.
This idea from ancient Greece turns out to be extremely important when we consider how to organize software as a hierarchy of classes. We will consider this further in the section on inheritance.
OO Analysis Techniques
Overall Goal
The goal of object-oriented analysis is to come up with a high-level model of the system as a collection of collaborating classes.
The process of identifying objects and classes, and how they relate to each other, is not an exact science. It isn’t necessary to get this right first time; indeed, it is entirely normal to refine an object-oriented model as we learn more about the system and how it is supposed to work.
Object-oriented analysis and design are thus fundamentally iterative in nature, like many aspects of software development.
A number of techniques have emerged for creating a high-level class model of a system. Two of the most popular are noun identification and CRC cards. Typically, these are used in conjunction with each other to analyze a problem domain and come up up with an OO model.
Noun Identification
The starting point for this technique is the text of a particular use case or user story, i.e., a description of something that the software will need to do.
Step 1 is to underline all the nouns and noun phrases in the text. These, reduced to their singular form1, become the initial set of candidate classes.
Step 2 involves discarding candidates that are deemed inappropriate for any reason, and also renaming initial candidates if necessary.
Here are some reasons why we might discard a candidate class:
- Redundant
- Vague
- Attribute of another class
- Event or operation
- Meta-language
- Outside scope of system
Redundancy occurs when you have multiple noun phrases that all refer to the same thing. Pick one noun to use as the name of the class and discard all the others.
Vagueness arises when you can’t tell unambiguously what is meant by a particular noun. You need to clear up that ambiguity before you can say whether the noun should be a class.
An attribute of another class will typically be a noun representing
something that is too simple to be a class itself. For example, a customer’s
name can just be a string attribute of a Customer class; it almost certainly
doesn’t need to be a class itself.2
Some nouns may refer to an event or operation: something that is done to, by, or in the system. Sometimes it is helpful for these things to be classes themselves, but often this is not the case. Ask yourself whether the thing has state, behaviour and identity: if so, it should be represented with a class; if not, it can be discarded.
Meta-language includes nouns that are part of the way that we define things. For example, the text of a use case or user story may use words like ‘feature’ or ‘system’. These are part of the language we use to describe requirements. They should not be classes themselves.
Some nouns represent things that are outside the scope of the system.
For example, in an e-commerce application, we wouldn’t have a class named
Shop, to represent the place from which a customer purchases items.
The classes we choose should generally be things that are inside the system
being modelled.
Example
Consider a university library that offers books and journals on loan to students and members of staff. Here are two paragraphs describing how the loan system should operate, with the nouns & noun phrases underlined:
The library contains books and journals. It may have several copies of a given book. Some of the books are for short term loans only. All other books may be borrowed by any library member for three weeks. Members of the library can normally borrow up to six items at a time, but members of staff may borrow up to twelve items at one time. Only members of staff may borrow journals.
The system must keep track of when books and journals are borrowed and returned, enforcing the rules described above.
The underlined things are the initial candidate classes. From this list, we would discard:
- Library (outside scope of system)
- Short term loan (loans are really events)
- Week (measure of time, not a useful thing)
- Member of the library (redundant: duplicate of ‘library member’)
- Item (vague: really means book or journal)
- Time (outside scope of system)
- System (meta-language)
- Rule (meta-language)
This leaves us with
- Book
- Journal
- Copy (of book)
- Library member
- Member of staff
This is only an initial model, and it may be refined further. For example,
we might later realize that all copies of a book are identical, so it will
be sufficient to just count them and represent this as an attribute of
the Book class.
CRC Cards
CRC cards are a long-established technique for checking and further refining an object-oriented model. The acronym ‘CRC’ stands for “Class, Responsibilities, Collaborations”.
The idea is fairly simple. For each class, you create a ‘card’ with the name of the class at the top. Underneath the name, you list the responsibilities of the class on the left side of the card, and the collaborators of the class on the right side.
The list of responsibilities captures, at a high level, the purpose of the class. They explain what it does, and why it is needed.
The list of collaborators identifies the other classes that help this class fulfil its responsibilities.
CRC cards are traditionally created as physical index cards that can be placed on a large table and rearranged as necessary while a team of developers discusses the design of the system. A variation on this idea uses Post-it notes stuck to a whiteboard, or stuck onto paper sheets that can be mounted on a wall later.

The class name and its responsibilities are written on the note. Collaborators are shown by drawing lines on the whiteboard or the backing paper, linking the note to other notes.
It’s usually easier to identify responsibilities than collaborators at first. The list of collaborators will typically grow as the team discusses the classes and explores how these classes might work in concert with each other.
Too many responsibilities indicates that a class has low cohesion.
Too many collaborators indicates that a class has high coupling.
Systems are easier to develop, test, maintain and extend if they are composed of highly cohesive classes that are loosely coupled with each other.
Example
Let’s consider the classes emerging from the earlier noun identification example.
The most important of these classes are LibraryMember, Copy and Book.
The CRC cards for these classes might look like this:
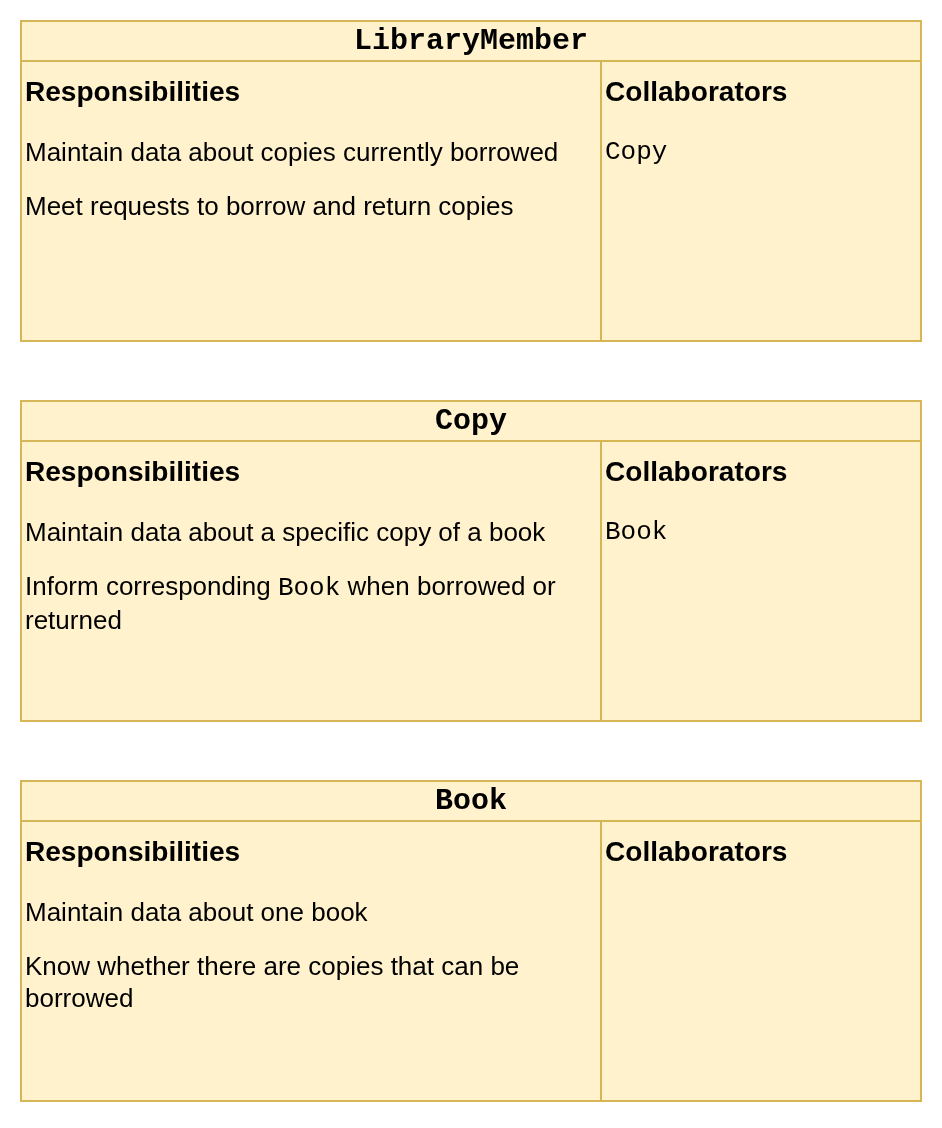
-
A class describes a singular thing. Thus ‘Bank Account’ is a class, but ‘Bank Accounts’ is not. ↩
-
Sometimes it isn’t clear whether something should be represented with a simple data type or a dedicated class. In such situation, pick one option and then refine the design or refactor your code later, when you’ve learned more about the system. ↩
UML Class Diagrams
What Is UML?
UML, Unified Modelling Language, is an international standard for visual modelling of software systems. It includes specifications for thirteen different diagrams that support all stages of the software development process.
One of the most important and widely used of the UML diagrams is the class diagram.
Like any international standard that tries to meet the varied needs of many different stakeholders, UML is very large and extremely complex. Most software developers use only a small subset of its features, and they often use these features in a relatively informal way.
We will follow this more limited, informal approach in COMP2850.
A good resource for learning more about using UML in a relatively lightweight manner is Scott Ambler’s Agile Modeling website.
Simple Classes
The simplest possible representation of a class is a rectangle, containing the class name:
---
config:
  theme: neutral
  look: handDrawn
  class:
    hideEmptyMembersBox: true
---
classDiagram
  class Student
This simple representation is typically adopted in the early stages of analysis, when we are focused on which classes might be needed to model a system, and how they might relate to each other:
---
config:
  theme: neutral
  look: handDrawn
  class:
    hideEmptyMembersBox: true
---
classDiagram
  Lecturer -- Module : teaches
  Student -- Module : enrols on
Notice how the relationships between these classes are drawn as solid lines, labelled to describe the nature of the relationship. This is the syntax for associations. We consider associations and other types of class relationship in more detail later. We will defer further discussion of UML syntax for relationships until then.
Adding Detail
Classes can include details of their attributes, their operations or both. In this representation, we divide the rectangle into three compartments. The class name occupies the top compartment, the attributes are listed in the middle compartment, and the operations are listed in the bottom compartment:
---
config:
  theme: neutral
  look: handDrawn
---
classDiagram
  direction LR
  Student -- Module : enrols on
  class Module {
    moduleCode
    title
    numCredits
    enrolStudent()
  }
  class Student {
    name
    degreeProgramme
    levelOfStudy
  }
In the example above, neither the attribute lists nor the operations lists are
complete. Also, we have not specified types for the attributes, nor have we
provided information on parameters and types for the enrolStudent()
operation.
This is entirely normal. The amount of detail shown for a class is a choice made by the analyst, based on how much is currently known about the class and what information the class diagram is intended to convey.
Design-Level Diagrams
Class diagrams differ in appearance, depending on whether they are drawn at the analysis level or the design/implementation level.
A design-level class diagram contains more detailed information about classes. On such a diagram, we would specify some or all of the following:
- Attribute types
- Attribute visibility
- Type of value returned by an operation
- Parameters needed by an operation (names and types)
This information provides further guidance to the programmer tasked with implementing the classes on the diagram.
For example, a design-level version of the class diagram above might look like this:
---
config:
  theme: neutral
  look: handDrawn
---
classDiagram
  Student -- Module : enrols on
  class Module {
    moduleCode: String
    title: String
    numCredits: Int
    enrolStudent(student: Student)
    generateTranscript(student: Student)
  }
  class Student {
    id: Int
    name: String
    degreeProgramme: String
    levelOfStudy: Int
  }
It often isn’t necessary to draw class diagrams with this level of detail.
Teams following an agile software development approach will often move directly from less detailed analysis-level class diagrams to implementations.
Diagramming Tools
Simple Tools
Agile software development approaches advocate use of the simplest tools possible that allow a team to meet its goals. Rather than reaching immediately for a software application to draw your diagrams, consider whether simpler tools might be easier and more inclusive.
When your team is able to gather in one place, tools such as whiteboards, flipcharts, Post-it notes and index cards can be very effective at facilitating collaborative design and diagramming activities. There is no learning curve to negotiate when using them, and diagrams can be redrawn quickly and easily as the team explores different design ideas.
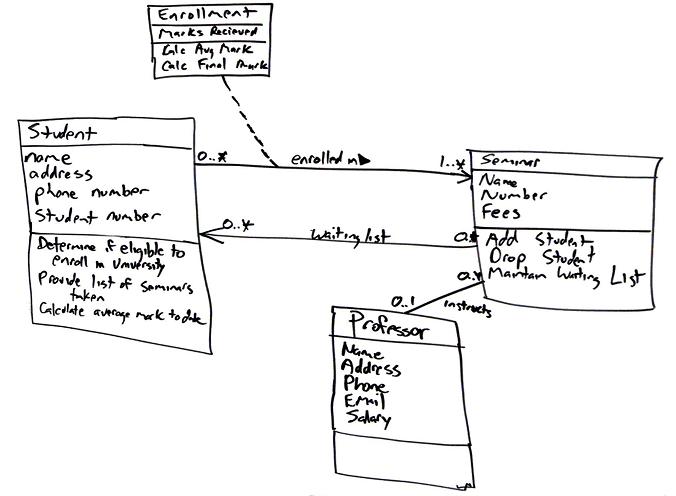
(Hand-drawn class diagram from Agile Modeling, by Scott Ambler)
When you’ve agreed on a diagram, it isn’t necessary to redraw it ‘nicely’ using a software application. If it is neat enough and legible enough, you can simply capture a photo of it with your phone and upload that photo to wherever your team stores its shared documentation.
This is an example of the ‘just barely good enough’ concept. Expending effort on diagramming adds value up to a certain point; beyond that point, the value of additional effort diminishes. That extra effort would be more usefully spent on analysis of other use cases, or the actual implementation of classes.
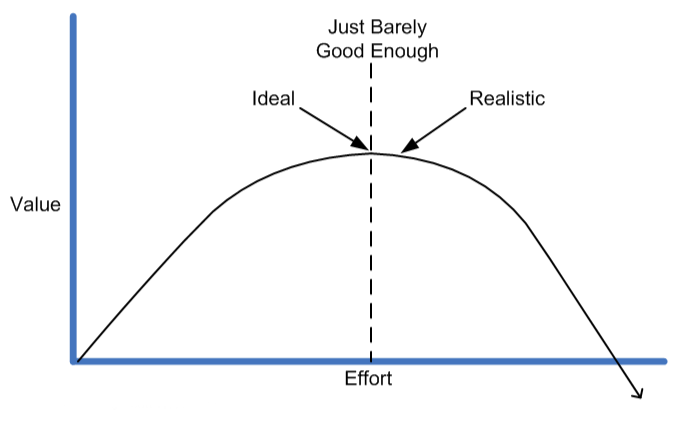
draw.io
Although simple physical tools can be the best option for collaborative development, sometimes it is useful to produce something more polished, using a software tool.
draw.io is a powerful, free-to-use diagramming tool that runs in your browser. You can also run it as a desktop application or as a VS Code extension.
This tool is not limited to UML modelling activities. It can create many different types of diagram, including ER diagrams, network infrastructure diagrams, and user interface mock-ups. You may find some of these useful in the Semester 2 project.
Diagrams can be saved locally to your PC or to cloud storage (Google Drive, OneDrive, GitHub). Saved diagrams are text files, in an XML format.
Task 11.4.1
-
Watch the quick-start tutorial on using draw.io:
-
Run the draw.io browser application. Click the Create New Diagram button.
-
Specify
student.drawioas the filename. Leave the diagram template set to ‘Blank Diagram’, and click the Create button. When prompted for a save location for the filename, choose thetask11_4_1subdirectory of your repository. -
Click on the ‘UML’ menu item in the panel on the left of the application window, to open up the list of UML diagram elements provided by draw.io.
Note: If you don’t see a ‘UML’ menu item, click on the More Shapes button at the bottom of the panel, and tick the ‘UML’ checkbox (NOT the checkbox for ‘UML 2.5’).
-
Drag the diagram element labelled ‘Class’ from the list of diagram elements into the canvas in the centre of the application window. Double-click on the top compartment of the class and change its name to
Student. -
Double-click on the middle compartment. Edit the class attributes to match those of the
Studentclass shown on the design-level class diagram in the previous section.Note: you’ll need to resize the attributes compartment so that all of the attributes are visible.
-
Follow the same process to recreate the
Moduleclass from the design-level class diagram. Be sure to include operations here, as well as attributes. -
Link the two classes with an association. To do this, hover the cursor near to an edge of the
Studentclass. When you see a blue arrow, click and draw the connection to theModuleclass.Once the two classes are connected, select the association and remove the navigability arrowhead (use the settings in the panel on the right of the application window to do this).
Then double-click on the middle of the line and enter “enrols on” as the label for the association. After providing the label, drag it to just above or just below the line.
-
Finally, use ‘Export As…’ on the ‘File’ menu to export the diagram as a PNG image. On the pop-up dialog of options, choose a Zoom Factor of 150% or 200%, for a larger, higher-quality image. Specify a Border Width of 5. Then click on the Export button.
Specify
student.pngas the filename when prompted, and make sure that the image is saved into thetask11_4_1subdirectory of your repository. Then examine the exported image.
Mermaid
Mermaid is a JavaScript library that transforms a text-based specification of a diagram into a graphical representation that is displayed in a web browser.
Like draw.io, it can draw many different types of diagram, not just UML diagrams.
Here’s an example of a class diagram specified in Mermaid:
classDiagram
  Student -- Module : enrols on
  class Module {
    moduleCode: String
    title: String
    numCredits: Int
    enrolStudent(student: Student)
    generateTranscript(student: Student)
  }
  class Student {
    id: Int
    name: String
    degreeProgramme: String
    levelOfStudy: Int
  }
And here is the diagram that Mermaid generates from that specification:
classDiagram
  Student -- Module : enrols on
  class Module {
    moduleCode: String
    title: String
    numCredits: Int
    enrolStudent(student: Student)
    generateTranscript(student: Student)
  }
  class Student {
    id: Int
    name: String
    degreeProgramme: String
    levelOfStudy: Int
  }
Mermaid works particularly well as a way of embedding diagrams into Markdown documents1. GitHub supports Mermaid, so if you put Markdown files containing Mermaid diagrams in your repository, those diagrams will be rendered when you view the files on github.com in your browser.
This also applies to documents put into a GitHub wiki. This may come in handy in Semester 2, when you are preparing the software design documents for your group projects!
You can create Mermaid diagrams in a more interactive way using the Mermaid Live Editor or the full Mermaid Chart app. You can then copy the code from these tools and paste it into the document where you want the diagram to appear; alternatively, you can export your diagram from these tools as a PNG image or SVG document.
For a deep dive into the use of Mermaid in software development, see the book Creating Software With Modern Diagramming Techniques, by Ashley Peacock.
Task 11.4.2
-
Study Mermaid’s class diagram documentation. Focus on the first few sections (Syntax, Define a Class, Defining Members, Defining Relationships).
-
Use the Mermaid Live Editor to create a class diagram that has the following features:
- A class
Customer, with- Attributes
nameandaddress - A single operation named
placeOrder
- Attributes
- A class
Order, with- Attributes
orderNumber,datePlacedanddeliveryDate - Operations
checkStockandtakePayment
- Attributes
- A class
OrderItem, with attributesnameanddescription - An association between
CustomerandOrder, labeled “places” - An association between
OrderandOrderItem, labelled “includes”
Do not put any details of attribute types or operation parameters on your diagram.
- A class
-
Edit the file
mermaid.md, in thetask11_4_2subdirectory of your repository. Note the lines that need to be replaced, as indicate by the comment line beginning with%%.Copy the Mermaid diagram specification from the live editor and paste it into
mermaid.md, replacing the indicated lines. -
Commit your changes to
mermaid.mdand push them to GitHub. Then go to your repository’s home page on github.com and view the file. You should see the diagram and the other content of the document properly rendered.
-
This is how we have used it in these teaching materials. The source files for the web pages that you’ve been reading are all Markdown documents. Most of the UML diagrams that you’ve seen on these pages are generated from Mermaid specifications embedded in those documents. ↩
Creating & Using Classes
Class design techniques will give you an idea of the attributes that a class has, and the operations that it supports. The next step is to translate this into Kotlin code.
One of Kotlin’s strengths is that it allows classes to implemented in a very concise way. Attributes are implemented as properties, which can represent values stored within an object or values that are computed on demand. Operations are implemented as methods, also known as member functions, which look a lot like regular Kotlin functions.
One important issue to consider when implementing a class is the visibility of its members. The properties and methods of a Kotlin class are public by default, but it can sometimes be useful to hide them from class users, by making them private.
In this section, you will also learn about two more specialized kinds of class: data classes and enum classes.
The Basics
Let’s begin with an example of the simplest possible class definition in Kotlin:
class Point
We can create an instance of this class (i.e., a Point object)
like so:
val p = Point()
This invokes the default constructor of the Point class.
In this case, the default constructor does nothing. Indeed, the class itself
is essentially useless. To make it useful, we need to add some Kotlin code
to Point that represents the attributes or behaviour associated with points.
Let’s assume that Point is supposed to represent a point in 2D space.
Its attributes will therefore be the \(x\) and \(y\) coordinates of that
point. We represent these as properties of the class. We can define and
initialize these properties like so:
class Point {
    val x = 0.0
    val y = 0.0
}
You can see here that properties look just like variables, but defined inside a class.
The code to initialize x and y to zero is executed as part of the
object construction process. After creating a Point object, we can access
its x and y properties with the ‘dot’ operator:
val p = Point()

println(p.x)   // prints 0.0
println(p.y)   // prints 0.0
Let’s try this out.
-
In the
tasks/task12_1subdirectory of your repository, create a filePoint.ktcontaining the simplePointclass definition shown above. -
Add a
main()function containing code to create aPointobject and print the values of itsxandyproperties. Compile and run the program. -
Add the following line to
main(), immediately after the line that creates thePointobject:p.x = 1.0What happens when you try to recompile?
-
Change the property definitions to use
varrather thanval. Verify that this fixes the problem.
val is used to define read-only properties in a class.
If you need the ability to assign a new value to a property after an object
has been created, you need to define that property using var.
Writing a Constructor
You should now have a class definition like this:
class Point {
    var x = 0.0
    var y = 0.0
}
This is the first genuinely useful version of the Point class. However,
the process of representing a point at any location other than the origin is
inconvenient:
val p = Point()
p.x = 4.5
p.y = 7.0
It would be better if we could supply the desired values for x and y
as part of the object construction process. We achieve this by adding an
explicit primary constructor to the class:
class Point constructor(x: Double, y: Double) {
    var x = x
    var y = y
}
The constructor keyword introduces this new constructor. It is followed by
a parameter list, specifying that two Double values must be provided to
create a Point object. These values are then assigned to the x and y
properties.
The compiler isn’t bothered by the repeated use of x and y here.
It knows that the usage of x and y on the right-hand side of the
assignments refers to the constructor parameters and not the properties.
If you find it confusing, you can use different names for the constructor parameters.
Let’s try this out now.
-
Return to
Point.kt. Modify the definition of thePointclass so that it looks like the one above, but don’t changemain().What happens when you try to compile the code?
-
To fix the issue, modify
main()so that coordinate values are supplied when creating the object. Check that the program now compiles and runs as expected.
If you write a primary constructor, this becomes the expected way of creating an instance of the class. We’ll consider how you can support different ways of constructing an object later.
Compact Syntax
The need to define some class properties and a constructor that assigns values to those properties is so frequent that Kotlin provides a much more compact syntax for doing this.
The class definition
class Point constructor(x: Double, y: Double) {
    var x = x
    var y = y
}
Can be written more concisely as
class Point(var x: Double, var y: Double)
When you see a class definition with a primary constructor, take a close
look at its parameter list. Each item in the list represents a value that
must be provided when creating an object. If you see val or var in
front of an item then that item also specifies a property of the class.
Let’s try this out.
-
Return to
Point.kt. Modify the class definition by removing the keywordconstructor:class Point(x: Double, y: Double) { var x = x var y = y }Recompile the program and run it, to verify that behaviour is unchanged.
-
Now merge the property definitions into the constructor parameter list so that the entire class definition is a single line of code, as shown above.
Recompile and run, to verify that behaviour is unchanged.
It is common to see classes defined in this very concise way. It may feel quite strange at first, particularly if you are used to the more verbose class definitions of other programming languages.
The best way of adjusting to it is to get lots of practice at writing small classes.
Mutable or Immutable?
Consider these two different versions of the Point class:
class Point(var x: Double, var y: Double)   // mutable

class Point(val x: Double, val y: Double)   // immutable
One is mutable, meaning that it is possible to give a Point object a
different value for x or y after creation. The other is immutable,
meaning that the property values are fixed when the Point object is
created and cannot change thereafter.
Despite the restrictions, you shouldn’t think of the immutable version as being necessarily inferior. Anything you can do with the mutable version can still be achieved with the immutable version, albeit at the cost of creating an additional object.
For example, here’s how you could create a point and then translate it by
10 units along the \(x\) axis, using both versions of the Point class:
// If Point is mutable:
val p = Point(x, y)
p.x += 10.0

// If Point is immutable:
var p = Point(x, y)
p = Point(p.x + 10.0, p.y)
Immutable types have some advantages, too. For one thing, they are safer to use in multi-threaded applications, because race conditions cannot occur when two threads share access to the same variable.
Adding a Method
It would be useful if a Point had a way of telling us how far it was from
the origin. We can implement this as a method or member function
of the class.
The distance of a point \( (x, y) \) from the origin is \[ d = \sqrt{x^2 + y^2} \]
We can use the hypot() function from the standard library to perform
this calculation. Our new method simply needs to call this function.
Here is the complete implementation of the class:
import kotlin.math.hypot

class Point(var x: Double, var y: Double) {
    fun distance() = hypot(x, y)
}
Notice that the method is defined in just the same way as a regular standalone function. In this case, we’ve used an expression body, but we could have also written it with a block body.
The body of the method has implicit access to properties x and y.
Finishing Task 12.1
There are three more things that you need to do to complete this extended task:
-
Modify the definition of
PointinPoint.ktso that it has adistance()method, as shown above. Then add a methoddistanceTo(). This method should accept aPointobject as its sole parameter. It should return the distance between the receiver of the method call and the specifiedPointobject.The distance between two points \( p \) and \( q \) is given by \[ d = \sqrt{(x_p - x_q)^2 + (y_p - y_q)^2} \]
You should be able to implement this in a straightforward way using the
hypot()function from the standard library, as you did for thedistance()method. -
Modify the main program so that it
- Reads an x coordinate from the user (prompting for input appropriately)
- Reads a y coordinate from the user
- Creates a
Pointobject using these coordinates - Computes and prints distance of the point from the origin
- Computes and prints the distance of the point from (4.5, 7.0)
-
Implement an equivalent class definition and program in Python, in a file named
point.py. Make sure that the class and program behave the same as the Kotlin implementation.
Comparison with Python
import kotlin.math.hypot

class Point(var x: Double, var y: Double) {
    fun distance() = hypot(x, y)
    fun distanceTo(p: Point) = hypot(x - p.x, y - p.y)
}
from math import hypot

class Point:
    def __init__(self, x, y):
        self.x = x
        self.y = y

    def distance(self):
        return hypot(self.x, self.y)

    def distanceTo(self, p):
        return hypot(self.x - p.x, self.y - p.y)
Before progressing any further, spend a few minutes comparing the two
implementations of Point that you created in Task 12.1. You should have
code resembling that shown above.
Here are the key differences:
-
The Kotlin class requires fewer lines of code, due to its very compact way of defining properties and primary constructor, and the use of expression body syntax when defining the methods.
-
The Kotlin class requires that types be specified for the properties. This is not required for Python (although if you wanted, you could specify that
xandyought to be of typefloatusing Python’s type hinting feature). -
The Python constructor has an explicit parameter
self, appearing before the parameters representing point coordinates, which refers to the object being created. Similarly, thedistance()anddistanceTo()methods both have aselfparameter to represent the object on which the method is being called.Methods in Kotlin classes do not use an explicit parameter for such a purpose, although you are free to use the special variable
thisas an implicit reference to the object. -
When referring to the fields
xandyin the Python class, you are required to useselfas a prefix: i.e, you must refer to the fields asself.xandself.y.You do not need to use any prefix in the Kotlin class, although you can be more explicit and refer to the properties as
this.xandthis.yif you really want to.
Constructors
Constructors are responsible for creating instances of a class. Kotlin classes are generally defined with a primary constructor, providing the main way of creating an object:
class Point(var x: Double, var y: Double)
In this example, the primary constructor specifies that two values of type
Double, representing a point’s \(x\) and \(y\) coordinates, need
to be provided whenever we try to create a Point. These values will be
used to initialize properties named x and y.
But what if we want to create objects of this class in other ways? For
example, what if we want there to be a ‘default point’ of \( (0,0) \),
created when no values are provided for x and y?
This could achieved by specifying default arguments of 0.0 in the
constructor:
class Point(var x: Double = 0.0, var y: Double = 0.0)
However, this isn’t entirely satisfactory. It allows us to create a Point
by supplying a value for only one of the two coordinates, and this feels
unintuitive.
Secondary Constructors
A better solution to this problem is to define an additional constructor
with an empty parameter list. This secondary constructor is specified
within the body of the class, using the constructor keyword:
class Point(var x: Double, var y: Double) {
    constructor(): this(0.0, 0.0)
}
The parameter list of this secondary constructor is followed immediately
by a colon, then this(0.0, 0.0). This syntax invokes the primary
constructor, providing values of 0.0 for parameters x and y.
A secondary constructor must always delegate either to the primary
constructor or to another secondary constructor, using the this() syntax
shown above.
If required, the secondary constructor can have a body, enclosed in {},
which can do other work, but it always has to delegate.
This ensures that the primary constructor is ultimately always used as part of the process of initializing an object.
Task 12.3.1
-
Edit the file
Construct.kt, in thetasks/task12_3_1subdirectory of your repository. You should see the following code:class Point(var x: Double, var y: Double) fun main() { val p = Point(4.5, 7.0) println("(${p.x}, ${p.y})") }Make sure that this code compiles.
-
Change
main()so that it attempts to create thePointobject without specifying values forxandy. Try compiling the code. What errors do you see? -
Modify the class definition so that it includes the secondary constructor described above. Compile and run the program to verify that this fixes the issue.
-
Now change the first line of
main()to beval p = Point(4, 7)Try recompiling the code. What happens?
-
Add another secondary constructor to
Pointthat fixes the issue.Hints
-
Your secondary constructor will need parameters. What type do they need to be?
-
Note that these parameters should NOT be prefixed with
valorvar. Those keywords are used to specify properties, and you are only allowed to do that in the primary constructor parameter list or separately in the body of the class. -
Remember that Kotlin has extension functions to support type conversion. For example, you can invoke
toDouble()on a number to create aDoublerepresentation of that number…
-
Another Example
Consider this class definition:
import java.time.LocalDate

class Person(var name: String, val birth: LocalDate) {
    var isMarried = false
}
This represents a person using three properties: their name, their date of birth, and their marital status. Notice that the latter is defined and initialized in the body of the class, rather than being specified as part of the primary constructor.
We are free to mix these different styles of property definition and initialization as we see fit. The design decision made here was that when we represent a person, it should be assumed that they are not married by default.
Notice also that properties name and isMarried are defined using var,
but birth is defined using val. This is because a person’s date of
birth is a fixed value that can never change, whereas their name and marital
status can both change during their lifetime.
Task 12.3.2
-
Edit the file named
Person.kt, in thetasks/task12_3_2subdirectory of your repository. Add to this file thePersonclass definition shown above. Be sure to include theimportstatement as well. -
Now add a
main()function that creates aPersonobject and then prints the person’s name, date of birth and marital status.Note: you can create a
LocalDateobject to represent date of birth like this:val date = LocalDate.of(1997, 8, 23)Check that your program compiles and runs successfully.
-
Dates are often manipulated as strings, in ISO 8601 format (e.g.,
"1997-08-23"). Add a secondary constructor toPersonthat allows date of birth to be supplied as such a string. -
Modify
main()so that when thePersonobject is created, date of birth is now specified as a string. Recompile and run the program to verify that it behaves as expected.
Initializer Blocks
There’s a problem with the Person class. In the implementation shown above,
it is possible to create a Person object using any string as the person’s
name. It would be better if we could impose some restrictions—e.g.,
preventing use of an empty string, or a string consisting solely of spaces.
However, there is no way do to this currently, because the primary
constructor just assigns values to properties.
There are a couple of different ways of solving this problem. One of them
is to give the Person class an initializer block.
Initializer blocks are blocks of code enclosed in braces, marked with the
init prefix. Any blocks marked in this way will be injected into the object
construction process. You can do almost anything you like inside an
initializer block, but a common thing to do is property validation:
import java.time.LocalDate

class Person(var name: String, val birth: LocalDate) {
    var isMarried = false

    init {
        require(name.isNotBlank()) { "Name cannot be blank" }
    }
}
In the example above, the name parameter is checked to make sure that
it is not blank, i.e., that its length is greater than zero and its contents
do not consist solely of whitespace characters. If this is not true, an
IllegalArgumentException will be thrown and object construction will fail.
Note that initializer blocks are effectively incorporated into the primary constructor, even in cases where that primary constructor is implicit rather than explicit. Thus they always execute when an instance of the class is created.
Task 12.3.3
-
Copy the file
Person.ktfrom thetask12_3_2subdirectory of your repository to thetask12_3_3subdirectory. -
Edit the copied file and modify
main()so that it reads the user’s name and date of birth usingreadln(), then creates aPersonobject using these strings.Compile the program and run it to verify that you can create a
Personwith a zero-length name, or a name consisting only of spaces. -
Modify the class so that it has the initializer block shown above. Recompile the program and try running it again to verify that invalid names trigger an exception.
Methods
Methods, also known as member functions, are functions defined inside the body of a class. They have implicit access to the properties of a class, by virtue of being defined within the same scope as those properties.
The syntax for defining a method is basically the same as that for standalone functions. You can write a method with a block body or expression body, as you prefer. The method can accept input via its parameter list and return values to the caller in the same way as a standalone function.
Task 12.4.1
This task will give you more practice at implementing methods. The code
is provided as an Amper project, in the subdirectory tasks/task12_4_1 of
your repository.
-
Examine
Point.kt, in thesrcsubdirectory of the project. -
Edit
Circle.kt. In this file, implement a new class namedCircle. Give your class twovalproperties:centre, aPointobject representing coordinates of the circle’s centre; andradius, aDoublevalue representing the circle’s radius.Check that project code compiles with
./amper buildRepeat this after each of step of developing
Circle. -
Add an
initblock toCirclethat guaranteesradiuswill be greater than zero when aCircleobject is created. -
Add methods
area()andperimeter()toCircle. These methods should have no parameters. They should return the area and perimeter, respectively, of the circle.Area and perimeter can be computed using the formulae \( \pi r^2 \) and \( 2\pi r \), respectively. The constant \( \pi \) can be imported as the name
PI, withimport kotlin.math.PI -
Add a method
contains()toCircle. This should have a single parameter, of typePoint. It should returntrueif the given point is inside the circle,falseotherwise. The point should be considered inside if the distance from it to the centre of the circle is less than or equal to the radius.If you like, use
infixwhen defining the method, so that it can be invoked like this:if (circle contains point) { ... } -
Edit
Main.kt. In this file, write a program that creates aCircleobject and then demonstrates the use of its three methods.Run the program with
./amper run
Overriding
One feature of methods that they don’t share with standalone functions is their ability to override (i.e., substitute for) other methods, or be overridden themselves. We will consider a simple example of this here, deferring more detailed discussion to when we cover inheritance.
All classes in Kotlin inherit implicitly from a superclass named Any.
This provides all Kotlin classes with certain capabilities, one of them
being the ability to generate a string representation of an object, via
the toString() method. The default representation is generic and not
particularly useful, so it is common to override toString() with a
version that yields something better1.
Note: toString() is called automatically on any object you pass to
print() and println(), so overriding it can be very useful for tasks
like debugging.
Task 12.4.2
-
Edit
Point.kt, in thetasks/task12_4_2subdirectory of your repository. Add amain()function that creates aPointobject and then callsprintln()on that object.Compile and run the program. What do you see?
-
Add a new method to the
Pointclass:override fun toString() = "($x, $y)" -
Recompile the program and run it again. What has changed?
You must use the override keyword when overriding a method, and the
new version must have the same signature as the version being overridden.
Also, note that methods must grant explicit permission to be overridden
in subclasses. The example above works because the Any superclass grants
that permission for toString(). We will discuss this further when we
cover inheritance.
Method or Extension Function?
Almost all of the methods we’ve seen so far could have been written instead
as extension functions. For example, Point
could have been implemented like this:
class Point(var x: Double, var y: Double)

fun Point.distance() = hypot(x, y)
fun Point.distanceTo(p: Point) = hypot(x - p.x, y - p.y)
From the perspective of users of Point, there is no discernable difference
between this version of the class and the version with methods rather than
extension functions.
But methods have some unique advantages. As we’ve seen already, they support overrriding, whereas extension functions do not.
Another advantage is that methods have more privileged access to members of a class. A method can make use of anything defined in its class, including private members. By contrast, an extension function only has access to the public API of the class.
Extension functions have their uses, though. If you don’t have access to the source code of a class, and that class prevents inheritance, then extension is the only way in which you can add new functions to that class.
-
You may remember doing something similar for Python. Python classes have inherited ‘dunder’ methods, much like Kotlin classes. Overriding the
__str__method in a Python class is the equivalent of overridingtoString()in a Kotlin class. ↩
Properties
Consider the Person class that we introduced when discussing
constructors:
import java.time.LocalDate

class Person(var name: String, val birth: LocalDate) {
    var isMarried = false
}
This class has three properties:
name, a writeable property representing the person’s namebirth, a read-only property representing date of birthisMarried, a writeable property recording marital status
Let’s dig into how these properties are represented in the code generated by the compiler.
Probing The Bytecode
-
Examine
Person.kt, in thetasks/task12_5_1subdirectory of your repository. This file contains the implementation ofPersonshown above. -
Compile
Person.ktin the normal way. This should generate a new filePerson.class, containing the Java bytecode representation of the class. -
In a terminal window, in the same directory as the bytecode file, run the Java class disassembler tool on it, like so1:
javap -p PersonStudy the output carefully.
You should see clear correspondences between the bytecode representation
and the properties of the Kotlin class. For example, the Kotlin property
birth is represented in the bytecode by a combination of two things:
- A private variable
birth, of typeLocalDate - A public method
getBirth(), which returns aLocalDateobject
whereas the Kotlin property name is represented by a combination of
three things:
- A private variable
name, of typeString - A public method
getName(), which returns aStringobject - A public method
setName(), which accepts aStringas an argument
The Kotlin property isMarried is represented in a similar way to name,
by a combination of private variable, ‘getter’ method and ‘setter’ method.
When you read the value of a property in Kotlin code, the corresponding getter method is called in the Java bytecode to retrieve the value of the associated private variable.
Similarly, when you assign a new value to a property in Kotlin code, the corresponding setter method is called in the Java bytecode, and this updates the value of the associated private variable.
Here’s an example:
val p = Person("Joe", birth=LocalDate.of(1992, 8, 23))

println(p.name)    // JVM calls getName()
p.name = "David"   // JVM calls setName("David")
Properties like name, birth, isMarried are stored properties,
with associated hidden variables that store their values. These hidden
variables are termed backing fields. Users of a class never interact
directly with backing fields; all interaction is via the getter and setter
methods generated by the compiler.
Stored properties are abstractions of an underlying implementation that depends on how the property is defined:
valproperties are implemented as a backing field and a gettervarproperties are implemented as a backing field, a getter and a setter
It’s useful to know all of this because it is possible in Kotlin to customize the getter or setter code associated with a property.
Custom Getter
Let’s change the behaviour of the name property so that we always see a
person’s name represented with uppercase characters, regardless of letter
case in the stored name. This isn’t especially useful, but it will serve to
illustrate the process.
-
Edit the file
Getter.kt, in thetasks/task12_5_2subdirectory of your repository. This contains the implementation of thePersonclass seen earlier.Modify the class definition so that it looks like this:
class Person(_name: String, val birth: LocalDate) {

   var isMarried = false

   var name = _name
       get() {
           return field.uppercase()
       }
}
Note carefully the differences between this and the original version of the
Personclass:-
The
nameproperty is now defined in the body of the class, and it is initialized using the value supplied via the_nameparameter of the primary constructor2. -
An additional piece of code, customizing the getter for
name, appears immediately after the definition of the property.
The new getter code is written as a function, with the name
getand an empty parameter list. Inside the body of this function, we use the special namefieldto refer to the backing field of the property. -
-
Add a
main()function that creates aPersonobject and then prints that person’s name. -
Compile and run the program. You should see the name displayed in uppercase.
Custom Setter
The procedure here is similar to that for customizing a getter. The property
needs to be defined in the body of the class and not as part of the primary
constructor. You then need to follow the property definition with a special
set() function.
Let’s do this for our Person class, customizing the setter for the name
property so that a person cannot be given a blank name.
-
Edit the file
Setter.kt, in thetasks/task12_5_3subdirectory of your repository. This contains the implementation of thePersonclass seen earlier.Modify the class definition so that it looks like this:
class Person(_name: String, val birth: LocalDate) {

   var isMarried = false

   var name = _name
       set(value) {
           require(value.isNotBlank()) { "Name cannot be blank" }
           field = value
       }
}
(Note: to keep things simple, we’ve customized only the setter code here, but you are allowed to customize getter and setter at the same time.)
The
set()function takes a single parameter. You can call this anything you like, butvalueis a sensible choice. This represents the value that appears on the right-hand side of any assignment operation involving the property. You don’t specify a type for this parameter, as type of the corresponding property is already known.The body of the function assigns this value to the special variable
field, which represents the backing field of the property. Before doing that,valueis checked and an exception is thrown if it is not acceptable. The most concise way of doing this is via therequire()precondition function. -
Add a
main()function that creates aPersonobject and then attempts to assign an empty string to itsnameproperty. -
Compile and run the program. It should crash with an
IllegalArgumentException. Examine the exception traceback carefully.
Note that custom setters are not used when you are assigning values to properties during the creation of an object.
So to be absolutely certain that a Person object can never have a blank
string for its name, you would need to write a custom setter like the
one above and build similar validation into the object construction
process, e.g., via an initializer block.
Computed Properties
The property examples considered above all have backing fields, but we can also have properties that don’t have backing fields.
For example, if you define a property with a custom getter and that getter
doesn’t use the special field variable to reference a backing field, the
compiler will not bother creating a backing field for the property. We
sometimes describe this as a computed property, because its value is
determined solely by computation and not by accessing a backing field
associated with the property.
As an example, let’s return to the Circle class discussed earlier:
class Circle(val centre: Point, val radius: Double) {
    fun area() = PI * radius * radius
    fun perimeter() = 2.0 * PI * radius
}
In this implementation, circle area and perimeter are computed via explicit method calls, but area and perimeter could also be viewed as characteristics that are intrinsic to circles. This makes them good candidates for implementation as computed properties.
To achieve this, all we need to do is redefine area() and perimeter()
to be val properties with a custom getter:
class Circle(val centre: Point, val radius: Double) {
    val area get() = PI * radius * radius
    val perimeter get() = 2.0 * PI * radius
}
Now, we can use the class like this:
val centre = Point(4.0, 1.0)
val circ = Circle(centre, radius=2.5)

println(circ.area)
println(circ.perimeter)
Note the absence of parentheses here!
It’s important to understand that there is little difference functionally
between these two versions of Circle. In both, a function executes to
compute the area or perimeter of a circle. The difference lies in whether
invocation of that function is explicit or hidden.
Which approach you use is largely a matter of personal taste. A useful rule of thumb is to make something a computed property rather than a method only when it feels more natural to do so, i.e., only when the thing you are computing feels more like an intrinsic quality of instances of the class than an action that is perform on instances of the class.
Another Example
Let’s return to the Person class for a final example of a computed property.
Imagine that we need to know the age in years of a person. We could write a method to compute this, but age feels much more like an intrinsic attribute of a person than a calculation that needs to be performed. This makes it an ideal candidate for implementation as a computed property.
-
Edit
Age.kt, in thetasks/task12_5_4subdirectory of your repository. This contains a now familiar version of thePersonclass:import java.time.LocalDate class Person(var name: String, val birth: LocalDate) { var isMarried = true }This implementation uses Java’s time API to represent date of birth with the
LocalDateclass. We can continue using this API to perform calculations such as determining the time interval between two dates.To calculate time intervals, we can use the
ChronoUnitenum class—specifically theYEARSobject of this class. To gain access to this, add the following import to the file:import java.time.temporal.ChronoUnit.YEARS -
The
YEARSobject has a methodbetween(), which accepts a pair ofLocalDateobjects as arguments. The method computes the interval between the two given dates in units of years, returning it as a long integer.The
birthproperty provides the first of the two required dates. The second should be today’s date, which is obtained easily enough by invoking the methodLocalDate.now(). Thus our implementation of theageproperty looks like this:val age get() = YEARS.between(birth, LocalDate.now()).toInt()Add this code to the class, then check that it compiles successfully.
-
Finally, add a
main()function toAge.kt. This program should create aPersonobject and then print the value of that object’sageproperty. -
Compile and run the program. Check that it is calculating age correctly.
-
Note: for this to work, a Java Development Kit (JDK) needs to be available on the system you are using, and the JDK’s
bindirectory needs to be included in yourPATHvariable. ↩ -
We’ve used
_nameas the name of the constructor parameter, for clarity, but it would have been OK to give it the same name as the property. ↩
Visibility
In all of the classes we’ve seen so far, the properties and methods have
had public visibility, meaning that any other code has access to them.
This level of visibility is the default, which is why we didn’t use the
public keyword with any of the definitions.
But other levels of visibility are possible in classes. For example, we
can declare members of a class using the private keyword. If you make a
property or method private, then it can be used only within the class that
defines that property or method. Code outside the class will not be able
to access it.
The ability to hide class members by making them private is important and useful. Let’s consider an example where public visibility of a class member causes problems, and examine how making that member private fixes things.
An Example
Imagine that you have a class Dataset, representing numbers read from
a file:
class Dataset {
    val values = mutableListOf<Double>()

    fun loadData(filename: String) { ... }
}
The property that stores all the values is a mutable list because we need to add values to it one at a time, as we read them from the file.
A Dataset object is initially empty. We populate it with values by
invoking the loadData() method, providing the name of the file containing
the data:
val dataset = Dataset()
dataset.loadData("data.txt")
After loading data, we can do things like query the size of the dataset, test its first value, or iterate over the values in order to print them all:
println(dataset.values.size)

if (dataset.values[0] < 0.0) {
    println("Dataset begins with negative value")
}

for (value in dataset.values) {
    println(value)
}
These operations are all useful—although having to access the values
property explicitly each time is a little inconvenient.
However, it is also possible to replace values, remove values, or add values:
dataset.values[1] = 0.0      // zeroes second value
dataset.values.removeAt(0)   // removes value at index 0
dataset.values.add(1.5)      // adds 1.5 to end
This is a big problem! A Dataset object is supposed to represent the data
read from a file. If we allow the contents of values to be modified in any
way, then it will no longer represent the contents of the file accurately.
Fixing Things
The solution to the issues noted above is to declare values as private
and then provide controlled access to it via additional computed properties
and methods:
class Dataset {
    private val values = mutableListOf<Double>()

    fun loadData(filename: String) { ... }

    val size get() = values.size

    operator fun get(index: Int) = values.get(index)

    operator fun iterator() = values.iterator()
}
This new version of Dataset has
-
A computed property
size, that simply returns thesizeproperty ofvalues -
An element access operator that gives read-only access to elements of
values, using[]and an integer index -
An iterator function that allows a
Datasetto be used as the subject of aforloop
No other parts of the list API are exposed to users of Dataset. Thus
it is no longer possible for users of the class to replace anything in
values, remove anything in values or add anything to values.
It is still possible to query dataset size, read an individual value or iterate over all values—with the added bonus that these things can now be done with slightly simpler syntax:
println(dataset.size)

if (dataset[0] < 0.0) {
    println("Dataset begins with negative value")
}

for (value in dataset) {
    println(value)
}
API vs Implementation
When you define the properties and methods of a class, think carefully about whether you want those properties and methods to be part of the public API of the class, or whether they should be part of the private implementation.
Every class will need a public API of some sort, but the public API becomes hard to change as soon as other code starts using that class, as changing a public feature is likely to break that code. Implementation details, on the other hand, are free to change whenever you need them to, without breaking any code that uses the class.
For example, the computed property size is part of the public API of
Dataset. If we changed its name to length, this would probably break
code that uses the class.
The values property, on the other hand, is no longer part of the public
API. It is now an implementation detail. If we later decide that a different
type of collection would be better for storing the individual values of a
dataset, we can make that change without breaking any code.
Data Classes
Some of the classes we create in a software application are there to
represent the fundamental ‘business entities’ of a use case. For example,
in an e-commerce scenario, we might have classes named Customer and
Order, involved in placing an order for a product.
These entity classes are data-focused. Instances of them may represent the results of a database query, or data that needs to be stored in a database. We may need to manage multiple instances using one of Kotlin’s collection types. We may need to test whether two instances contain the same data. We may even need the ability to generate strings giving details of the data stored inside an instance (for testing and debugging purposes, if nothing else).
Kotlin classes have methods named equals(), hashCode() and toString()
that support these tasks, but the default implementations generally won’t
provide us with what we require. They need to be overridden in order to
be useful.
This is where Kotlin’s data classes come in. When we designate a class
as a data class, the compiler will synthesize useful versions of equals(),
hashCode() and toString() for us. We can use the data class feature to
implement entity classes more quickly, with less code.
Task 12.7
-
Edit the file
Data.kt, in thetasks/task12_7subdirectory of your repository. This file contains two things:-
A class
Person, whose implementation should be familiar to you by now -
A program that creates and manipulates two instances of
Person
-
-
Compile and run the program. Study the output carefully. This shows you the behaviour of the ‘default’ versions of
toString(),hashCode()andequals().You should see something similar to this:
p1 == p1?     : true
p1 == p2?     : false
p1.hashCode() : 504bae78
p2.hashCode() : 53e25b76
p1.toString() : Person@504bae78
p2.toString() : Person@53e25b76
Although objects
p1andp2contain exactly the same data, comparing them with==returnsfalse, indicating that they are not considered to be equal.This is because using
==invokes theequals()method, and the default implementation of this method tests for equality of identity (do the variables reference the same object?) rather than equality of state (do the variables represent objects containing the same data?)p1andp2also have different hash codes and different string representations. The hash codes differ because the default implementation ofhashCode()is based on the memory address at which an object is located. The string representations differ because the default behaviour oftoString()is to include an object’s hash code. -
Now make one small change to the
Personclass. Add the keyworddatato the start of the definition. The class should now look like this:data class Person(var name: String, val birth: LocalDate) { var isMarried = false }Recompile the program and run it. Notice how the output changes.
p1 == p1?     : true
p1 == p2?     : true
p1.hashCode() : 042a878b
p2.hashCode() : 042a878b
p1.toString() : Person(name=Dave, birth=1997-08-23)
p2.toString() : Person(name=Dave, birth=1997-08-23)
Now,
p1andp2are considered equal, and they have the same hash codes. They also have the same string representation, and that representation is much more useful, showing us property values (although one property is missing). -
The last five lines of
Data.ktare currently commented out. Uncomment these lines, then recompile the program and run it. The program will generate the following additional lines of output:p1 marries p1 == p2? : true p1.hashCode() : 042a878b p1.toString() : Person(name=Dave, birth=1997-08-23)Think about what is happening here. the
isMarriedproperties ofp1andp2now have different values, but the objects are still being reported as equal, and they still have the same hash codes and string representations.You may have already guessed the reason for this. The
isMarriedproperty is currently ignored by the implementations ofequals(),hashCode()andtoString()that were generated for us when we madePersona data class. -
To fix the problem, modify the
Personclass so thatisMarriedis now defined as part of the primary constructor. The class should now look like this:data class Person( var name: String, val birth: LocalDate, var isMarried: Boolean = false )If you recompile and run the program, it should now behave as expected.
Data classes are a handy way of creating fully functional entities without having to write lots of ‘boilerplate’ code yourself.
Just remember that any properties that are important in determining object equality, hash code or string representation need to be defined within the primary constructor.
Should All Classes Be Data Classes?
The short answer is No.
Entity classes are not the only kind of class that we find when we analyze
a use case. Some classes are boundary classes that represent points
of interaction with a user of a system. For example, an OrderForm class
might represent the UI with which a customer places an order.
Other classes turn out to be control classes, which orchestrate the flow
of events in a use case. For example, an OrderPlacement class might be
used to capture the logic of checking stock levels, taking payment from a
customer and then placing the order for an item.
Boundary classes and control classes are not data-focused like entity classes are. We won’t need to compare instances of them for equality, store instances of them in a collection, or display the state of an instance. Hence there is no benefit in adding to these classes the extra code that supports such activities.
Enum Classes
Many of the data types we’ve seen so far can represent a huge number of
possible values. An Int variable, for example, can have any of over four
billion values, and the number of different values possible for a String
is vastly greater than that.
It simply isn’t practical to enumerate all possible values of these fundamental types, and if that’s the case, it follows that it also won’t be practical to enumerate all the possible states for an instance of any class composed of those types.
However, there are situations in which the number of possible values for something is relatively small—small enough that they can be enumerated easily. Take days of the week, for example. There are only seven possible values here: Monday, Tuesday, Wednesday, Thursday, Friday, Saturday, Sunday.
We could represent days of the week using an Int with a value between
1 and 7, but how do we restrict it to that range? Another problem is that
Int supports operations such as multiplication or division that clearly
don’t make any sense for days of the week:
val today = 1               // Monday (minimum value)
val yesterday = today - 1   // has value 0, which isn't a day
val day = today * 3         // what does this even mean?
Like many other programming languages, Kotlin offers a better solution: a way of creating special enumerated types that have a predefined set of possible values.
An Example
In Kotlin, we can represent days of the week by defining them as an enum class:
enum class Day {
    Monday, Tuesday, Wednesday, Thursday,
    Friday, Saturday, Sunday
}
Here, the possible values for a Day variable are provided in the body of
the class, as a comma-separated list of constants. For example, Monday is
a constant, of type Day. Monday is both the name of this constant, and
its value1.
When you use one of these constants in your code, you’ll need to be explicit about its type:
val day = Monday        // 'Unresolved reference' error

val day = Day.Monday    // OK

if (day == Day.Monday) {
    println("Another week begins...")
}
If that becomes too tedious, you could import the constants from the class
by putting the following at the top of the .kt file:
import Day.*
This would allow you to refer to them more simply, as Monday, Tuesday,
etc.
Built-in Properties & Methods
Enum constants each have a property name, which gives the constant’s
name as a string, and a property ordinal, which gives the zero-based
position of the constant in the enum’s list of constants:
Day.Monday.name      // "Monday"
Day.Monday.ordinal   // 0
Day.Sunday.ordinal   // 6
Another property, entries, is associated with the enum class, rather
than individual constants. This represents all of the constants as a
collection, which can be useful if you need to iterate over all possible
values:
for (day in Day.entries) {
    // task that needs to be performed for each day
}
A useful method associated with the class is valueOf(). This will parse
the given string, returning the enum constant that matches that string:
val day = Day.valueOf(dayString)
Task 12.8.1
-
Edit
Enum.kt, in thetasks/task12_8_1subdirectory of your repository. Add to this file the enum class for days of the week shown above. -
Add to
Enum.ktamain()function that asks the user to enter a day, reads that day as a string, then attempts to parse it usingDay.valueOf(). -
Compile and run the program. Try entering
Mondayas the string. Run it again, this time enteringmonday. What happens? -
Modify the program so that it handles errors more gracefully and indicates to the user what their options are.
Hints
Refer to the earlier discussion of exceptions if you need a reminder of how to handle run-time errors gracefully.
You can use the
entriesproperty to get the options for specifying a day.
A More Complex Example
You can create enum classes with additional properties and methods. Every enum constant will acquire those properties, initialized to the values you supply as constructor arguments.
As an example, let’s imagine that you are creating software that plays games using playing cards. A standard 52-card deck contains of four suits: Clubs (♣), Diamonds (♦), Hearts (♥) and Spades (♠). Each suit consists of cards with thirteen different ranks: Ace, Two, Three, etc, up to Ten, followed by Jack, Queen and King.
Here’s how you could represent card suits as an enum class, in which each
constant has a symbol property representing the Unicode character of
the suit:
enum class Suit(val symbol: Char) {
    Clubs('♣'),
    Diamonds('♦'),
    Hearts('♥'),
    Spades('♠');

    val plainSymbol get() = name[0]

    override fun toString() = "$symbol"
}
The standard syntax is used to specify both the property and a primary
constructor to initialize that property. The property is of type Char,
so a Char value must be supplied when creating each enum constant in the
body of the class definition.
Notice that this enum class has two additional features, besides the
enum constants. First is a computed property, plainSymbol. This provides
a simpler symbol for each suit: the first character of each constant’s
name. This can be used in situations where it might not be possible to
display the Unicode symbols.
The second additional feature is an overridden toString() method. All
enum classes have a default implementation of toString() that returns an
enum constant’s name, but this can overridden if required. The new version
of the method shown here returns a string containing the Unicode symbol
of the suit.
Did you spot the semicolon that has now appeared at the end of the list of constants?
You need this if you are adding anything extra to the enum class, besides the list of constants. This is one of the few occasions where semicolons are necessary in Kotlin code!
Task 12.8.2
This uses an Amper project, in the tasks/task12_8_2 subdirectory of
your repository.
-
Examine
Suit.kt, in thesrcsubdirectory of the project. This file contains the enum class for playing card suits discussed above. -
Edit the file
Rank.kt. Add to this file an enum class namedRankthat represents the rank of a playing card. LikeSuit, this should give each enum constant asymbolproperty. Use'A','2','3',…,'9','T','J','Q','K'as values for this property.Check that this new code compiles, using
./amper buildRepeat this command after each of the steps that follow.
-
Give
Rankan overriddentoString()method just like the one forSuit. -
Edit the file
Card.kt. In this file, create a class namedCardwith a primary constructor that defines and initializes two properties:rank, of typeRank, andsuit, of typeSuit. -
Add to the
Cardclass a computed propertyfullName, which provides the full name of a card, as aStringobject.It should do this by concatenating the name of the card’s rank, the string
" of ", and the name of the card’s suit. Thus, if therankproperty has the valueRank.Aceand thesuitproperty has the valueSuit.Clubs,fullNameshould be"Ace of Clubs". -
Override
toString()inCardso that it returns a two-character string consisting of the rank’s symbol and the suit’s symbol. So if therankproperty has the valueRank.Tenand thesuitproperty has the valueSuit.Hearts, the string"T♥"should be returned. -
Edit
Main.kt. In this file, write a program that- Creates a mutable list of
Cardobjects, to represent a deck of cards - Populates that list with a full set of 52 standard playing cards
- Shuffles the deck randomly
- Prints the full name of each card in the shuffled deck
Check program behaviour by running it with
./amper run - Creates a mutable list of
Nested Classes
If you’ve completed the tasks above, you should have enum classes Rank
and Suit, plus a regular class Card that uses those enum classes. There
is one further improvement we can make to this implementation of playing
cards.
If you think about it, the concepts of ‘rank’ and ‘suit’ have no separate
meaning outside the context of playing cards. We are unlikely to ever write
code that works with ranks or suits on their own, without there being a
Card object somewhere.
We can model the intimacy of this relationship between Rank, Suit and
Card by nesting the definitions of the enum classes inside the
definition of the Card class:
class Card(val rank: Rank, val suit: Suit) {

  enum class Rank { ... }

  enum class Suit { ... }

  ...
}
Kotlin allows class definitions to be nested within other class definitions. It allows you to do the same with functions, too2.
The practical impact of this change is that code outside the Card class
will need to refer to the enums as Card.Rank and Card.Suit:
for (suit in Card.Suit.entries) {
    ...
}
However, this can be avoided by importing the enum classes from Card:
import Card.Rank
import Card.Suit
Optional Task Extension
If you like, try modifying your Task 12.8.2 solution so that the Rank and
Suit enums are nested inside the Card class, as described above.
Make sure that this new solution compiles and runs successfully.
-
We’ve used upper camel case as the naming style for these enum constants, which is one of the two accepted styles in the official Kotlin coding conventions. The other accepted style is ‘screaming snake case’, in which constant names are written using capital letters and underscores. You’ll see examples of both styles in Kotlin code. ↩
-
In general, you can limit the scope of a function or class to a single block of code by defining it within that block of code. ↩
Object Declarations
A class definition is effectively a reusable ‘template’ that specifies how to create and use a particular kind of object. Object creation is handled in a separate step, with code that invokes a constructor of the class, and there are no limitations on how many objects we can create in this way.
However, Kotlin also allows us to combine class definition and instance
creation into a single step, using the object keyword. This can be useful
in scenarios where we want to restrict object creation, such that only a
single instance of a class can ever exist.
Singletons
A singleton is an instance of a class that is guaranteed to be the only instance of that class. This means that singletons are good ways of representing anything that can exist only once in an application.
For example, imagine that a library has a Kotlin application allowing users
to search for books they are interested in. Details of those books are stored
in a database. Interaction with that database could be managed with a
Database class, but that would allow multiple instances to be created.
This wouldn’t make sense, as there is only one database.
A better solution is to represent the database as a singleton, using object:
object Database {
    val connection = DriverManager.getConnection(...)

    val query = "select * from Books where title like ?"

    fun findBooks(searchTerm: String): ResultSet {
        val statement = connection.prepareStatement(query)
        statement.setString(1, searchTerm)
        return statement.executeQuery()
    }
    ...
}
Note the syntax here. The object keyword is followed by a name. Alhough
we would normally reference objects by names that begin with a lowercase
letter, the convention for singletons is to use an initial uppercase letter,
just as we would for classes.
After the name we have the body of the object, which can define both properties and methods. In this case, we have properties representing the connection to the database and an SQL query, and a method that runs the query to find books whose titles match the given search term.
We would use the singleton like this:
val bookDetails = Database.findBooks("%Kotlin%")
‘Singleton’ is an example of a design pattern: a well-understood, documented solution to a problem commonly encountered in software development.
Implementing the Singleton pattern can be complicated in some object-oriented
languages, but the object keyword makes this trivial in Kotlin.
Companion Objects
A companion object is a special type of singleton defined within a class. It provides a home for class-level properties and methods1.
Here’s a simple example:
class Location(val longitude: Double, val latitude: Double) {
    companion object {
        const val MIN_LONGITUDE = -180.0
        const val MAX_LONGITUDE = 180.0
        const val MIN_LATITUDE = -90.0
        const val MAX_LATITUDE = 90.0
    }

    init {
        require(longitude in MIN_LONGITUDE..MAX_LONGITUDE) { ... }
        require(latitude in MIN_LATITUDE..MAX_LATITUDE) { ... }
    }
}
This class represents a location on the Earth by its longitude & latitude. An initializer block is used to ensure that these properties are within valid ranges.
We define the limits on longitude and latitude using named compile-time
constants, to make the code clearer. These constants are defined
at the class level, within the companion object of Location2.
Other code is able to refer to these properties in a couple of different ways:
Location.MIN_LATITUDE
Location.Companion.MIN_LATITUDE
This first of these is shorthand for the second, and Companion appears
in the second example because we didn’t give the companion object an
explicit name.
Companion objects can be named easily enough:
class Location(val longitude: Double, val latitude: Double) {
    companion object Limits {
        ...
    }
    ...
}
With this change, a full reference to a member of the companion object looks like this:
Location.Limits.MIN_LATITUDE
Keep in mind that these constants are effectively associated with the class,
not with instances of the class. If you create a Location object and try to
access MIN_LATITUDE as if it were a property of that object, you will get
a compiler error.
In general, companion objects are a good place for properties that can shared by all instances of a class. It would be a waste of memory to give each instance its own copy of those properties.
Another Example
Let’s return to our old friend, the Person class, for a more complex
example of how companion objects can be useful.
Imagine that you want to impose some limitations on the creation of Person
objects. In particular, you want to ensure that every Person object has
a unique name. Attempts to create a Person object with the same name as
another should fail.
The only way of achieving this is to prevent users of the class from invoking
the constructor of Person, and then take control of instance creation
yourself, by writing your own method to do so. This method has to be a
class-level method, defined in the companion object of Person:
class Person private constructor(val name: String, val birth: LocalDate) {
    companion object Factory {
        private val names = mutableSetOf<String>()

        fun create(name: String, birth: LocalDate): Person {
            require(name !in names) { "Name must be unique!" }
            names.add(name)
            return Person(name, birth)
        }
    }
}
Notice here that the primary constructor is defined more verbosely, with
explicit use of the constructor keyword. We need to do this in order to
declare it as private. Doing this will prevent users of the class from
invoking the constructor themselves.
A user of the class must request creation of a Person object by using
the public method create(), defined inside Person’s companion object:
val p = Person.create("Sarah", LocalDate.of(2005, 7, 16))
The create() method is able to impose restrictions on object creation.
In this case, we keep track of the names given to people in a set of
strings called names. Notice that this set is defined as a private
class-level property, within the companion object.
The create() method checks whether the desired name is in this set,
aborting object creation with an exception if the name is found. If the
name isn’t found, the set is updated with the desired name, then the method
invokes the primary constructor to create the Person object. This object
is then returned to the caller.
Although users of Person cannot access the private constructor, the
create() method, being part of the class, is able to do so (after first
doing some checking to make sure that creation should be permitted).
The choice of name for Person’s companion object is not accidental. Its
purpose here is to act as a ‘factory’ for creating Person objects.
This is an example of another design pattern, Static Factory Method.
Task 12.9
-
Edit the file
Factory.kt, in thetasks/task12_9subdirectory of your repository. Modify the basicPersonclass definition in this file to match the example given above. -
Add to the file a
main()function. In this function, write a line of code that attempts to create aPersonin the normal way, by invoking the primary constructor. Verify that this line produces a compiler error. -
Replace that line with a different line that creates a
Personobject by invoking the class-levelcreate()method. Compile and run the program to make sure that there are no errors. -
Add a line that attempts to create another
Personobject with the same value for thenameproperty as the first. Verify that this leads to a run-time error.
-
Kotlin’s approach to supporting features at the class level is different from that of Java, C# or C++. In those languages, you can label a member of a class with the keyword
staticto indicate that it is associated with the class rather than any particular instance. ↩ -
An alternative approach would be to define these constants at the top level, outside the class. This would work fine, but defining them within the class is a nicer solution. ↩
Unit Testing (Part 2)
Part 1 explored the basic principles of unit testing and introduced Kotest, a powerful testing framework for Kotlin software.
In this follow-up, you will learn about richer and more powerful assertions, with which you can check that floating-point values, strings and collections have the expected form, or that exceptions are thrown when expected.
You will also learn about how test fixtures allow you to set up a consistent environment for running tests.
You will apply what you’ve learned so far about Kotest in a scenario that introduces you to the concept of test-driven development, whereby tests are written before the code that needs to be tested.
Finally, you’ll learn how to isolate unit tests from external dependencies using test doubles.
At the end of all this, you should have a solid grounding in how to write automated tests for Kotlin software using Kotest. We will return to testing later in the module.
Rich Assertions
In Part 1, we saw how you can write assertions
in Kotest using matchers, and we considered a single example of a
matcher: shouldBe.
You can do a lot with shouldBe, but Kotest provides a large set of matchers
that perform other kinds of assertion. Using these can simplify unit tests
and make them much easier to read.
We present examples of some of these below, but for full details you should consult the Kotest documentation for Core Matchers and Collections Matchers.
Floating-Point Values
When testing the result of a floating-point expression, shouldBe won’t
suffice on its own, due to the inexactness of floating-point arithmetic.
Instead, we need to test whether the result of the expression is close
enough to the expected value.
We achieve this by combining shouldBe with another matcher, plusOrMinus.
This allows us to specify how much deviation above or below the expected
value is considered acceptable.
For example, to test whether variable result is close enough to 3.0,
we could use
result shouldBe (3.0 plusOrMinus 1e-6)
The parentheses are needed here to ensure that the plusOrMinus matcher
takes priority over shouldBe.
This assertion would succeed if the value of result was between 2.999999
and 3.000001.
plusOrMinus is in the package io.kotest.matchers.doubles. You will need
an import statement like this in order to use it:
import io.kotest.matchers.doubles.plusOrMinus
Comparisons
Consider how we might assert that the result of some computation is a value
less than 10. We could do this using shouldBe like so:
result < 10 shouldBe true
Alternatively, we could write
result shouldBeLessThan 10
This is clearer and more readable.
Kotest also provides the other comparison matchers that you would expect:
shouldBeGreaterThan
shouldBeLessThanOrEqualTo
shouldBeGreaterThanOrEqualTo
These can be used to test values of any type for which the standard comparison operators are defined.
These matchers are provided in the package io.kotest.matchers.comparables.
You will need the appropriate import statement to use one of them, e.g.,
import io.kotest.matchers.comparables.shouldBeLessThan
Testing Strings
Consider how we might test whether the string resulting from some text manipulation was blank, or was empty, or started with a particular sequence of characters. We could make the necessary assertions like this:
str.isEmpty() shouldBe true
str.isBlank() shouldBe true
str.startsWith("Foo") shouldBe true
Alternatively, we could use Kotest’s string matchers:
str.shouldBeEmpty()
str.shouldBeBlank()
str shouldStartWith "Foo"
Again, the benefit here is improved readability.
Notice the change in syntax here. Asserting that a string should be empty, for example, doesn’t require an additional argument, therefore we cannot use infix notation for the call.
Some of the string matchers are particularly powerful. For example, if you need to assert that a string should contain at least one decimal digit, or that it contains only decimal digits, or that it is valid representation of an integer in a particular number base, you can use
str.shouldContainADigit()
str.shouldContainOnlyDigits()
str.shouldBeInteger()           // decimal representations
str.shouldBeInteger(radix=16)   // hexadecimal representations
str.shouldBeInteger(radix=2)    // binary representations
There are many other string matchers. See the documentation for details of these.
These matchers are provided in the package io.kotest.matchers.string.
You will need the appropriate import statement to use one of them, e.g.,
import io.kotest.matchers.string.shouldBeEmpty
Testing Collections
If the result of computation is a collection of some kind, then we could
make assertions about emptiness, size and contents using shouldBe, like so:
result.isEmpty() shouldBe true
result.size shouldBe 10
42 in result shouldBe true
Alternatively, we could use others matchers to make these assertions in a clearer way:
result.shouldBeEmpty()
result shouldHaveSize 10
result shouldContain 42
We can also make more sophisticated assertions about collection contents:
result.shouldContainAll("a", "b", "c")
result.shouldContainExactly("a", "b", "c")
tesult.shouldContainExactlyInAnyOrder("a", "b", "c")
result.shouldBeSorted()
The first of these examples would succeed for any collection containing these
three strings and would allow other strings to be present. For example, it
would succeed for ["a", "b", "c"], ["b", "a", "c"] and
["a", "b", "c", "d"], but fail for ["a", "b", "d"].
The second example would succeed only for collections containing exactly
["a", "b", "c"]. It would fail for ["a", "b", "c", "d"] or
["b", "a", "c"].
The third example relaxes the ordering requirement, so would succeed for
both ["a", "b", "c"] and ["b", "a", "c"].
The final example is used specifically with lists, and would succeed for any list whose elements were sorted into their natural ascending order.
There are many other matchers that can be used with collections. See the documentation for details of these.
These matchers are provided in the package io.kotest.matchers.collections.
You will need the appropriate import statement to use one of them, e.g.,
import io.kotest.matchers.collections.shouldHaveSize
Inspectors
Kotest inspectors allow for more detailed assertions to be made about the
contents of a collection. For example, suppose you need to verify that
a particular collection of strings contains at least two strings that are
at least 10 characters long. You can do this using the forAtLeast()
inspector, with a lambda expression containing the shouldHaveMinLength
matcher:
result.forAtLeast(2) {
  it shouldHaveMinLength 10
}
See the Inspectors documentation for more details.
Logical Negation
The matchers discussed above have involved ‘positive’ assertions that something is true about the value being tested, but it important to note that Kotest also provides matchers representing the logical negation of these assertions.
For example, you can use shouldNotBe to assert that the result of
computation should not have a particular value.
Other examples include
shouldNotBeEmptyandshouldNotBeBlank, for stringsshouldNotBeLessThan,shouldNotBeGreaterThan, etc, for comparisonsshouldNotHaveSizeandshouldNotContain, for collections
Testing For Exceptions
If your code throws exceptions, it’s essential to have some of your unit tests check whether these exceptions are thrown when expected.
Kotest provides the following functions for testing exceptions. Each of them accepts a lambda expression as an argument, containing the code that is supposed to trigger the exception. The first two are generic functions that also require an exception type to be specified.
shouldThrow
shouldThrowExactly
shouldThrowAny
For example, suppose you have a class Money, representing an amount of
money as euros and cents. Attempting to create a Money object with a
negative number of euros should trigger an IllegalArgumentException.
You could test for this behaviour using shouldThrow() like so:
"Exception when creating Money with negative euros" {
    shouldThrow<IllegalArgumentException> {
        Money(-1, 0)
    }
}
This test will pass if creating a Money object with a negative value for
euros throws an instance of IllegalArgumentException or any of its
subclasses. If you want to exclude subclasses, use shouldThrowExactly
instead.
If you don’t care about the exception type and simply want to verify that an exception occurs, you can use simpler code to make that assertion:
shouldThrowAny { Money(-1, 0) }
Note that shouldThrow() and shouldThrowAny() return the exception object
that was thrown. You are free to ignore this, or you can use it to test the
error message associated with the exception, using the shouldHaveMessage
matcher:
"Exception when creating Money with negative euros" {
val exception = shouldThrow<IllegalArgumentException> {
Money(-1, 0)
}
exception shouldHaveMessage "Invalid euros"
}
These matchers are provided in the package io.kotest.assertions.throwables.
You will need the appropriate import statement to use one of them, e.g.,
import io.kotest.assertions.throwables.shouldThrow
Test Fixtures
A test fixture is a known, fixed environment to use as a baseline when running tests. Typically it consists of a set of objects that are created and initialized to a known state, and then made available to every test.
Test fixtures help to eliminate code duplication by defining objects that are used by multiple tests in a single place.
Test fixtures can also speed up test execution by ensuring that time-consuming object configuration is performed once, instead of being repeated unnecessarily in multiple tests.
Task 13.2
Let’s work through an example of using a fixture in Kotest.
-
The
tasks/task13_2subdirectory of your repository is a Gradle project that implements a class representing time on a 24-hour clock.The class is defined in
Time.ktand its unit tests are in the fileTimeTest.kt. Open these files and examine them carefully. -
Run the tests, with
./gradlew testThey should all pass.
-
Note any examples of code duplication that you can see in
TimeTest.For example, in the portion of the code shown below, you can see that a
Timeobject representing a time of midnight is defined more than once.class TimeTest : StringSpec({ "Hours stored correctly" { val midnight = Time(0, 0, 0) val noon = Time(12, 0, 0) withClue("00:00:00") { midnight.hours shouldBe 0 } withClue("12:00:00") { noon.hours shouldBe 12 } } "Minutes stored correctly" { val midnight = Time(0, 0, 0) val thirtyMin = Time(0, 30, 0) withClue("00:00:00") { midnight.minutes shouldBe 0 } withClue("00:30:00") { thirtyMin.minutes shouldBe 30 } } ... }) -
Redefine
midnightoutside the tests, at the start ofTimeTest. Remove any definitions that are made inside the tests:class TimeTest : StringSpec({ val midnight = Time(0, 0, 0) "Hours stored correctly" { val noon = Time(12, 0, 0) withClue("00:00:00") { midnight.hours shouldBe 0 } withClue("12:00:00") { noon.hours shouldBe 12 } } "Minutes stored correctly" { val thirtyMin = Time(0, 30, 0) withClue("00:00:00") { midnight.minutes shouldBe 0 } withClue("00:30:00") { thirtyMin.minutes shouldBe 30 } } ... })The variable
midnightis now a test fixture. This definition is executed once by default (though see the discussion below), and the variable can be used by any of the tests defined insideTimeTest. -
Repeat this process for any other
Timeobjects that are used more than once by the tests. After moving an object into the fixture, rerun the tests to check that they all still pass.You should end up with a test fixture consisting of six
Timeobjects. This new version ofTimeTestshould be around eight lines shorter than the original.
Isolation Modes
In the example above, Kotest creates a single instance of the TimeTest
class and reuses it to run each of the specified tests. This means that the
code to create the fixture is executed only once.
This is ideal for situations like this one, where the class under test has
no methods that change object state. But what if we were testing a class
in which changes in state were possible? For example, what if Time had been
defined with var properties, allowing hours, minutes and seconds to be
altered after object creation?
This creates a potential problem. When objects are mutable, it is possible for a test to modify an object in the test fixture so that it is no longer in the state expected by other tests!
The solution to this problem is to switch Kotest’s isolation mode from ‘single instance’ (the default) to ‘instance per test’. In this mode, Kotest creates a new instance of the test spec before running each test. This means that the fixture will be recreated before each test, so it no longer matters if a test modifies the objects in the fixture.
Here’s an example of how to switch to ‘instance per test’ in a single set of tests:
import io.kotest.core.spec.IsolationMode
...
class MyTests : StringSpec({
isolationMode = IsolationMode.InstancePerTest
...
})
The Kotest documentation has more information on isolation modes, including details of how to set a project-wide default isolation mode.
Test-Driven Development
In test-driven development (TDD), tests are written before the code that needs to be tested.
Why might you choose to do this?
One reason is that it forces you to implement the test. With a ‘test last’ approach, there can sometimes be a temptation to skip one or more tests. (When you are under pressure to deliver working code quickly, it is surprisingly easy to delude yourself that a piece of code is “bound to be correct”, and therefore doesn’t require tests.)
But there is much more to TDD than that. By writing a test first, you are forced to think carefully about how a method should be called and what the precise outcome of calling it should be; in essence, TDD clarifies the detailed requirements for your code.
TDD also helps to define a clear endpoint for implementation of a feature; when you have tests that cover each aspect of the behaviour required of that feature, and they all pass, you’ve finished. Advocates of TDD argue that this approach leads to cleaner and simpler code that does no more than what is required.
The remainder of this section is an extended task in which you will use TDD
to create a class named Money, representing an amount of money as euros
and cents.
You will need to work through it right to the end in order to get a proper idea of what TDD feels like in practice.
Getting Started
-
The
tasks/task13_3subdirectory of your repository is the Gradle project in which you will develop theMoneyclass.Open the file
MoneyTest.kt, in thesrc/tests/kotlindirectory of the project. All of your tests for theMoneyclass will be written here. -
The starting point of the TDD cycle is to write a test that fails, so let’s do that now. Write the following in the
MoneyTestclass:"Can create a Money" { val m = Money(1, 50) }This code encapsulates two design decisions: one is that there should be a class named
Money; the other is that two integer values (representing number of euros and number of cents) must be supplied in order to create aMoneyobject.If you have written this code using an IDE such as IntelliJ, you will see that it is highlighted as an error. If you try to run the test manually, e.g., with
./gradlew test, you will see a compiler error reporting thatMoneyis an ‘unresolved reference’.You have written a test that fails1, as required in TDD; it is this failure that motivates creation of the
Moneyclass. -
In
src/main/kotlinis a file namedMoney.kt. Edit this file and add the following minimal definition ofMoney:class Money(euros: Int, cents: Int)Run the tests again. They should now pass.
You should not implement anything more at this stage. A central principle of TDD is that you write only the minimum of code needed to get a test to pass. The need for a more complex implementation has to be driven by the existence of additional failing tests.
-
The test could be improved by making it actually assert something, so let’s add a couple of assertions:
"Can create a Money" { val m = Money(1, 50) withClue("euros") { m.euros shouldBe 1 } withClue("cents") { m.cents shouldBe 50 } }The modified test captures another design decision; namely that the
Moneyclass has properties namedeurosandcents. Since these properties don’t yet exist, the test fails to compile. -
Modify the
Moneyclass so that it looks like this:class Money(euros: Int, cents: Int) { val euros = 1 val cents = 50 }Don’t be tempted to do anything else at this stage; as yet, our test requires only that the
eurosandcentsproperties have values of 1 and 50, respectively.If you rerun the tests, they should now pass.
It is obvious that these properties shouldn’t really have hard-coded values, but you need to bear in mind that TDD encourages implementation of the simplest possible solution that makes the tests pass. Only when we have a failing test that identifies the need for something more complicated should we add that complexity. This is a powerful way of preventing ‘over-engineering’ of the code.
-
Now add a second test, to see whether a different amount of money can be created properly:
"Can create a different Money" { val m = Money(2, 99) withClue("euros") { m.euros shouldBe 2 } withClue("cents") { m.cents shouldBe 99 } }Rerun the tests and you’ll see a failure. The test report will provide further details:
io.kotest.assertions.MultiAssertionError: The following 2 assertions failed: 1) euros expected:<2> but was:<1> at MoneyTest$1$2.invokeSuspend(MoneyTest.kt:18) 2) cents expected:<99> but was:<50> at MoneyTest$1$2.invokeSuspend(MoneyTest.kt:19) -
The only sensible way of getting this failed test to pass as well as the previous one is to have the properties store the values that were supplied to the constructor:
class Money(euros: Int, cents: Int) { val euros = euros val cents = cents }Make these changes, then rerun the tests. They should now pass.
A Refactoring Opportunity
The Money class as it stands can be implemented in a more concise way,
without changing its functionality. Making such a change, in which structure
is improved with affecting behaviour, is known as refactoring.
Having good unit tests available is an essential prerequisite for refactoring. If you have good tests, you can make structural improvements with confidence, safe in the knowledge that any mistakes will cause a test to fail.
-
Try this out now. Refactor the
Moneyclass into a compact, single line implementation:class Money(val euros: Int, val cents: Int)Then run the tests again. They should still pass.
-
One other thing we can do is turn
Moneyinto a data class:data class Money(val euros: Int, val cents: Int)Make this change, then run the tests again. They should still pass.
Improving Robustness
Another required feature is that is shouldn’t be possible to create a Money
object with an invalid number of euros or cents. Any attempt to do so should
result in an IllegalArgumentException thrown by the constructor.
-
Identity a minimal number of tests that will be required to verify that that this feature has been implemented correctly.
-
For each of these, write the test first, run all the tests to make sure that it fails, then make changes to
Moneythat are sufficient for the test to pass.
Hints
Hints
You can drive implementation of this feature with as few as three tests:
- It shouldn’t be possible to create a
Moneywith a negative value for euros - It shouldn’t be possible to create a
Moneywith a negative value for cents - It shouldn’t be possible to create a
Moneyin which cents has a value larger than 99
See the section on rich assertions for details of how to assert that a particular exception is thrown by code.
Further Steps
Let’s use TDD to implement one more feature in Money: the ability to add
two amounts together, yielding a new Money object representing the
total amount.
-
Add the following test to
MoneyTest:"€1.50 + €1.00 is €2.50" { Money(1, 50) + Money(1, 0) shouldBe Money(2, 50) }This won’t compile, because we’ve not defined how the addition operator should work for
Moneyobjects. -
Add the following minimal implementation of the addition operator to
Money:operator fun plus(other: Money) = Money(2, 50)This is obviously wrong, but is sufficient for the test to compile and pass.
This is an example of operator overloading.
We’ve not covered operator overloading formally, but if you are curious about it, see the official language documentation for more details.
-
Write another test, one that adds a different number of euros:
"€1.50 + €2.00 is €3.50" { Money(1, 50) + Money(2, 0) shouldBe Money(3, 50) }This will fail when executed.
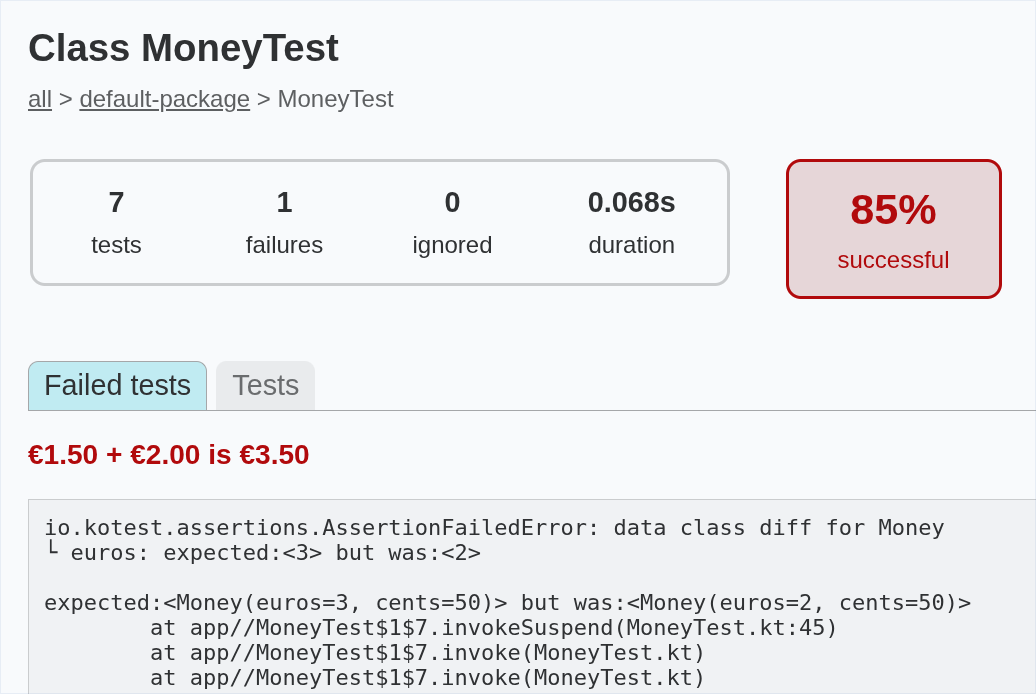
-
The failed test motivates a modification to the implementation of the addition operator, so that it adds the
eurosproperties of the twoMoneyobjects:operator fun plus(other: Money) = Money(euros + other.euros, 50)Make this change and rerun the tests. They should now all pass.
-
Verify that cents are added correctly with a test like this:
"€1.50 + €0.01 is €1.51" { Money(1, 50) + Money(0, 1) shouldBe Money(1, 51) }This should fail when you rerun the tests.
-
Make the minimal changes necessary for the failing test to pass:
operator fun plus(other: Money) = Money(euros + other.euros, cents + other.cents) -
There is one further aspect of adding together two
Moneyamounts that we need to test. If the sum of thecentsvalues equals or exceeds 100, we need to represent this as an additional euro plus zero or more remaining cents.Add this test to
MoneyTest:"€2.99 + €0.01 is €3.00" { Money(2, 99) + Money(0, 1) shouldBe Money(3, 0) }This should fail when you run the tests.
-
Make the changes to the addition operator that are needed for this final test to pass. We’ll let you figure those out for yourself!
Other Things To Try
You’ve hopefully done enough now to understand the TDD cycle, but if you want to carry on and gain more experience of it, here are a few optional tasks:
- Implement comparisons using the
<,<=,>,>=operators - Override
toString()so that it returns strings like€0.01and€10.50 - Add support for subtraction of one amount of money from another
In each case, be sure to follow a test-driven approach: write a test to verify one aspect of the desired behaviour, make sure it fails, then write the minimum of code needed for the test to pass. Repeat these steps until all aspects of the desired behaviour are covered by tests that pass.
You could also try refactoring the tests—e.g., introducing a test fixture.
Final Thoughts
You may still be unconvinced by TDD. Newcomers to the concept often feel that it is slow and unnecessarily cautious, forcing you to take small steps towards the desired implementation when the nature of that implementation is ‘obvious’—but this is missing the point.
Take a close look at the tests you have written in MoneyTest. Effectively,
these document the required behaviour of the Money class. There are two
tests that document the requirement that euros and cents values are stored
in, and can be retrieved from, a Money object. There are three tests that
document the constraints that are enforced on the values of euros and cents.
There are four tests that collectively encode the rules governing how two
sums of money should be added together. Use of TDD has resulted in the
development of a complete and executable requirements specification for
the Money class. Without using TDD, we might not have arrived at such a
complete specification.
Because the requirements are specified so comprehensively by tests, you can have more confidence in the correctness of your implementation. You can also be more confident about refactoring the class in future development work, knowing that unintended changes in its behaviour will be flagged by failing tests.
Finally, TDD’s emphasis on not implementing more code than is necessary to
make the tests pass means that you haven’t wasted any time over-engineering
the Money class by adding features that aren’t yet needed.
-
Failure to compile counts as a failed test here. ↩
Test Doubles
In object-oriented systems, it’s normal for objects to do their work in collaboration with other objects. When it comes to testing, this creates a problem, because unit tests are supposed to test a small part of the system in isolation from other parts.
The need for isolation becomes especially acute when the dependent code interacts with something external to the system under test—a file, a database, or a network resource, for example. We cannot write fast, reliable and repeatable tests when there are external dependencies of this kind.
We can solve this problem by introducing a test double. A test double is analogous to a ‘stunt double’ in a movie. A stunt double stands in for an actor when they are required to do something difficult or dangerous in a movie scene. Similarly, a test double stands in for real code in a test: real code that would have prevented that test from being fast, reliable or repeatable.
There are several different types of double:
-
Fakes are objects with working implementations that employ shortcuts or simplifications so that they are better suited for use in tests. For example, if we had code dependent on a database accessed over the network, we could have our tests use a fake in-memory database in place of that real database.
-
Stubs are simple objects that don’t have working implementations. Instead, they provide pre-programmed responses to method calls made on the object.
-
Spies are stubs that record some information about the methods that are invoked on them. For example, you could set up a spy that doubles for an email sending service. It wouldn’t actually send any emails, but it could count the number of times that the
sendMail()method is called. -
Mocks encode detailed expectations about the methods that will be invoked on them. We use them to verify that the code under test invokes those methods in the expected way. This is a deeper form of testing than the state verification approach that we typically use with stubs.
We will focus here on stubs.
An Example
Suppose you are implementing a financial application that converts amounts of money from British Pounds Sterling (GBP) to other currencies, such as US Dollars (USD) or Japanese Yen (JPY).
You might have a CurrencyConverter class, instances of which perform such
conversions. Those instances might use an ExchangeRateService object to
provide the required exchange rates between GBP and currencies:
val rateService = ExchangeRateService()
val converter = CurrencyConverter(rateService)
...
val amountInYen = converter.convertTo("JPY", amount)
Below is a working implementation of ExchangeRateService. It makes a network
call to a web API to obtain the current exchange rates between GBP and other
currencies. These rates are returned as JSON data. The implementation
uses the Jackson library to parse the data, extracting exchange rates
and storing them in map, with the three-letter currency codes used as keys.
class ExchangeRateService {
private val url = URI.create(SERVICE_URL).toURL()
private val mapper = jacksonObjectMapper()
private val rates = mutableMapOf<String, Double>()
init { updateRates() }
fun updateRates() {
val json = mapper.readTree(url) // network call made here!
for (rate in json.path("rates").fields()) {
rates[rate.key] = rate.value.asDouble()
}
}
fun rateFor(currency: String): Double = rates.getOrElse(currency) {
throw IllegalArgumentException("Unsupported currency: $currency")
}
}
When writing unit tests for CurrencyConverter, we shouldn’t use this
implementation of ExchangeRateService, for several reasons:
- Bugs in the implementation of
ExchangeRateServicemight affect our tests - Creation of an
ExchangeRateServiceobject involves a network call, which will slow down the tests (even if we limit this by doing it only once, in a test fixture) - Creation of an
ExhangeRateServiceobject could fail, e.g., if the API server is down - Exchange rates change, but to make assertions about whether
convertTo()returns the correct values, we need rates to be fixed
Creating Stubs With Mockk
We can create a stub for ExchangeRateService without having to define
another class, by using an object mocking library.
In this example, we will use Mockk, a library designed specifically for Kotlin.
-
The
tasks/task13_4subdirectory of your repository is a Gradle project containing the classes described above. Take some time to examine the source code. -
The project contains a small program that performs a currency conversion. It uses the full implementation of
ExchangeRateService. Try running the program with./gradlew run -
Open
build.gradle.kts. You will see familiar test dependencies on the Kotest libraries, plus a new dependency on Mockk:testImplementation("io.mockk:mockk:1.13.13") -
Now locate
CurrencyConverterTest.kt. In this file, create the following test fixture:val service = mockk<ExchangeRateService>() every { service.updateRates() } just Runs every { service.rateFor("GBP") } returns 1.0 every { service.rateFor("USD") } returns 1.5 every { service.rateFor("JPY") } returns 190.0 val conv = CurrencyConverter(service)Here, the
servicevariable is our stub object. We useeveryto specify how the stub should behave. The first use ofeverydeclares that callingupdateRates()is allowed, and that it does nothing. The other three uses ofeverypre-program the stub to return specific values whenrateFor()is called for currency codes ofGBP,USDandJPY.The final line of the code above simply plugs this stub object into the
CurrencyConverterobject that will be the subject of our tests. -
Add a test like this:
"Amount can be converted to JPY" { conv.convertTo("JPY", 2.0) shouldBe (380.0 plusOrMinus 0.00001) } -
Add similar tests for the other two currencies that the stub knows about. Then run the tests with
./gradlew testThe tests should all pass.
And that’s all there is to it! You have now successfully isolated
CurrencyConverterfrom its dependency, using a stub.
Creating Stubs Manually
This explanation depends on concepts yet to be covered. You might want to return to this section after having learned about interfaces.
Let’s imagine that you don’t have access to a mocking library. How could
you create your own stub, and have the ability to plug this in to a
CurrencyConverter object?
The trick is to make ExchangeRateService an interface, with updateRates()
and rateFor() methods. We then make the real working version of the service
implement this interface. Finally, we write a stub that also implements the
interface:
classDiagram
ExchangeRateService <|.. ExchangeRateServiceImpl
ExchangeRateService <|.. ExchangeRateServiceStub
class ExchangeRateService {
<<interface>>
updateRates()
rateFor(currency: String) Double
}
ExchangeRateServiceImpl will contain the code shown earlier.
ExchangeRateServiceStub will look like this:
class ExchangeRateServiceStub : ExchangeRateService {
fun updateRates() {
// does nothing!
}
fun rateFor(currency: String) = when(currency) {
"GBP" -> 1.0
"USD" -> 1.5
"JPY" -> 190.0
else -> throw IllegalArgumentException("$currency")
}
}
Now, our unit tests can use the stub when creating a fixture:
val service = ExchangeRateServiceStub()
val conv = CurrencyConverter(service)
Applications that use CurrencyConverter will obviously need to use the full
implementation of the service, rather than the stub:
val service = ExchangeRateServiceImpl()
val conv = CurrencyConverter(service)
...
val amountInYen = currency.convertTo("JPY", amount)
Clearly, this approach involves more code than using a mocking library.
However, there are other benefits to hiding the service implementation behind an interface. For one thing, it allows us to have multiple working implementations of the service, e.g., one that uses a web API, another that retrieves exchange rates from a database, etc.
Class Relationships
Classes are not isolated entities. They collaborate with each other to deliver the functionality of a software application. These collaborations can take different forms.
We begin this section by considering the idea that closely-related classes should be organized into logical groups called packages.
After that, we compare and contrast the simple transient dependencies between classes with a stronger, more long-lived type of relationship, termed association.
We finish the section by considering two specialized and subtly different kinds of association: aggregation and composition.
Grouping With Packages
Key Concepts
It can be useful, particularly in larger systems, to have distinct logical groupings of classes1. These groups of classes are called packages.
The classes within a package all ‘fit together’ in some sense; typically, they are used together to implement a particular feature of the system, or they form a distinct architectural component of the system.
For example, you might have an application with one group of classes that
are used to provide a user interface, and another group of classes that
handle interaction with a database. You could put the first group of classes
in a package named myapp.ui and the second group in a package named
myapp.database.
Or you might organize things functionally, putting all the classes that
relate to placing an order for a product in the myapp.orders package, and
all the classes that relate to delivering the ordered product in the
myapp.delivery package.
A package constitutes a namespace for your code. Within that namespace, class names need to be unique, but the same constraint doesn’t apply across namespaces.
This can be useful in large projects, where different teams are working on different parts of a system. It may well happen that two teams happen to use the same name for different purposes. This would cause problems if all the code were part of a single namespace, but if the teams put their classes in differently-named packages then the problem disappears.
An Example From Java
The Java language ships with a huge standard library comprising thousands of classes. These are organized into a large number of packages.
The package java.util contains a class named Date, which
represents a date & time with millisecond precision. Another package,
java.sql, contains a different class that is also named Date,
representing a date retrieved from an SQL database.
These two classes are allowed to have different names because they reside in differently-named packages. If you ever needed to reference both classes from within the same file of source code, you could use the package names to distinguish between the two.
Packages in UML
A package is represented in UML as a file folder, with a tab sticking out of one corner. If you are not interested in seeing the contents of a package, the package name can be displayed in the middle of the folder icon:

For more detail, you can put the package name in the tab and show the package contents inside the folder, either as a full class diagram or as a list of class names:
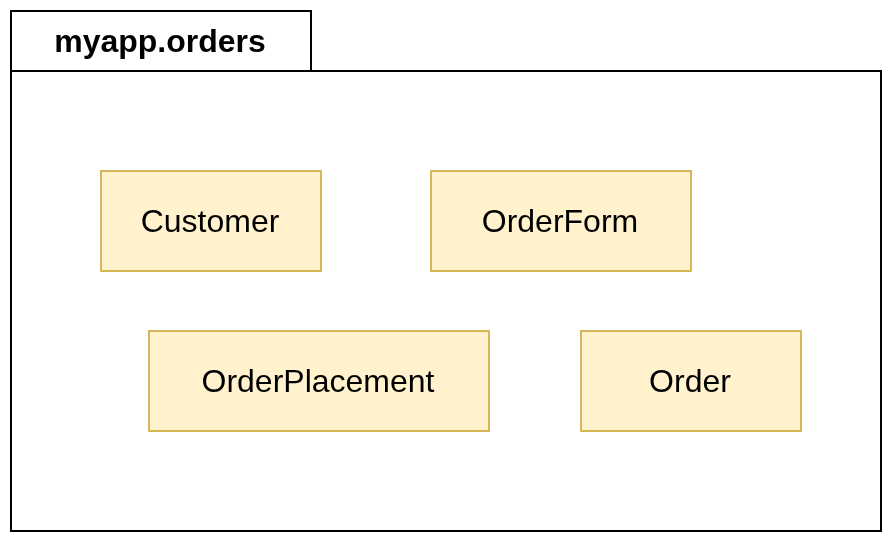
Packages in Kotlin
Putting Code in a Package
This is fairly straightforward. If you put a package declaration at the
top of a .kt file, all of the classes and functions defined within that
file will become part of the package that you have named in the declaration.
For example, to put class Customer in the package myapp.orders, you
would write
package myapp.orders
class Customer(val name: String, val email: String)
Package Naming Conventions
Package names generally have two or more elements, separated from each other by a period. Each element should use lowercase letters if possible, although a lower camel case naming style is permitted. Underscores should not be used.
In code intended for public release, it is advisable to make package names unique by incorporating a reversed domain name as a prefix.
Consider, for example, the Kotest libraries that you have already used for
unit testing. The website for Kotest is hosted at the domain kotest.io, and
all of the code in the libraries is organized into packages whose names
begin with io.kotest.
Implications For Project Organization
Package names affect where the output from the Kotlin compiler is stored.
Let’s experiment with this now.
-
Examine the file
Customer.kt, in thetasks/task14_1_1subdirectory of your repository. This file doesn’t have an explicit package declaration. The class defined in the file will be treated as if it were part of an unnamed ‘default package’. -
In a terminal window, compile the code using the command-line compiler:
kotlinc Customer.ktVerify that this has created a bytecode file named
Customer.class, in the same directory asCustomer.kt. Then remove this bytecode file. -
Edit
Customer.ktand add this line to the start of the file:package myapp.ordersInvoke the compiler again. Where is
Customer.classnow?
Note that it is customary to organize source code in a directory hierarchy that mirrors the package name.
So if you put a class into a package named myapp.orders, the .kt file
containing the class definition should ideally be located in the subdirectory
src/myapp/orders.
The Kotlin compiler doesn’t require this, but it is considered to be good practice.
You’ll have noticed that packages generally haven’t been used in the tasks and code samples that we’ve provided for you.
This has been done to keep things simple, and because the amount of code used in a task is generally very small, so there is not much benefit to be gained by putting functions and classes into packages.
In larger pieces of work—e.g., your Semester 2 group project—we will expect you to use packages or similar mechanisms to keep all of your code well organized.
-
We focus on classes here, but this idea of grouping applies equally to functions. ↩
Dependency
A dependency between two classes indicates that one class needs to make use of the other, typically for a short period of time.
For example, suppose we have a transport simulation involving electric vehicles. A vehicle will be able to drive for a period of time, until the level of charge on its battery falls below some threshold, at which point it will need to seek out a charging station in order to recharge the battery.
There are two obvious classes here: Vehicle and ChargingStation.
However, the relationship between them is transient in nature. A Vehicle
object won’t need permanent access to a ChargingStation object. The
two objects will interact only during the recharging process.
In UML, we represent relationships of this kind using a dashed line, with a v-shaped arrowhead. The arrow must point from the class that has the dependency, towards the class on which it depends:
classDiagram
direction LR
Vehicle ..> ChargingStation
class Vehicle {
batteryLevel: Int
drive()
recharge()
}
This diagram tells us that Vehicle depends on ChargingStation. The
implementation of the recharge() method will involve some interaction with
a ChargingStation object.
In practice, a class will often have dependencies on many other classes, relying on them to help it perform its various duties.
Generally, we do not show all these dependencies on a class diagram.
Dependencies between classes should only be drawn if they are of particular importance.
Association
We say that one class associates with another if it knows about, and regularly collaborates with, that other class in order to perform its tasks.
Unlike a simple dependency, which typically indicates a transient collaboration between classes, the collaboration represented by an association isn’t temporary.
This means that an instance of one class must be linked to an instance of the other class, so that it can invoke methods of that instance whenever it needs to do so.
Representation in UML
Associations are shown on UML class diagrams by drawing a solid line between two classes. Ideally, that line should also be labelled to indicate the nature of the association.
Here’s an example:
---
config:
class:
hideEmptyMembersBox: true
---
classDiagram
direction LR
Employee -- Company : works for
Association labels are read from left to right or top to bottom by default. If you need the association to be read in the opposite direction to those defaults, you should show this by including a small triangular arrowhead beside the label:
---
config:
class:
hideEmptyMembersBox: true
---
classDiagram
direction LR
Employee -- Company : ◂ employs
Navigability
You can indicate that an association is navigable in a specific direction or in both directions by including a v-shaped arrowhead on one or both ends of the association.
For example, a module enrolment system might have classes named Student
and Module, associated like this:
---
config:
class:
hideEmptyMembersBox: true
---
classDiagram
direction LR
Student <-- Module : is enrolled on
This relationship is navigable in one direction only: from Module to
Student. In other words, a Module object knows about a Student who
enrols on a that module, but a Student object doesn’t keep track of
the modules with which it has been linked.
Don’t get confused between the directionality applied to an association label and the navigability of the association itself. These are different things!
In the example above, the directionality of the association label is
left-to-right, from Student to Module: we read the association as
“a student is enrolled on a module”.
However, in an implementation of these classes, the relationship is navigable
in the opposite direction, from Module to Student, as indicated by
the v-shaped arrowhead.
Given a Module object, we can find the students enrolled on that module, but
if we have a Student object then we cannot immediately enumerate all of the
modules on which this student is enrolled.
Navigability is an optional feature of UML class diagrams.
It’s quite common not to show it all when doing object-oriented modelling of a system, making the final decisions about navigability when the classes are actually implemented.
Multiplicity
You can add multiplicity to either end of an association to indicate how many objects are expected to participate in the relationship.
Here are some examples of the syntax:
| Multiplicity | Meaning |
|---|---|
1 | Exactly one object |
* | Any number of objects |
0..1 | Zero or one object |
1..6 | Between 1 and 6 objects |
1..* | At least one object, no upper limit |
We can take the Student & Module example from earlier and add
multiplicities to model the relationship that applies to Level 2 of your
Computer Science degree:
---
config:
class:
hideEmptyMembersBox: true
---
classDiagram
direction LR
Student "1..*" <-- "3" Module : is enrolled on
The ‘English translation’ of this diagram is as follows:
A Module can have one or more students enrolled on it, and there is no upper limit on enrolment. Each Student is enrolled on precisely 3 modules. Given a Module, we can enumerate all of the students enrolled on it.
Multiplicity, like navigability, is an optional feature of UML class diagrams.
Add multiplicities only if it is clear what they should be and it feels useful to do so.
Representation in Kotlin
Basic Example
Let’s return to the example of Employee and Company seen earlier.
We will assume that both employees and companies have names. The two classes
can therefore be represented like this on a UML diagram:
classDiagram
direction LR
Employee --> Company : works for
class Company {
name: String
}
class Employee {
name: String
}
Note: we are also assuming here that the relationship
is navigable in one direction only, from Employee to Company.
These classes and their association can be implemented in Kotlin like so:
class Company(val name: String)
class Employee(val name: String, val employer: Company)
The employer property is initialized when we create an Employee object,
establishing a permanent connection with a Company object, as required
by the association.
Notice that employer is not shown explicitly as a property of Employee on
the UML diagram.
The existence of a property of type Company is already implied by the
association. It would be a mistake to also list the property in the
properties section of Employee.
More Complex Example
Imagine a lending library for books. The software managing this library records the names of library members, and the title & author of each book owned by the library. Members are allowed to borrow up to 5 books at a time.
This description suggests a need for classes LibraryMember and Book,
associated like this:
classDiagram
LibraryMember --> "0..5" Book : borrows
class LibraryMember {
name: String
borrow(book: Book)
}
class Book {
title: String
author: String
}
This class diagram suggests a Kotlin implementation like the following:
const val MAX_BOOKS = 5
data class Book(val title: String, val author: String)
class LibraryMember(val name: String) {
private val borrowed = mutableListOf<Book>()
fun borrow(book: Book) {
require(borrowed.size < MAX_BOOKS) { "Borrow limit reached" }
borrowed.add(book)
}
...
}
Book is a simple data class doing nothing beyond storing details of a book’s
title and author. It doesn’t need to be any more complex than that, because
the association is not navigable from Book to LibraryMember: books don’t
keep track of who has borrowed them.
All of the complexity is therefore in LibraryMember. The one-to-many
association is implemented via the property borrowed, which is a
MutableList<Book> object. This list keeps track of the books borrowed by
a member.
The association has a constraint: no more than 5 books can be borrowed at any
one time. To enforce this constraint, we make the list of books private and
provide a public borrow() method that users of the class must call in order
to borrow a book. This will add a book to the list only if the library member
hasn’t already reached their limit of 5 books.
Aggregation & Composition
In some associations between classes, the class on one side of the relationship can be regarded as representing a composite of some kind, whereas the class on the other represents one of the component parts that make up that composite.
A relationship of this particular kind can be described as an aggregation or a composition. Which of these two options applies is determined by considering whether parts can be shared by different composites or not.
Aggregation
Consider the relationship between a band and its musicians. The band is the composite entity. The musicians are the component parts of the band.
This relationship is aggregation rather than composition here because a band does not necessarily have exclusive ownership of the musicians that are part of it. It is possible for a musician to be a member of more than one band at the same time. Also, if a band decides to end its existence, the musicians that were members of it do not automatically cease to be musicians.
UML Representation
We can depict the fact that a band is an aggregration of muscians like so:
---
config:
class:
hideEmptyMembersBox: true
---
classDiagram
Band o-- Musician : plays in ▴
Notice the arrowhead on the relationship label, telling us that it applies upwards: i.e., a musician plays in a band; a band does not play in a musician!
The new feature here is the unfilled diamond, appearing on the composite end of the relationship. An unfilled diamond signifies aggregation.
People new to object-oriented software software development often overuse aggregation or composition on UML diagrams.
Remember that both are special kinds of association, so it is always valid to draw an aggregation as a plain association on a class diagram.
Add the diamond only when it is very clear that one class can be decribed as a composite and the other as a part of that composite, and you want to convey that fact to the reader.
Implementation in Kotlin
The aggregation relationship between Band and Musician described above
could be implemented in Kotlin like this:
class Musician(val name: String, val role: String)
class Band {
private val members = mutableSetOf<Musician>()
fun join(musician: Musician) = members.add(musician)
fun leave(musician: Musician) = members.remove(musician)
}
We use a set to keep track of the band members, rather than a list. This makes it easy to ensure that a particular musician can’t join a band more than once.
The use of a set is a private implementation detail of the class. Musicians
can join or leave a band by using the join() or leave() methods in
the public API.
The important point to note here is that the Musician objects representing
band members are created externally. A Band object stores references to
those Musician objects, but it does not claim ownership of them, nor is
it responsible for managing their existence.
Composition
Imagine a software system designed to simulate train travel. This might have a class to represent a train and another to represent an individual carriage of that train. Once again, we have a composite (the train) and component parts (the carriages).
The relationship here is composition rather than aggregation. This is because
a Train object has ‘strong ownership’ of its carriages. A Carriage
object belongs to the Train object (for a period of time, at least), and
cannot be shared by multiple Train objects at the same time.
UML Representation
We can depict the fact that a train is composed of carriages like this:
---
config:
class:
hideEmptyMembersBox: true
---
classDiagram
Train *-- "1..10" Carriage : pulls
We’ve added a multiplicity here to show that there are restrictions on the number of carriages that can form part of a train (dictated by platform length, engine power, etc).
The key feature of this diagram is the use of a filled diamond at the composite end of the relationship. A filled diamond signifies composition.
Implementation in Kotlin
Let’s consider how the composition relationship between Train and Carriage
could be implemented as code.
We will assume that a Carriage has two properties: a unique identifier and
the number of seats it has (both integers). We will also assume that a Train
has a property representing the number of carriages that it pulls, and that
this is constrained as indicated in the UML diagram above.
Given these assumptions, the two classes could be implemented like this:
const val MAX_SIZE = 10
class Carriage(val id: Int, val seats: Int)
class Train(val size: Int, seatsPerCarriage: Int) {
private val carriages = mutableListOf<Carriage>()
init {
require(size in 1..MAX_SIZE) { "Invalid train size" }
for (id in 1..size) {
carriages.add(Carriage(id, seatsPerCarriage))
}
}
val seats: Int get() = carriages.sumOf { it.seats }
...
}
As in the example of a band and its musicians, we use one of Kotlin’s collection types as the basis for the implementation of the relationship (a mutable list, in this case).
Once again, we make that collection private, so that users of Train
can’t interact with it except in ways that we specify, via methods or
computed properties of the class.
But there is a very important difference between this code and the code from the band & musicians example, relating to object ownership and lifetime.
Here, Carriage objects are managed by a Train object. It creates those
objects via an initalizer block. Clients of Train do not have direct
access to those objects, so they cannot be shared. When a Train object is
destroyed and the memory it uses is reclaimed, the Carriage objects will
also be destroyed, and the memory allocated to them will be reclaimed.
In the band & musicians example, destroying a Band object and reclaiming
the allocated memory won’t necessarily lead to destruction and memory
reclamation for Musician objects, because other code may continue to hold
references to those objects.
Inheritance & Polymorphism
In this section, we consider the idea that classes can inherit attributes and behaviour from other classes, adding their own attributes and behaviour as well as altering the behaviour they have inherited.
We look at how to create these ‘subclasses’ in Kotlin. We also look at the impact of overriding inherited methods a subclass. This leads us to an extended example, a graphics application that demonstrates the concepts of dynamic binding and polymorphism.
We conclude the section by examining the idea of multiple inheritance and explaining why Kotlin doesn’t support this feature.
Basic Concepts
Human beings understand the world by grouping things into particular categories or classes, but these classes are not independent of each other; instead, they are organized into a hierarchy.
For example, we organize our knowledge about the animal kingdom in a hierarchical fashion using classes like these:
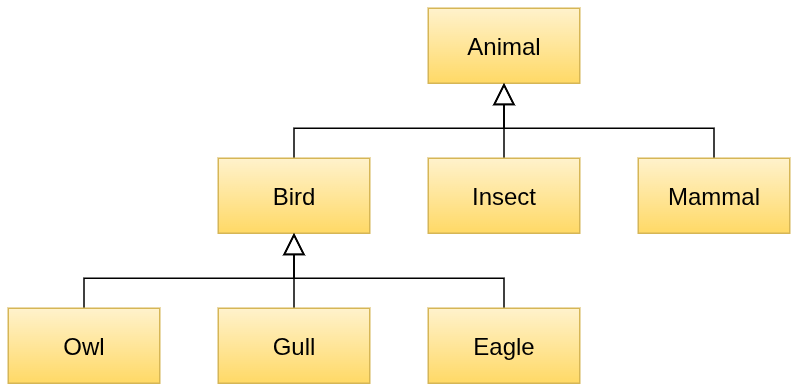
On this diagram, the most general class, Animal, is at the top, at the
root of an ‘inverted tree’. As we moved downwards, classes become more
specialized. Those at the bottom (the leaves of the tree) are the most
specialized of all.
Consider two specific classes from this diagram: Bird and Owl.
We say that Bird is the superclass of Owl, and that Owl is a
subclass of Bird1.
We can also say that Owl ‘specializes’ Bird. The relationship between
the two classes is one of specialization. In practice, this means that
Owl inherits things from Bird, so we can also describe the relationship
using the term inheritance. We will use that term here2.
This hierarchical organization of classes is very useful. For one thing, it facilitates more efficient communication. Imagine, for instance, that you were familiar with the concept of birds in general, but you didn’t know what an owl was. Someone could painstakingly describe to you an owl’s feathers, the fact that it has wings and can fly, etc; or they could just tell you “a bird is a kind of owl”. That simple phrase would instantly reveal the most important things to know about owls.
Inheritance in Software Classes
A class hierarchy in the real world helps us to organize and communicate information more efficiently, and we can glean analogous benefits from organizing software classes into inheritance hierarchies.
In such a hierarchy, a subclass inherits the attributes and behaviour of its superclass, so inheritance provides a structured mechanism for code reuse. Instead of having code duplicated across multiple classes, that code can be provided once only, in a superclass from which they all inherit.
Besides inheriting code from a superclass, a subclass can
-
Add new attributes and behaviour that aren’t found in the superclass
-
Alter specific behaviour that was inherited from the superclass
Choosing Inheritance
When should you make one class inherit from another?
This is actually quite easy to determine!
If you have an existing class X and you want to know if a new class Y should inherit from X, just ask yourself whether the phrase “Y is a kind of X” makes sense.
If “is a kind of” doesn’t describe the relationship accurately, then you should not be using inheritance!
Newcomers to the concept of inheritance sometimes see it primarily as a mechanism for code reuse, and hence they are tempted to ignore the requirement that “is a kind of” should describe the relationship between the classes accurately.
But code reuse is really just a secondary benefit of inheritance. The primary benefit comes from substitutability. A properly constructed inheritance hierarchy will adhere to the Liskov substitution principle (LSP), meaning that a subclass will always be substitutable for its direct superclass, or any of its more distant ancestors further up the tree.
For example, suppose you have a superclass Person, along with subclasses
StaffMember and Student. This makes sense, because a member of staff is a
kind of person, as is a student.
Now suppose that you also have a function with a parameter of type Person.
LSP means that you are allowed to call that function with either a
StaffMember object or a Student object as an argument.
We will explore the practical benefits of LSP in more detail later in this section.
UML Syntax
On a UML class diagram, we show that one class is a subclass of another by drawing a specific type of arrow between the classes. The arrow must have a solid line and an unfilled triangular arrowhead, and it must point from the subclass to the superclass:
---
config:
class:
hideEmptyMembersBox: true
---
classDiagram
Person <|-- Student
Be very careful when you draw relationship arrows on class diagrams!
The details really do matter. Using a v-shaped arrowhead instead of an unfilled triangle, for example, would make this an association, which is clearly incorrect.
Potential Drawbacks
Inheritance is a very helpful feature of object-oriented languages, but there are a few potential disadvantages to using it.
For example, it can be hard to understand where the methods available in a class come from, if that class is part of a deep inheritance hierarchy. Some could come from the parent, others from the grandparent, etc. Deep hierarchies are generally quite hard to work with.
Another issue is that a subclass and a superclass are very tightly coupled to each other. Once you have classes inheriting from a superclass, it becomes harder to change things in that superclass. You don’t necessarily know, simply by examining the code in the superclass, whether or not a change to that code will cause a subclass to break in some way. This is sometimes described as the fragile base class problem.
-
The terms ‘base class’ and ‘derived class’ are less common alternatives for superclass and subclass. ↩
-
Strictly speaking, inheritance is just the mechanism by which specialization is implemented. We will be a bit looser in our use of terminology here and use ‘inheritance’ to describe the relationship itself, as well as its implementation. ↩
Creating Subclasses in Kotlin
Basic Syntax
Let’s start with a very simple example of a superclass and subclass, stripping everything away from both classes so we can focus on the basic syntax:
open class Parent
class Child : Parent()
Here, Parent is the superclass and Child is the subclass.
Note the use of open in front of the definition of Parent. Kotlin classes
are closed for inheritance by default, meaning that a class cannot act
as the superclass of another unless we allow this explicitly, using the
open modifier1.
Note also how the definition of Child includes a colon, followed by
Parent(). This not only names Parent as the superclass, it also declares
that the default constructor of Parent will be invoked as part of the
process of creating a Child object.
Subclasses always need to specify how they want to initialize any properties that have been inherited from the superclass. They do this by indicating which superclass constructor should be invoked.
Task 15.2.1
-
Edit
Subclasses.kt, in thetasks/task15_2_1subdirectory of your repository. Add the two class definitions forParentandChildshown above.Check that
Subclasses.ktcompiles. This should produce two files of bytecode,Parent.classandChild.class. -
Add another class definition to
Subclasses.kt:class GrandChild : Child()Try to compile
Subclasses.kt. Note the error message from the compiler. -
Add the
openmodifier to the definition ofChild, then attempt to recompile. This time compilation should succeed.Openness doesn’t ‘carry forward’ from superclass to subclass. The
openmodifier will need to be used repeatedly when building an inheritance hierarchy.
Another Example
Consider a class to represent a person. For simplicity, let’s assume that it has only one property, the person’s name. We can specify this class, enable inheritance and give it a primary constructor with a single line of code:
open class Person(val name: String)
Now suppose that we need a class to represent a student. A student has a name
and also a degree programme that they are studying. A student is a kind of
person, so our Student class should be a subclass of Person, inheriting
its name property and then adding another property to represent degree
programme.
We can define Student like this:
class Student(name: String, val degree: String) : Person(name)
----------------------------------
Look closely at the parameter list of Student’s primary constructor
(underlined for emphasis).
Notice that degree is prefixed with val, indicating that this is a
property defined within Student, as well as being a parameter of the primary
constructor of Student.
By contrast, name is just a regular constructor parameter. It isn’t defined
as a property in Student because we are already inheriting a name
property from Person.
When creating a Student object, a student’s name and degree programme must
both be supplied as strings. The degree programme will be used by the primary
constructor of Student but the name will be forwarded directly to the primary
constructor of the superclass:
class Student(name: String, val degree: String) : Person(name)
------------
Here’s an example of how we might create and use a Student object:
val student = Student("Sarah", "Computer Science")
println(student.name) // accesses inherited property
println(student.degree)
Task 15.2.2
-
Examine
Subclasses.kt, in thetasks/task15_2_2subdirectory of your repository. This contains the code described above, with some additions to show which constructors are being invoked when aStudentobject is created. -
Compile and run the program. Notice how the superclass constructor is invoked first.
Task 15.2.3
The class BankAccount represents an account held by a customer of a bank.
This class has a String property identifying the account holder, and an
Int property to represent the current balance of the account. The class
also has methods to handle the deposit and withdrawal of money.
Another class, SavingsAccount, represents a bank account that can accrue
interest on its balance, at a specified interest rate. This class has a
method that calculates the amount of interest and applies it to the account
balance.
The relationship between the classes looks like this:
classDiagram
BankAccount <|-- SavingsAccount
class BankAccount {
holder: String
balance: Int = 0
deposit(amount: Int)
withdraw(amount: Int)
}
class SavingsAccount {
rate: Double
applyInterest()
}
Partial code for the diagram above is provided as an Amper project, in the
tasks/task15_2_3 subdirectory of your repository.
-
Examine
BankAccount.kt, in thesrcsubdirectory of the project.Notice that
balanceis avarbut that it has been given a custom setter that is private. This means that only code withinBankAccounthas permission to assign tobalancedirectly. The methodsdeposit()andwithdraw()constitute the public API for altering the balance on an account. -
Edit
SavingsAccount.ktand implement theSavingsAccountclass in this file, using the class diagram as your guide.Note that the
rateproperty should be aval, and it should be initialized by the primary constructor of the class.The
applyInterest()method should treatrateas as a percentage and use it to compute the accrued interest. It should then deposit the computed amount in the account.Check that both classes compile, using
./amper build -
Edit
Main.ktand modifymain()so that it- Creates a savings account with an interest rate of 1.8%
- Deposits £1,250 in the account
- Accrues interest for five years, by invoking
applyInterest()five times - Withdraws £50 from the account
- Displays the final balance of the account
Run your program with
./amper run
Visibility in Subclasses
We saw earlier that it is possible to make members of a class private, hiding them from class users. These private members become part of the class implementation, rather than its public API.
Inheriting from a class with private members does not grant a subclass any special privileges. Thus code in a subclass will NOT have access to private members of its superclass.
However, there is an intermediate level of visibility, protected, which sits between private and public. Protected members are visible to the class that contains them and to subclasses, but are otherwise inaccessible.
Members of a class can be given protected visibility using the protected
modifier. For example, we could take the Dataset class that we
looked at earlier, open it for inheritance and give the list of
values protected visibility like so:
open class Dataset {
protected val values = mutableListOf<Double>()
...
}
Whilst the methods and overloaded operators of Dataset are probably
sufficient for subclasses to do their work, there might be situations in
which those subclasses would benefit from the direct access to values
that protected visibility gives them.
Every Class is a Subclass!
We’ve focused in this subsection on how to create classes that inherit
explicitly from other classes, but it is important to note that all classes
inherit implicitly from a special class named Any. This special class
provides every Kotlin class with default implementations of several methods,
including equals() and toString().
The equals() method is called whenever you test whether an object is equal
to another using the == operator. The toString() method is called
automatically whenever you try to print an instance of one of your classes
using the standard print()and println() functions.
As an example of how Any is used in Kotlin, consider how println() is
defined. One of the overloaded implementations of this function has this
signature:
fun println(message: Any?)
The message parameter has the type Any?—meaning that we can pass to
println() the value null or an instance of any class. In the latter
case, the toString() method of that class will be used to create the string
that is then printed on the console.
-
This makes Kotlin a bit different from most other object-oriented languages. Classes are open for inheritance by default in Java, C++ and Python. You can prevent inheritance from a class in Java by declaring it to be
final. The same approach works in C++, for C++11 onwards. ↩
Overriding & Dynamic Binding
Overriding Methods
A method inherited from an open superclass can be overridden (i.e., replaced) in a subclass. For this to happen, you need to
- Declare the method in the superclass as
openfor overriding - Use the
overridekeyword when defining the method in the subclass
Try this out now:
-
Edit the file
Override.kt, in thetasks/task15_3subdirectory of your repository. Add to this file the following class definitions:open class Person { fun speak() { println("I am a Person") } } class Student(val degree: String) : Person() { } -
Try compiling the code. This should succeed without any problems.
-
Now add the following method definition to
Student:fun speak() { println("I am a Student, studying $degree") } -
Try recompiling the code. What error do you see?
-
Follow the advice of the error message, and add an
overridemodifier inStudent. Try recompiling the code. What error do you see now? -
Fix the error by adding the
openmodifier to the definition ofspeak()in thePersonclass. You should find that the code now compiles successfully.
Overriding Properties
It is also possible to override properties inherited from a superclass.
As with methods, the property in the superclass must declared as open for
overriding, and the redefinition of the property in the subclass must be
made using the override modifier.
open class Shape {
open val isPolygon = false
}
class Triangle : Shape() {
override val isPolygon = true
}
Note that when you override a property, the redefinition of the property
in the subclass must be of the same type, or a subtype. So you are not
allowed to override a Boolean property with an Int, for example.
Also, you can override a val property with a var, but you cannot override
a var property with a val. This is because a var property has both a
getter and a setter, whereas a val has only a getter. If we allowed a var
to be overridden by a val, this would effectively remove functionality in
the subclass, violating the Liskov substitution principle.
What Happens Here?
Let’s return to the Person and Student classes seen earlier, and consider
a small program that uses these classes:
open class Person {
open fun speak() {
println("I am a Person")
}
}
class Student(val degree: String) : Person() {
override fun speak() {
println("I am a Student, studying $degree")
}
}
fun main() {
val p = Person()
p.speak()
val s = Student("Computer Science")
s.speak()
val p2: Person = Student("Maths")
p2.speak()
}
The main program here contains three examples of creating an object and
invoking its speak() method. But what do we see printed on the console in
each case?
Try the following quiz before adding this code to your Task 15.3 solution and testing it.
Dynamic Binding
When an open method from a superclass is overridden in subclasses, this allows dynamic binding (or ‘run-time binding’) of method calls to take place. In dynamic binding, a determination of which method to call is made at run time.
The counterpart to dynamic binding is static binding (or ‘compile-time binding’). In static binding, a determination of which method to call can be made at compile time.
Methods are open for overriding by default in Java, so dynamic binding is
always possible, unless we prevent overriding by marking a method as final.
In Kotlin, it is the other way around; dynamic binding cannot happen unless
we mark a method as open and then override it in subclasses. C++ is a bit
like Kotlin in this regard, in that static binding is the default and special
steps are needed to enable dynamic binding.
Object-oriented languages typically implement dynamic binding by providing a method dispatch table (also known as a ‘vtable’) for each class.
Consider the following Kotlin classes:
open class X {
fun method1() {}
open fun method2() {}
override fun toString() = "hello"
}
class Y : X() {
override fun method2() {}
fun method3() {}
}
Because Kotlin classes inherit implicitly from Any, the full class
hierarchy looks like this:
classDiagram
direction LR
Any <|-- X
X <|-- Y
class Any {
equals(other: Any?) Boolean
hashCode() Int
toString() String
}
class X {
method1()
method2()
toString() String
}
class Y {
method2()
method3()
}
The method dispatch table for the class Y could therefore look something
like this:
| Method name | Code invoked |
|---|---|
equals | Any.equals() |
hashCode | Any.hashCode() |
method1 | X.method1() |
method2 | Y.method2() |
method3 | Y.method3() |
toString | X.toString() |
Now imagine we have a variable thing, defined like this:
val thing: X = Y()
To resolve the method call thing.method2(), we look at the object referenced
by thing, see that it is of type Y, then look for method2 in the
dispatch table of Y. The dispatch table tells us that the version of
method2 defined in class Y is the one that we need to call.
Now imagine that the method call is thing.toString(). Resolving this via the
same process will lead to invocation of the version of toString() defined
in X. Similarly, thing.hashCode() will resolve to the version of
hashCode() defined in Any.
Case Study
Imagine that you are tasked with creating a 2D graphics application. A description of what this application must do includes the following text:
The application must draw a picture. A picture is composed of 2D shapes such as circles, rectangles, etc, which can have different positions, sizes and colours.
Analysis of this text suggests Picture, Shape, Circle and Rectangle
as candidate classes, with position, size and colour as attributes and ‘draw’
as the key operation, but that leaves us with several questions to answer:
- How do the classes relate to each other?
- Where do we put those attributes?
- How can the classes work together to support drawing of the picture?
Initial Solution
One possible solution is to have Circle and Rectangle inheriting from
Shape. The Shape class can supply the two properties commmon to all kinds
of shape: position (specified via \( x \) and \( y \) coordinates) and
colour. Subclasses can then add further properties to specify the size of a
shape in an appropriate way (e.g., radius for Circle, width & height for
Rectangle), as well as a draw() method that handles the specifics
of shape drawing.
A picture is essentially a collection of shapes, so the relationship between
Picture and Shape is one of aggregation or composition. The Picture
class can use a collection type such as a mutable list to implement this
relationship. If list contents are specified to be of type Shape then we
will be able to add instances of Circle, Rectangle or any other subclass
of Shape to the collection.
Here’s the structure of this solution, depicted as a class diagram:
classDiagram
Shape <|-- Circle
Shape <|-- Rectangle
Picture o-- "0..*" Shape
class Shape {
x: Int
y: Int
col: Color
}
class Circle {
radius: Int
draw(context: Graphics2D)
}
class Rectangle {
width: Int
height: Int
draw(context: Graphics2D)
}
class Picture {
add(shape: Shape)
draw(context: Graphics2D)
}
We assume that this application is running on the JVM and using features
of the Java standard library to handle graphics. Color is a Java class for
representing colours, and Graphics2D represents a ‘graphics context’, into
which we can draw anything want.
The application will somehow create a Picture object and then invoke its
draw() method to draw the picture. This, in turn, will need to invoke the
draw() methods of all the shapes stored in its list. How should it do this?
Here’s a complete implementation of Picture, showing how draw() might
do its work:
import java.awt.Graphics2D
class Picture {
private val shapes = mutableListOf<Shape>()
fun add(shape: Shape) = shapes.add(shape)
fun draw(context: Graphics2D) = shapes.forEach { shape ->
when {
shape is Circle -> shape.draw(context)
shape is Rectangle -> shape.draw(context)
}
}
}
Focus here on the body of the draw() method. This iterates over the list of
shapes, taking each object and checking its type. Kotlin’s smart casting
feature ensures that, on a successful check for a particular type, the object
can subsequently be treated as an instance of that type.
Thus, when we reach the code shape.draw(context) in the first branch of the
when expression, shape is known to be a Circle object, and the version
of draw() from Circle is invoked.
Similarly, when we reach the code shape.draw(context) in the second branch
of the when expression, shape is known to be a Rectangle object, and
the version of draw() from Rectangle is invoked.
This is not a good way of implementing the Picture class!
Consider what happens if we want to draw triangles. We will need a Triangle
class, inheriting from Shape, but we will also need to add a new branch
to the when expression in the draw() method:
shape is Triangle -> shape.draw(context)
We will need to do something similar each time that we add a new kind of shape to the application.
Task 15.4.1
You won’t be able to carry out this task in a Codespace!
Clone your repository to your own PC or a SoCS lab machine and do the task there instead.
Note: this restriction also applies to subsequent tasks involving other versions of this graphics application (e.g., Task 15.4.2 below).
-
The
tasks/task15_4_1subdirectory of your repository is an Amper project containing the complete code for our initial solution. -
Examine the source code files in the
srcsubdirectory of the project. Focus your attention on the filesShape.kt,Circle.kt,Rectangle.ktandPicture.kt. (You can examine the other files if you are interested, but this isn’t necessary.) -
Build and run the application with
./amper runYou should see a window appear on screen, containing several circles and rectangles of different colours.
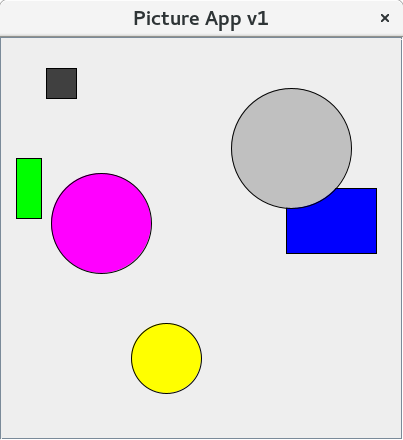
Polymorphic Solution
The problem with the initial version our graphics application is that draw()
is defined only in the subclasses Circle and Rectangle. Consequently, we
need Kotlin to ‘smart cast’ an object reference retrieved from the list of
shapes into either a Circle reference or a Rectangle reference, before
attempting to invoke draw().
Additional type checking will be needed in the draw() method of Picture
every time that we add support for a new kind of shape.
The fix for this issue is fairly simple. We start by defining a draw() method
in Shape, making it open for overriding:
open class Shape(val x: Int, val y: Int, val col: Color) {
open fun draw(context: Graphics2D) {
// nothing to do here
}
}
The implementation of draw() in Shape is empty, because the information
on what to draw is contain in subclasses of Shape, rather than Shape
itself.1
The draw() methods in Circle and Rectangle now need to declare that
they are overriding the version inherited from Shape:
override fun draw(context: Graphics2D) {
...
}
The draw() method in Picture can then be simplified to
fun draw(context: Graphics2D) = shapes.forEach {
it.draw(context)
}
The compiler can cope with this simpler implementation because Shape has
a draw() method, but the version of draw() that is invoked at run time
will be the one that is appropriate to the object actually being
referenced. This is dynamic binding in action.
This version of the draw() method does not need to be altered if we add
new types of shape to the application.
We describe code like this as polymorphic, meaning that it will work
with many different types of object (any subclass of Shape), exhibiting
varying behaviour as a result, without ever needing to be aware of the
specific type of object that it is manipulating.
Task 15.4.2
-
The
tasks/task15_4_2subdirectory of your repository is an Amper project containing the complete code for the polymorphic solution.Examine the source code files in the
srcsubdirectory of the project. Focus your attention on the filesShape.kt,Circle.kt,Rectangle.ktandPicture.kt. Compare these files with the versions fromtask15_4_1. -
Build and run the application with
./amper run -
Examine
Triangle.kt. This is a new subclass ofShape, to represent triangles. Currently, it is not used in the application. -
Edit
Main.ktand uncomment the line that adds aTriangleobject to the picture. Save the file, then rebuild and rerun the application. You should now see a small red triangle in the picture.Notice that you didn’t need to make any changes to the
Pictureclass in order for this to happen.
Multiple Inheritance?
Imagine that you are creating a game that simulates the world in a fairly realistic way. The simulation includes various species of animal, some of which can fly. You might be tempted to represent with different animal species in a class hierarchy like this:
---
config:
class:
hideEmptyMembersBox: true
---
classDiagram
Animal <|-- FlyingAnimal
FlyingAnimal <|-- Bird
FlyingAnimal <|-- Insect
Bird <|-- Eagle
Insect <|-- Wasp
The problem with this hierarchy is that it assumes that all birds and insects fly, which is not the case. So how do we express the idea that an eagle is a bird and that it can fly?
One solution might be to have a hierarchy like this:
---
config:
class:
hideEmptyMembersBox: true
---
classDiagram
Animal <|-- Bird
Animal <|-- Insect
Bird <|-- Eagle
Flyer <|-- Eagle
Flyer <|-- Wasp
Insect<|-- Wasp
Here, Eagle is a kind of Bird and a kind of Flyer. It has two
superclasses. This is termed multiple inheritance.
Multiple inheritance is allowed in some object-oriented languages, but not in others. For example, it is possible in C++ and Python, but not in C# or Java, and not in Kotlin.
To understand why, consider the classic ‘inheritance diamond’ scenario:
classDiagram
direction LR
A <|-- B
A <|-- C
B <|-- D
C <|-- D
class A {
x: String
y: Int
}
Here, class A has properties x and y. Class B inherits from A,
thereby inheriting both of those properties. Class C does the same.
So what happens when we have a class D, inheriting from both B and C?
Does D get two properties named x and two named y? If so, which of
them will be used we attempt to access x or y in an instance of D?
By not supporting multiple inheritance, C#, Java and Kotlin avoid having to deal with problems like this. Yet these languages are still able to exploit some of the benefits of multiple inheritance, through the use of interfaces.
Abstract Classes
Abstract classes are partially-implemented classes, with missing features that will need to be provided in subclasses.
Although it is not possible to create instances of such classes, because they are incomplete, they are nevertheless useful in situations where we need a more general way of referring to instances of subclasses, in order to support polymorphism.
After completing this section, you will understand how abstract classes are defined in Kotlin and how they can be used in object-oriented applications.
Basic Concepts
What is an Abstract Class?
So far, we have considered classes that are fully implemented, but it is also possible to have classes that are only partially implemented. Such classes are known as abstract classes.
In a typical abstract class, one or more methods are declared but are not actually implemented. In other words, we specify their names, their parameter lists and their return types, but we do not supply a method body for any of them. These unimplemented methods are known as abstract methods. The intention is that subclasses will provide the missing implementations of these abstract methods.
Because an abstract class is incomplete, it is not possible to create an instance of such a class in a program. Attempting to do so will result in a compiler error. We are, however, allowed to create instances of concrete subclasses of that abstract class. A concrete subclass is a subclass that implements all of the abstract features of its superclass.
If you create a subclass of an abstract class but do not implement all of its abstract methods, then that subclass will also be abstract.
UML Representation
On UML class diagrams, abstract classes are often shown by rendering the name of the class, and the name of any abstract features, in an italic font.
It is also common to see class names labelled with the «abstract» stereotype1.
Here’s an example of a class that has a mixture of abstract and concrete features:
classDiagram
class Vehicle {
<<abstract>>
fuelLevel: Int
refuel(amount: Int)
drive()*
}
The Vehicle class exists to provide some state and functionality to
instances of its subclasses, via the fuelLevel property and refuel()
method. However, it also specifies an abstract method, drive().
A subclass of Vehicle that does not provide an implementation of the
drive() method will also need to be labelled as «abstract».
classDiagram
direction LR
Vehicle <|-- WheeledVehicle
WheeledVehicle <|-- Car
note for WheeledVehicle "abstract, as it doesn't implement drive()"
note for Car "concrete, because it implements drive()"
class Vehicle {
<<abstract>>
fuelLevel: Int
refuel(amount: Int)
drive()*
}
class WheeledVehicle {
<<abstract>>
changeTyres()
}
class Car {
drive()
}
-
Strictly speaking, this usage doesn’t conform fully to the rules of UML, but it is commonly seen, easy to understand, and is the only way of showing abstractness in some UML diagramming tools. ↩
Abstract Classes in Kotlin
Creating an Abstract Class
We indicate an abstract class in Kotlin by using the abstract modifier
when defining the class. The modifier must be applied to the start of the
class definition and to the declarations of any specific abstract features.
For example, the Vehicle class described with UML earlier could be
defined in Kotlin like so:
abstract class Vehicle(var fuelLevel: Int) {
fun refuel(amount: Int) {
require(amount >= 0) { "Invalid fuel amount" }
fuelLevel += amount
}
abstract fun drive()
}
Try this out now:
-
The subdirectory
tasks/task16_2in your repository is an Amper project that you can use to experiment with defining abstract classes.Open the file
Vehicle.kt, in the project’ssrcsubdirectory. Add the definition ofVehicleshown above and save the file. -
Go to the project directory in a terminal window and check that the class compiles successfully, using
./amper build -
Try removing the
abstractmodifier at the start of the class definition. What error do you see when you try rebuilding the project? -
Reapply the
abstractmodifier to the start of the class definition, then remove the modifier on thedrive()method. What error do you see when you try rebuilding the project? -
Reapply the
abstractmodifier to thedrive()method.
Using an Abstract Class
Inheriting from an abstract class doesn’t look any different to inheriting from a regular concrete class. However, when you do so, you must either provide implementations of all the abstract features, or declare the subclass itself as abstract.
Let’s try this out:
-
Return to the Amper project in
task16_2. Edit the file namedCar.ktand add the following class definition:class Car(fuel: Int) : Vehicle(fuel) -
Try rebuilding the project with
./amper build. What error do you see? -
The error message suggests two possible fixes. Implement the first of them now by adding the
abstractmodifier to the definition ofCar. Check that this does, indeed, fix the compiler error. -
Now try the other fix. Modify
Carso that it looks like this:class Car(fuel: Int) : Vehicle(fuel) { fun drive() { println("Vrooom!") } }When you rebuild the project, you should see another error from the compiler.
-
Use the information from the compiler error message to make one final change to the class, fixing the error. Rebuild the project to verify that you have done this successfully.
-
Finally, edit the file
Main.kt. Add code to themain()function that creates aCarobject and invokes itsdrive()method. Verify that this program runs as expected, using./amper run
Case Study Revisited
Let’s see how abstract classes can improve the picture drawing application that we examined in the earlier case study.
Version 2 of the application has a Shape class that looks like this:
open class Shape(val x: Int, val y: Int, val col: Color) {
open fun draw(context: Graphics2D) {
// nothing to do here
}
}
Just so you are clear on why this implementation is not ideal, return to
task15_4_2 in your repository and try the following:
-
Edit
Main.ktand add a new line to the code that configures thePictureobject:add(Shape(0, 0, Color.RED)) -
Rebuild and rerun the application with
./amper runThis should compile and run successfully, displaying the same picture as before.
This experiment demonstrates that adding actual Shape objects to a picture
is permitted, even though it is meaningless to do so!
Whilst this causes no real problems at run time, it would be nice if we could prevent meaningless code like this from compiling in the first place.
The solution is to make the Shape class abstract:
classDiagram
Shape <|-- Circle
Shape <|-- Rectangle
Picture o-- "0..*" Shape
class Shape {
<<abstract>>
x: Int
y: Int
col: Color
draw(context: Graphics2D)*
}
class Circle {
radius: Int
draw(context: Graphics2D)
}
class Rectangle {
width: Int
height: Int
draw(context: Graphics2D)
}
class Picture {
add(shape: Shape)
draw(context: Graphics2D)
}
The implementation of Shape now looks like this:
abstract class Shape(val x: Int, val y: Int, val col: Color) {
abstract fun draw(context: Graphics2D)
}
Task 16.3
-
The subdirectory
tasks/task16_3is an Amper project containing Version 3 of the picture drawing application, in whichShapeis now an abstract class.If you examine
Shape.kt, you’ll see the implementation shown above. -
Build and run the application with
./amper runYou should see a now-familiar picture appear.
-
Edit
Main.ktand add a new line to the code that configures thePictureobject:add(Shape(0, 0, Color.RED))This time, you should get a compiler error when you attempt to rebuild the application.
Interfaces
We’ve seen in earlier sections how classes can form a hierarchy, in which subclasses are specialized versions of more general superclasses. In languages like C#, Java and Kotlin, a particular restriction applies to this class hierarchy: each class cannot have more than one superclass.
We’ve also seen that these superclasses can be abstract, with ‘missing’ method implementations that have to be provided in subclasses.
Interfaces are similar to abstract classes in this respect, but are not subject to the same limitations. A class can have at most one abstract class as its superclass, but it can implement multiple interfaces.
After completing this section, you will understand why interfaces are useful in their own right, and how they complement abstract classes. You will also know how to use them in Kotlin code.
Basic Concepts
What is an Interface?
An interface is very similar to an abstract class. Like an abstract class, it defines abstract methods, for the same reasons that an abstract class does. Also, classes that use, or ‘implement’, an interface must provide implementations of those abstract methods, just as concrete classes that inherit from an abstract class must do.
However, interfaces offer more flexibility than abstract classes. A C#, Java or Kotlin class can have only one class as its superclass, but it can implement many interfaces.
This is possible because interfaces themselves are subject to certain restrictions. We can’t put anything we like into an interface. We will consider these restrictions further when we look at the Kotlin syntax for creating interfaces.
Thanks to these restrictions, we can use interfaces to achieve some of the benefits of multiple inheritance, without having to deal with any of its messy complications.
Inheritance vs Interface Implementation
Having interfaces as a distinct entity in their own right makes sense, because inheriting from a superclass and implementing an interface represent two subtly different kinds of relationship, one weaker in nature than the other.
For many classes, there is one obvious ‘parent’ class, to which there is a strong ‘is a kind of’ relationship. We can inherit both state and behaviour from that superclass.
At the same time, there may also be lots of small ways in which the behaviour specified by a class resembles that specified by other classes, from entirely different branches of the inheritance hierarchy. Interfaces allow us to capture and express these smaller, more limited resemblances.
The relationships between a class and the interfaces it implements are weaker than the relationship between that class and its superclass, but they are nonetheless important and useful—e.g., in supporting polymorphism.
UML Representation
An interface is represented on a UML class diagram in a similar way to a regular class, except that its name is prefixed with the «interface» stereotype:
classDiagram
class Printable {
<<interface>>
print()
}
Implementation of an interface by a class can be shown shown in a similar way to specialization of a class, except that the arrow uses a dashed line:
---
config:
class:
hideEmptyMembersBox: true
---
classDiagram
Printable <|.. Document
class Printable {
<<interface>>
}
Using a dashed line rather than a solid line is a visual indicator that implementing an interface is a weaker kind of relationship than specializing a class.
A more compact alternative is to use UML’s ‘lollipop’ notation:
---
config:
class:
hideEmptyMembersBox: true
---
classDiagram
Printable ()-- Document

Creating Interfaces
Basic Syntax
A Kotlin interface is defined in a similar manner to a class, except that
we use the interface keyword instead of class.
Kotlin interfaces typically define abstract methods, in the same way that an
abstract class does. However, we don’t use the abstract keyword as part
of the method definition.
Here’s a simple example1. Imagine that you are building a GUI, and some
elements of that GUI can be clicked on using the mouse. You might represent
that capability by means of a Clickable interface:
interface Clickable {
fun click()
}
In this example, click() is an abstract method, even though it isn’t
specified using the abstract keyword. Any class that implements Clickable
will need to provide an implementation of the click() method, otherwise
it will not compile.
It is quite common for interfaces to have names ending in ‘able’.
This is because they are often used to represent capabilities that are shared by otherwise dissimiliar classes.
Default Implementations
Although the classic interface contains only abstract methods, it is possible to include methods that have default implementations. The limitation is that those method implementations are not allowed to reference state.
Unlike abstract classes, Kotlin interfaces cannot contain any members that are used to represent object state.
For example, we could modify the Clickable interface to look like this:
interface Clickable {
fun click()
fun info() = println("I am clickable")
}
In this version of the interface, click() is an abstract method but
info() is not. Any class that implements Clickable will be able to make
use of this method, or override it with a new implementation.
Notice that there is no need to use the open modifier when defining
info(). The method is implicitly open for overriding, by virtue of being
defined within an interface.
-
This is adapted from an example in the book Kotlin In Action, as are some of the other examples in this section. ↩
Using Interfaces
To use an interface, we must make a class implement that interface. The syntax for this is very similar to the syntax for inheriting from a superclass. You must follow the class name with a colon, then the name of the interface.
Let’s return to the GUI scenario discussed earlier, where we
introduced the Clickable interface. We can create a class Button that
implements this interface like so:
class Button : Clickable {
override fun click() {
...
}
}
Because Button implements the Clickable interface, it must override
click() explicitly and provide an implementation for this method. Failing
to do so would be a compiler error.
Notice the lack of parentheses after Clickable. When we are creating a
subclass, we need to specify not only the name of the superclass but also
which superclass constructor we want to invoke. Hence the superclass name is
always followed by parentheses, possible containing arguments that will be
passed to the superclass constructor.
Implementing an interface is simpler, because interfaces don’t have constructors. All we need to do when implementing an interface is name that interface.
A slightly more realistic version of the example above might look like this:
class Button : Widget(), Clickable {
override fun click() {
...
}
}
Here, Widget represents a superclass, possibly abstract, from which all GUI
components should inherit. It provides Button with some properties to
represent state, and some methods. In this case, we specify that the default
constructor of Widget will be invoked as part of the process of creating
a Button object.
In this scenario, Clickable represents an additional contract that Button
objects must fulfil. We can say that Button is primarily a kind of widget,
but it also has the more general capability of being clickable.
When you see a list of type names appearing after a colon in a class definition, you can say immediately that the first name in the list is either a superclass or an interface, and all subsequent names are interfaces.
If the first type name is followed by parentheses, possibly containing constructor arguments, then you know that it is the name of the superclass, rather than an interface.
Task 17.3
-
Edit the file
Interfaces.kt, in thetasks/task17_3subdirectory of your repository.At the location indicated by the relevant comment, add an interface named
Printable. This should specify a single abstract method namedprint(), with an empty parameter list. -
At the location indicated by the relevant comment, add a class named
Documentwith avalproperty namedfilename, of typeString. -
Make your
Documentclass implement thePrintableinterface. Your implementation ofprint()should display the word “Printing” on the console, followed by the document’s filename. -
Compile and run the program.
Properties in Interfaces
We noted previously that interfaces cannot contain members whose purpose is to supply objects with some of their state. An interface can still specify properties, but those properties are implicitly abstract.
Just like the abstract methods of an interface, those abstract properties will need to be implemented in any class that implements the interface.
Here’s a small example of an interface that represents users of a computer system:
interface User {
val username: String
}
The interface User does not actually provide a username property that
other classes can use. Instead, User imposes a contractual obligation on
any classes that implement it, requiring them to provide a property with this
name, of type String. That property could have backing storage, or it could
be a computed property, but it has to exist in order for a class that
implements User to compile successfully.
For example, we could have a class LocalUser, representing local users of
the system. In this case, username is overridden with a regular String
property that has backing storage:
class LocalUser(override val username: String) : User
This implementation follows the compact class definition syntax that you have
seen earlier, but note the use of the override keyword. This is required by
the compiler.
In addition to LocalUser, we could have another class SubscribingUser,
representing external users who have registered with the system using their
email address:
class SubscribingUser(val email: String) : User {
override val username: String
get() = email.substringBefore('@')
}
A SubscribingUser has an email property with backing storage, representing
the email address with which a user subscribed. It also has a username
property, as required by the User interface, but in this case that property
has no backing storage; instead, it is computed on demand from the email
address.
With the interface and classes shown above, tasks such as displaying the usernames of all system users become very straightforward:
val users = mutableListOf<User>()
...
users.forEach {
println(it.username)
}
This is polymorphic code, much like that in the graphics application discussed earlier.
Case Study Revisited
Let’s revisit the graphics application case study one final time, for a practical illustration of how interfaces can be useful.
Currently, Version 3 of the application has the ability to draw any kind
of shape, provided that it is implemented as a class that inherits from an
abstract superclass named Shape:
classDiagram
Shape <|-- Circle
Shape <|-- Rectangle
class Shape {
<<abstract>>
x: Int
y: Int
col: Color
draw(context: Graphics2D)*
}
class Circle {
radius: Int
draw(context: Graphics2D)
}
class Rectangle {
width: Int
height: Int
draw(context: Graphics2D)
}
Now imagine that we want to incorporate images into the pictures created by
the application. To help us achieve this, we will use an existing image
handling library that gives us a class named Bitmap. This can handle loading
bitmapped images from a file in any of the standard formats (PNG, JPG, etc).
We can create a subclass of Bitmap, with position properties and a
draw() method:
classDiagram
Bitmap <|-- Image
class Bitmap {
filename: String
width: Int
height: Int
}
class Image {
x: Int
y: Int
draw(context: Graphics2D)
}
But now we have a problem.
The current version of the Picture class can draw pictures composed of
objects whose classes inherit from Shape. The Image class does not inherit
from Shape, and cannot be made to do so, because it already has a
superclass, and Kotlin does not support multiple inheritance.
Even if Kotlin did support multiple inheritance, it wouldn’t make any sense
for Image to inherit from Shape.
An image is not ‘a kind of shape’; it is a different kind of thing entirely.
Inheritance makes sense only in situations where there is a clear ‘is a kind of’ relationship between two classes.
Solution
An interface is the ideal solution to this problem.
Interfaces allow us to express the limited ways in which otherwise dissimilar
objects resemble each other. In this case, we have classes like Circle and
Rectangle, which are dissimilar from Image. The only behaviour that these
classes have in common is the ability to be drawn into a graphics context.
We can express this shared capability like so:
interface Drawable {
fun draw(context: Graphics2D)
}
After introducing this interface into the application, we make Circle,
Rectangle and Image implement the interface, in addition to inheriting
from their respective superclasses. For example, Image now looks like
this:
class Image(val x: Int, val y: Int, filename: String) :
Bitmap(filename), Drawable {
override fun draw(context: Graphics2D) {
...
}
}
We then modify Picture so that it represents an aggregation of Drawable
objects:
class Picture {
private val items = mutableListOf<Drawable>()
fun add(item: Drawable) = items.add(item)
fun draw(context: Graphics2D) = items.forEach {
it.draw(context)
}
}
Here’s a class diagram that captures the essential details of this new, interface-based implementation:
classDiagram
direction LR
Drawable <|.. Circle
Drawable <|.. Rectangle
Drawable <|.. Image
Picture o-- Drawable
class Drawable {
<<interface>>
draw(context: Graphics2D)
}
class Picture {
add(item: Drawable)
draw(context: Graphics2D)
}
Here’s the ‘English translation’ of this diagram:
A Picture is composed of things that are Drawable. Examples of Drawable things are Circle, Rectangle and Image. We can add Drawable things one at a time to a Picture. We can also draw a Picture.
Task 17.5
-
The
tasks/task17_5subdirectory of your repository is an Amper project containing the final, interface-based version of the graphics application. Take some time to examine the code in theapp/srcsubdirectory, comparing it with earlier versions. -
Look at the code in
Shape.kt. Notice that theShapeclass no longer specifies an abstractdraw()method. This specification now resides in theDrawableinterface.Although
Shapeno longer needs to be abstract, it makes sense for it to remain so, to prevent creation ofShapeobjects. -
Now look at the code in
Main.kt. You can see here that the program creates a picture containing a mixture ofCircle,RectangleandImageobjects. -
Build and run the application with
./amper runYou should see a window appear on screen, containing shapes and images.